Two Child Loft Bed

NYC Tiny Shop

Member
Joined
Sep 12, 2013
Messages
929
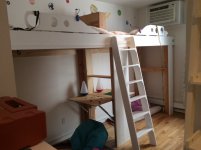
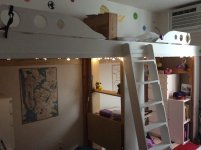
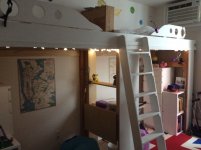
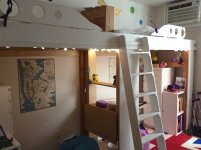
Just finished this loft today...the first build outside of the shop - made possible by my new SysRoll, UG cart, and CT Mini Vac. They wanted a loft bed with a fold-up desk-top for a boy and a girl, so that they could stay in their two bedroom apartment. It's finished with GF Snow White Milk Paint and pure Tung Oil cut with Citrus Solvent. I used the Domino XL and pocket screws to make the two bed frames and secure the eight legs. (Basically, two separate lofts that are joined.)
The slats were half lapped on the table saw with a jig inspired by Eric's cabinet videos. The frames are attached to the legs with 3/8" carriage bolts and screws. The real challenge was that the floor was completed twisted and not level anywhere. Every floor board was a different height. My lasers and the precision of the Kapex made it possible to build.  (No slats are visible from either the top or bottom of the bed frame. The other challenge was holding up the heavy bed frames while drilling and securing the carriage bolts. This was made possible using a 2x4 screwed into wall beams and two Fastcap Third Hands.
Other Festools integral to the build were: HL 850, RO90, RS2E, CSX, ETS125, OF1400, Domino 500.

Thanks to those who made suggestions on how to hold up the underneath ply on this thread:
http://festoolownersgroup.com/home-improvement-other-projects/fastening-14'-ply-on-underside-of-loft-bed/
 

Attachments

  • image.jpg
    image.jpg
    1 MB · Views: 802
Thanks, Bryan. ...just realized that I forgot to put a face piece on under the dest-top.  [embarassed] good thing that I'm not a surgeon, I guess.
 
Funny you mention surgeons, the father of another kid on my son's lacrosse team is in surgical sales, and he is in the room a lot, and he has told me some stories, if I ever need anymore surgeries, I am glad I am asleep.  He told me that one of his doctors actually left a sponge and closed the incision 3/4 of the way before someone pointed it out. 

I guess you could always go back and add the piece.
 
Yes, looks great. What did you end up using to hold the panel under the bed. And we need PICTURES if you go back...

Please?
 
Thanks, Sal, Don, and Wow.

There is a 2x4 in between each of the V legs on the corners that supports each corner of the ply. Along the sides of the ply, I used Paslode 18 gauge brad nails. It's not a heavy piece of ply, so it should hold. If not, I'll go back with a heavier gauge. I didn't want to glue, since this is a rental apartment and they may want to dismantle it and take it with them if they have to move. I was going to try the 3M tape, but I wanted the ply to be recessed up under the face.
 
NYC Tiny Shop said:
Thanks, Sal, Don, and Wow.

There is a 2x4 in between each of the V legs on the corners that supports each corner of the ply. Along the sides of the ply, I used Paslode 18 gauge brad nails. It's not a heavy piece of ply, so it should hold. If not, I'll go back with a heavier gauge. I didn't want to glue, since this is a rental apartment and they may want to dismantle it and take it with them if they have to move. I was going to try the 3M tape, but I wanted the ply to be recessed up under the face.

I was thinking about this the other day...  I don't remember if it was suggested but perhaps use some dominos as clips underneath the ply to support it. If the kids are tall enough, they might pull them out though.
 
Bkharman, thanks, but I think I'm good with this. I added that missing piece and took another couple pics. Wow, I forgot to photograph the underside, but will be going back to build them a piano bench...so, I'll take a photo then. They loved the look and feel of the finished ply underside. I sanded to 800 grit with the ETS 125 and hand rubbed in pure tung oil. It was like a baby's skin. They added lights into the slot I made for lighting. It was made so that you wouldn't see the bulbs, but they installed these lights that they already had on hand.  There's also another slot above the mid section that still needs lights.
 

Attachments

  • image.jpg
    image.jpg
    1.3 MB · Views: 236
  • image.jpg
    image.jpg
    1.3 MB · Views: 252
Nice job!  [thumbs up]

By the way.... you might consider resizing your photos to a smaller size. (1024X768 is about perfect). That way they'll show on your posts full size, and not as thumbnails. Additionally, they will be easier on the bandwidth required to view them (less than 1MB each after reducing with no loss of clarity).  Just an idea! [smile]

Taking a little liberty here, but as an example, I have reduced your 1.3MB picture to 1024X765 and the result is 290KB size and will display as shown below. Hope you don't take offense. Doing this partly because internet sucks here in Nigeria, and a 1.3MB picture can take over a minute to load!  [crying] 

[attachimg=#]

Cheers,

Frank
 

Attachments

  • Loft Bed.jpg
    Loft Bed.jpg
    283.6 KB · Views: 602
Thanks, Frank. I'll try to keep this in mind. I take photos with my iPad and just attach from the stream onto the thread. I'm sure that there's a way to reduce the size. No one has said anything before.
 
[size=10pt]

On my  iPad before downloading to the FOG,  I use AutoResize which is a free App that simply resizes. It is quick and simple to use.

However your pictures as they are downloaded in around three-five seconds down here. Frank must be on close to dial up speeds.
 
Back
Top