Two new lamps

rvieceli

Member
Joined
Feb 4, 2008
Messages
2,384
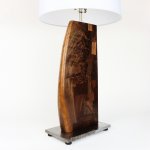
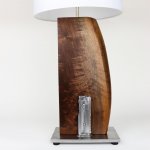
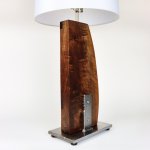
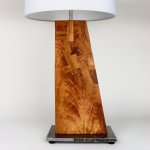
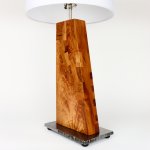
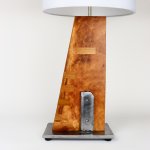
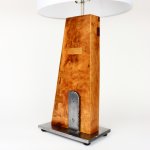
Here are two new lamps for the upcoming show season. I am very pleased with the way they turned out. one walnut and one cherry. There are a bunch more but these got their pics first.  [big grin]

Ron

[attachimg=1]

[attachimg=2]

[attachimg=3]

[attachimg=4]


Attachments

  • IMG_1181.jpg
    IMG_1181.jpg
    1.6 MB · Views: 436
  • IMG_1202.jpg
    IMG_1202.jpg
    1.1 MB · Views: 437
  • IMG_1191.jpg
    IMG_1191.jpg
    201.9 KB · Views: 437
  • IMG_1198.jpg
    IMG_1198.jpg
    1.4 MB · Views: 422
[attachimg=1]

[attachimg=2]

[attachimg=3]

[attachimg=4]
 

Attachments

  • IMG_1206.jpg
    IMG_1206.jpg
    1.9 MB · Views: 438
  • IMG_1212.jpg
    IMG_1212.jpg
    1.6 MB · Views: 435
  • IMG_1217.jpg
    IMG_1217.jpg
    1.6 MB · Views: 432
  • IMG_1222.jpg
    IMG_1222.jpg
    1.5 MB · Views: 442
Gorgeous as always Ron!

Your photography is looking great as well

RMW
 
I really like the look of the metal bases. The contrast between the torch cut areas and the smooth polished sections is really cool.
The shapes of the main bodies are quite interesting too.
Great looking builds.
 
Very nice work.  Can you share some details on how you made the angular wooden part and what looks like inset rectangles?  Was that Origin enabled?  Just thinking through how you might fixture that.

Thanks for sharing!  Great work on the metal and wood!
 
Thanks Neil.

Basically I use something like an MFS to make a template for the piece to be inlaid. Then use a router to hog out the space and chisels to square off the corners and then fit the inlay in. On walnut I use Titebond 3 because it dries dark and on cherry I usually reach for the Titebond Original.

Where my wife works they were tossing a display that was made up of aluminum extrusions bout 3/8 thick that slotted together and fastened. I rescued it to use for the templating material.

Ron
 
Really nice stuff Ron...gorgeous, I like the cherry best because it really shows off the patches, also looks great with the white shade.  [smile]

As Richard mentioned, kudos on the photography also.
 
Thanks everyone for the kind words. Both of those are my favorites from the ones i produced over the winter.

They were amazing pieces of wood for figure and depth.

Ron

 
rvieceli said:
Thanks Neil.

Basically I use something like an MFS to make a template for the piece to be inlaid. Then use a router to hog out the space and chisels to square off the corners and then fit the inlay in. On walnut I use Titebond 3 because it dries dark and on cherry I usually reach for the Titebond Original.

Where my wife works they were tossing a display that was made up of aluminum extrusions bout 3/8 thick that slotted together and fastened. I rescued it to use for the templating material.

Ron

How do you bore the channel for the wires?  That's a long shot to keep straight.
 
kmickey said:
How do you bore the channel for the wires?  That's a long shot to keep straight.

[member=66316]kmickey[/member]

Mostly I cheat.  [blink]

I use a Dowl-it doweling jig to drill the holes. It’s a self centering jig with drill bushings. It does a decent job of keeping things straight enough. The pipe I’m using for the lamping assembly needs a 1/2 inch hole but the wire can get by with 3/8. So I’ll switch to a 12 inch bit and maybe even 18 inch in 3/8

The bits even in the jig will flex some if they hit some funky grain and there’s always some funky grain. Since the placement of the exit home is important to my process, I’ll stop and drill from the bottom with a 1/2 inch drill to meet the top hole somewhere inside the piece.

Ron
 
Have you considered gundrilling the hole from just one end Ron?  Gun drills have recently seen an increase in use for plastics & woodworking. They'll use air instead of oil to flush out the chips. The tooling is not that expensive but you will need a lathe.
 
In a word no. Didn't know they were a thing. Seems an interesting process.

But in reality the method that I am currently using is working fine with the advantage of using equipment I already. It's not really as kludgy as it sounds.  [eek]

Ron 
 
rvieceli said:
In a word no. Didn't know they were a thing. Seems an interesting process.

But in reality the method that I am currently using is working fine with the advantage of using equipment I already. It's not really as kludgy as it sounds.  [eek]

Ron

Ya...obviously the quantity will dictate the viability.  [smile] 
I pursued the technology back in 1998 for drilling long holes in PTFE rods for manifold valving applications. The tooling prices have really tumbled since then. A current 1/2" carbide gun drill made in the US runs about $100.  Heck...I recently paid $25 for a bread & butter Fuller 1/2" HSS brad point bit.  [eek]
 
I haven't seen a gun drill for years. We had one in the shop when I worked for Sandvik (Coromant), back in the early 80s. That place was so cool, on the cutting edge of technology of the time. That's where I saw my first CNC milling machine. The had 2 Bridgeports and it was the coolest thing ever to watch a "robot" do the work. The operator had to manually change tools, but it was automatic other than that. Totally unprecedented in 1980.
We used the gun drill to drill coolant holes up the flutes of the drills that we were making. The irony of using a drill to make a drill was not lost on me. All we did at that location was drills/drill heads, and insert holders of some type or another.
 
Back
Top