Timtool
Member
- Joined
- Mar 13, 2011
- Messages
- 1,000
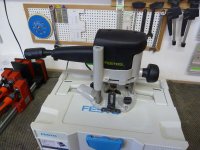
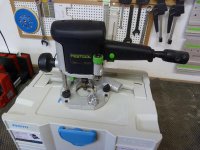
I purchased a used old Festo OF 900-E from 1997, i already have an OF1010 but wanted a second small router one for dedicated tasks like dovetailing.
And then these old Festo tools have a certain charm, so i just wanted to have one!
This one is in pretty good shape, only used by hobby users. Comes in a classic Festo systainer, no mention of Tanos as it didn't exist yet i suppose.
The systainer has turned yellow on the outside, not dramatically but i tried to clean it with no luck.
My goal is actually to upgrade this router for everyday use.
[attachimg=#]
First thing i did was take it apart entirely, the person i bought it from told me it had been revised entirely and gave me a bill mentioning they just replaced the rod that holds the spring. So no revision was done as the bottom bearing sounds like a rattle snake when you shake it!
Apart from that the interior looks like new, brushes are good and there is practically no dust inside.
Yesterday i ordered all the parts from ekat , gonna replace all the bearings but also all the dark plastic housing. It's not that expensive so what the heck.
I also ordered a plug it conversion kit, i am going to try to build the plug it into it. If not possible just add it to the cable outside the tool.
[attachimg=#]
Another thing i want to update is the systainer, this is my first classic systainer ever. But i had a spare T-loc 3 laying around for over a year unused.
Because it's a Festo and not Festool i cut away the "ol" on the systainer with my fein, then sanded it clean and made it porous again with some acetone and dabbing with a hard brush. the result is pretty ok if you don't look with a magnifying glass. Also painted the letters blue!
I ordered a blue latch as well.
[attachimg=#]
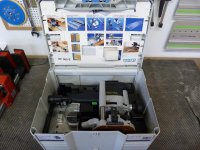
I also needed labels to identify the tool, so i remove the sticker from the classic systainer and scanned it. I cut out the info, pictures and even bar code in gimp and re arranged them Festool style on a blank label that i downloaded from the Festool website! I printed these out and glued them on the systainer with the contact glue i use to glue HPL edge banding.
[attachimg=#]
I trimmed the insert to make it fit in a T-loc and also trimmed the lid backing image using a T-loc backing image as template.
And also glued the foam block from the old systainer in place.
[attachimg=#]
Now i am waiting for the parts, and if they are all still available as this tool is 16 years old.
I will keep this updated as i get along!
And then these old Festo tools have a certain charm, so i just wanted to have one!
This one is in pretty good shape, only used by hobby users. Comes in a classic Festo systainer, no mention of Tanos as it didn't exist yet i suppose.
The systainer has turned yellow on the outside, not dramatically but i tried to clean it with no luck.
My goal is actually to upgrade this router for everyday use.
[attachimg=#]
First thing i did was take it apart entirely, the person i bought it from told me it had been revised entirely and gave me a bill mentioning they just replaced the rod that holds the spring. So no revision was done as the bottom bearing sounds like a rattle snake when you shake it!
Apart from that the interior looks like new, brushes are good and there is practically no dust inside.
Yesterday i ordered all the parts from ekat , gonna replace all the bearings but also all the dark plastic housing. It's not that expensive so what the heck.
I also ordered a plug it conversion kit, i am going to try to build the plug it into it. If not possible just add it to the cable outside the tool.
[attachimg=#]
Another thing i want to update is the systainer, this is my first classic systainer ever. But i had a spare T-loc 3 laying around for over a year unused.
Because it's a Festo and not Festool i cut away the "ol" on the systainer with my fein, then sanded it clean and made it porous again with some acetone and dabbing with a hard brush. the result is pretty ok if you don't look with a magnifying glass. Also painted the letters blue!
I ordered a blue latch as well.
[attachimg=#]
I also needed labels to identify the tool, so i remove the sticker from the classic systainer and scanned it. I cut out the info, pictures and even bar code in gimp and re arranged them Festool style on a blank label that i downloaded from the Festool website! I printed these out and glued them on the systainer with the contact glue i use to glue HPL edge banding.
[attachimg=#]
I trimmed the insert to make it fit in a T-loc and also trimmed the lid backing image using a T-loc backing image as template.
And also glued the foam block from the old systainer in place.
[attachimg=#]
Now i am waiting for the parts, and if they are all still available as this tool is 16 years old.
I will keep this updated as i get along!