Using Dominos for 30 Deg Mitered Corner on 3/4 Ply?

Just F Me

Member
Joined
Aug 4, 2014
Messages
227
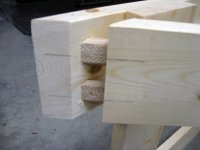
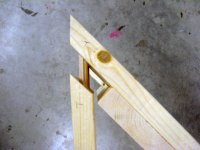
Hi Ya'll...I've been a good boy and santa is bringing me a domino this xmas!!!!  I have a project already in mind to make and I wanted to ask you guys what the best way to use the domino.  I purchased some 4mm dominos as well as 5mm dominos.  My first project is to make a triangle. 

I was thinking that I should set the domino to 20mm cutting depth...create a mortise in the wood at the end (RED PIECE).  Then throw that piece of wood on my MFT and do a 30 degree miter cut.  Using Sketchup, i'll lose about ~10mm off the end due to the 30 degree miter cut.

The trouble now that I can't visualize is making the mortise on the other piece of wood (TEAL PIECE) where I will have to create a mortise on the top of the wood...It looks like then I'll have to adjust the fence on the Domino to 30 degrees and then create a mortise so that it will all go together...does this make sense?

View attachment 1
 

Attachments

  • Screen Shot 2016-12-20 at 11.35.43 PM.png
    Screen Shot 2016-12-20 at 11.35.43 PM.png
    78 KB · Views: 133
I think you can cut the first mortice in the teal piece at right angles to the surface, and then cut the red mortice at an angle.

But aligning the teal cut will be tricky as you'll have to eyeball lining up the distance from the end.

You could cheat, and cut the mortice leaving a bit of the teal piece overhanging, assemble it, mark where the red piece comes to and then cut the teal piece to length.  Easier to do than to explain!

If you pm me I'll send you a sketch.

Andrew
 
Is there a way to use a spline instead of Dominos? I have done this type of spline joint using my table saw and a jig. I have difficulty making angled joints with my Domino.

If you really want to use the Domino, I'd suggest building some sort of a jig to manage the alignment problem.
 
For tricky situations like this, I would clamp up the components, and then use the domino to plunge through both pieces at the same time on the narrow setting. You would see the exposed domino, but it would be the most secure and accurate method.
 
I've done this before, and with plywood.  First off, I would cut all the pieces to size, including the miter, and then do the mortising with the domino fence at 30 (120) degrees for both operations -- the way you have it drawn is actually incorrect, since on the domino the mortise/tenon has to be plunged perpendicular to the face into which it is plunging.  The problem you run into, as you've realized, is that you're registering the fence off of different faces (the inside flat on the red piece, and the end on the teal piece), and so can't simply set the fence depth once and be done with it.  But it is doable, and basically it just comes down to trial and error.  Since it is plywood, you should have plenty of scrap to do the test on.  I'm trying to remember the sequencing I used -- I'm pretty sure I cut the mortises in the red piece first, and then used scrap to stand in for the teal piece, plunging at different fence depths until I finally got them aligned. 

You can do the entire process on scrap first if you want, but keep in mind that unless you plunge the red piece at one of the preset depth positions on the fence, you won't necessarily be able to exactly replicate the mortise position on the red piece that you had on the scrap red piece (because you will be switching fence depths as you go back and forth between red and teal -- In general, though, when mortising the mitered end of a board, like you are doing on the red piece, you want the depth set as shallow as possible to avoid blowing out the other side).  That's why when I did it I just plunged the mortises on the red piece straightaway, and then fiddled with the positioning on the teal scrap.  If something went truly wrong, I could always replunge the mortises on the red piece in a different position, since they were on the end of the board and so would not be visible in the joint.
 
That's the best kind of good boy!

I might try cutting the mortise in the red piece before cutting the angle, then taping or gluing the cutoff to the blue piece to get a reference surface for cutting the mortise in the second.  You'll certainly have to experiment a bit to get the mortise locations and depths right.  Instead of using the cutoff to cut the blue mortise, you might want to use a one-time jig piece made especially for the task.
 
This is simple, but a little complicated. 😀

I would use the Domino with the fence set at 90 degrees (parallel to the base) for both operations. Register the fence off of the North-West surfaces in your drawing for both pieces. The only tricky part is figuring out depths, since the machine will not be bearing fully against the surface. It'll be easy to figure out when you have the parts cut.
 
Chris Wong said:
This is simple, but a little complicated. 😀

I would use the Domino with the fence set at 90 degrees (parallel to the base) for both operations. Register the fence off of the North-West surfaces in your drawing for both pieces. The only tricky part is figuring out depths, since the machine will not be bearing fully against the surface. It'll be easy to figure out when you have the parts cut.

This is exactly how I do the same task. I am usually cutting at 45 degrees and using the DF700 with 8mm Dominoes, but the concept would be similar. Set the fence to 90 and do both cuts.

I mark the location with pencil as the reference pins won't make contact when using the machine at this angle. When cutting the front piece there is only a tiny bit of the pencil mark to align with, but I just make sure the bottom edge of the machine is tight to the work piece and the fence tight to the miter cut.

There is a little testing to find depth as Chris said. In my case I am using a 8x50mm domino and plunge 40mm into the side rail and 35mm in the front rail to get the proper depths in 20mm stock.

Works beautifully for making exact triangles with tight joints. I do hundreds of these a year and it is very repeatable. It is a little messier than normal as a few wood chips do escape but not bad.
 

Attachments

  • IMG_0096.JPG
    IMG_0096.JPG
    2.7 MB · Views: 331
  • IMG_0097.JPG
    IMG_0097.JPG
    3.9 MB · Views: 445
Roseland said:
I think you can cut the first mortice in the teal piece at right angles to the surface, and then cut the red mortice at an angle.

But aligning the teal cut will be tricky as you'll have to eyeball lining up the distance from the end.

You could cheat, and cut the mortice leaving a bit of the teal piece overhanging, assemble it, mark where the red piece comes to and then cut the teal piece to length.  Easier to do than to explain!

If you pm me I'll send you a sketch.

Andrew

You can attach photos like this...
View attachment 1
 

Attachments

  • Screen Shot 2016-12-21 at 11.51.45 AM.png
    Screen Shot 2016-12-21 at 11.51.45 AM.png
    86.8 KB · Views: 159
You can just fence off the short topside of the teal part? Maybe clamp another layer on it to increase area to push the fence on.
 
Back
Top