Using setup blocks to center domino mortises....

jcrowe1950

Festool Dealer
Member
Joined
Sep 10, 2014
Messages
239
Hi Folks,

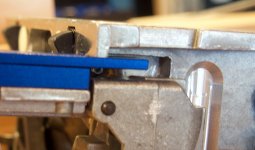
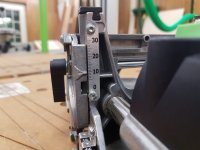
    I am not sure if this has been discussed before but I thought I'd share a technique I've been using successfully. I don't remember who told me this, either Greg Paolini or Brian Sedgeley, but there are two machined tabs in the domino fence body which top surface represent the exact center of the horizontal cut of the mortise. What I do is to use that as a reference surface with setup blocks to set my adjustable fence face height very precisely. In the photo attached, I am using a 1/4" and a 1/8" setup block to center the bit at 3/8" for the reference edge which will center the mortise in a 3/4" board. This also works for offsetting one workpiece from another for a reveal for example for offsetting an apron from a leg. This actually works best with two setup blocks so one can be slid into place for the reference tab.
[attachimg=1]
Note: orientation is upside down....reference edge above and adjustable fence face below...easier this way.
 

Attachments

  • Depth.jpg
    Depth.jpg
    150.7 KB · Views: 866
Did your source happen to publish a video of this technique? I don’t think I’m comprehending the technique, unfortunately for me.
 
Rhino1789 said:
Did your source happen to publish a video of this technique? I don’t think I’m comprehending the technique, unfortunately for me.

    I will try to do a video at some point. This was my own technique....I recently bought a nice set of setup blocks and use them for all of my machine setups now.....it's so much easier and more precise.
 
Thanks for sharing!  I knew about the top of the tab showing the center of the bit, but very clever using setup blocks to establish the fence height for reveals and when the stock setting block doesn’t work with the material your joining.
 
Rhino1789 said:
Did your source happen to publish a video of this technique? I don’t think I’m comprehending the technique, unfortunately for me.
Hi Rhino,

    I have created a bit clearer set of photos that might help in your understanding of how I do this.....the first photo was out of focus, pretty much as was I.

    In any case, here goes.

[attachimg=1]

This picture shows a front view of the business end of a Domino 500 with an 8mm bit installed. The yellow line is intended to indicate the top of what I call the Centerline Tabs.

[attachimg=2]

The second shot shows a side angled view of the adjustable fence face side of the tool with the adjustable fence face in the 90˚ position and the two setup blocks in position to create a 3/8" offset from the "Domino Face" to the centerline of the mortise cut. Notice too that one of the setup blocks has to be slightly offset so that it registers the adjustable fence face rather than the casting. Please let me know if this needs further clarification.


Attachments

  • Domino.jpg
    Domino.jpg
    65.1 KB · Views: 645
  • DominoExt.jpg
    DominoExt.jpg
    341.2 KB · Views: 638
Yes, I totally get it now. Thank you for the clarity.  I’m going to remember this hack, thanks for sharing.  Maybe you should design a set up block set that slides in the gap a bit better.  I would buy them.  I’m always looking for ways to use the domino in more applications. 
 
Rhino1789 said:
Yes, I totally get it now. Thank you for the clarity.  I’m going to remember this hack, thanks for sharing.  Maybe you should design a set up block set that slides in the gap a bit better.  I would buy them.  I’m always looking for ways to use the domino in more applications.
Cool.....as far as set up blocks, I'll leave that to the younger, more motivated folks....I just really enjoy using these tools and where possible giving people information about how to get the most goodie out of what really is a significant investment. Now what I'd really like to see is a trim stop with greater capacity and removable fences on either side, or some sort of hack that provides the same capability.
 
Always nice to know that Domino Joiner users come up with new ways to do things. It is such a versatile machine that its full potentials are to be unleashed. I belong to the group that thinks it's a real game-changer. Unless I'm cutting joinery by hand, it's my go-to joinery tool.

Speaking of hacks, this one from Libby is not documented anywhere except in one of her Fine Woodworking articles:https://www.finewoodworking.com/2017/03/29/get-perfect-reveals-domino

The three offsets (front, back & tray) in the box were done with her technique without changing the Joiner's height setting. No calculations, no math...zero chances for errors (almost).


Attachments

  • IMG_9547.jpg
    IMG_9547.jpg
    551.1 KB · Views: 333
One more thing to remember is the height scale.  When you calibrate the DF 500 to a specific height using shims as demonstrated by [member=39505]jcrowe1950[/member], one should also remember to calibrate the scale on the machine to get the scale to match the reality.  You'll need a T-10 driver to make this adjustment. 
 

Attachments

  • 20200901_095939.jpg
    20200901_095939.jpg
    1.2 MB · Views: 361
I made setup blocks years ago for my Skil biscuit jointer.  The fence didn't work well and the manual suggested the wooden blocks to use to set the fence.  Mine go from 1/8 to about 1 3/8 inch thickness and are about the size of the fence.  They vary in thickness by 1/16 of an inch.  Not the best for metric tools but works great for many things.  I use them for setting the table saw blade height, sometimes for setting the fence.  I used one to scribe some 2x4s to an uneven floor recently.  Setup blocks are a great idea, I haven't used them on the domino yet but I probably will, despite the inconsistency in dimensioning.  A key advantage is they make it harder to mess up.  You can buy them but if you have a thickness planner and some scraps it's easy to make them.
 
Back
Top