Vac-Sys non t-loc Systainer?

Well Richard, that space thing affects us all. It’s a constant struggle. The older I become, the less room I have...and the less room I have, the older and crankier I become.  [big grin]

I’ve followed your French cleat program, I embrace it, applaud it and am going to implement it for some of my storage solutions...as soon as I can finish installing this blasted Honeywell dehumidifier into the HVAC system.
 
I would have that using the classic systainer would be a matter of robustness. I find the classics stronger. I put mine in a classic and I have the choice of both. the classics are more rigid, which could be a benefit in an application such as this, vibration, heavy load, no need for frequent and convenient access.
 
[member=44099]Cheese[/member] I like your creative use of pressure differentials to bend matter to your will [smile]

Regarding your space problem I can comfort you with the knowledge of you not being alone:

tallgrass said:
I would have that using the classic systainer would be a matter of robustness. I find the classics stronger. I put mine in a classic and I have the choice of both. the classics are more rigid, which could be a benefit in an application such as this, vibration, heavy load, no need for frequent and convenient access.
While the classic systainers might be stronger, my fingernails hate the connector latches with a passion that would be filtered by the forum should I try to express it.
 
Gregor said:
[member=44099]Cheese[/member] I like your creative use of pressure differentials to bend matter to your will [smile]

Regarding your space problem I can comfort you with the knowledge of you not being alone:

Hey [member=53905]Gregor[/member]  that's hilarious...it really hits home because I also have rental space to store more of my STUFF.  [eek]

Originally I was going to use some 1/4" thick aluminum plate for the base until I accidentally placed the SE 1 on some thin sheet metal...that's when I had the A HA moment. [big grin]
 

Attachments

  • 2958_S.jpg
    2958_S.jpg
    653 KB · Views: 711
Richard/RMW said:
[member=44099]Cheese[/member] Nice! I haven't looked at the clamp bottom, appears that there is clearance for the BHSCS underneath. I like this approach.

I'm probably destined to add the SE-2 to the fleet, doesn't seem to be a choice now.

Spent tonight finishing up install of French cleat cubbies for some cheap HF parts bins to empty out several cabinets worth of small hardware fasteners etc. and clear out some floor space. Part of the unending dance of cramming more stuff into the small space. I'm tettering on buying a HF tool cart to replace the last 2 cabinets now. Their metal rolling tool boxes are surprising high quality. Everything on wheels is the battle cry.

Next up is finishing the main workspace including this.  I'll post some progress photos next week. Adding the mig and welding table created some challenges.

RMW

I bought one. It is a pretty good value but I actually wish it was not 22” deep. To fully open a drawer you have to back pretty far away from the wall. I’m used to the very cheap light weight tool chests bought from K-Mart 30+ years ago that only pull out half as far (and are half as deep to start with). With just a wrist swing the cheap drawer opens enough to see tools at the back. To see the back of the drawer on the  new cabinet takes a full arm swing. Or grab the pull and walk backwards.

First world problems.
 
Cheese said:
Richard/RMW said:
[member=44099]Cheese[/member] Nice! I haven't looked at the clamp bottom, appears that there is clearance for the BHSCS underneath. I like this approach.

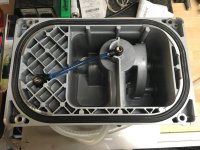
Hey Richard  [member=69167]RMW[/member] , here's a shot of the underside of the SE 1 unit. Lots of room there.  That prompted me to investigate & start this thread.
http://festoolownersgroup.com/festool-tool-reviews/vac-sys-vacuum-decay-times/msg458918/#msg458918

[attachimg=1]

Wow. Never occurred to me that using the vacuum to hold the clamp down has side benefits. My unreasoned assumption was the opposite, that it would somehow "use up" vacuum and negatively impact the actual clamping pressure. Darned physics stuff tripped me up again.

Thanks [member=44099]Cheese[/member]

RMW

 
PS regarding adding quick disconnects to the clamping units, I assume that the internal threads are going to be metric? Anyone have any actual knowledge on this?

I'd like to add male nipples to the clamp and the female QD to the hoses. I think...

RMW
 
I added disconnects to both my vac units it make storing them more manageable.  I bought 8mm push/pull fittings and tube from automationdirect.com.  I originally started buying from them for the use with the two Virutex clamping heads that I bought a year before Festool decided to make theirs AINA...I hate "murphy" with an endless passion.
I used 3/8" polycarbonate for my vac bases.  View attachment 1
 

Attachments

  • IMG_20160330_111726374_HDR.jpg
    IMG_20160330_111726374_HDR.jpg
    3 MB · Views: 217
  • IMG_20160329_160021211.jpg
    IMG_20160329_160021211.jpg
    2.3 MB · Views: 251
rst said:
I added disconnects to both my vac units it make storing them more manageable.  I bought 8mm push/pull fittings and tube from automationdirect.com.  I originally started buying from them for the use with the two Virutex clamping heads that I bought a year before Festool decided to make theirs AINA...I hate "murphy" with an endless passion.
I used 3/8" polycarbonate for my vac bases.  View attachment 1

[member=25351]rst[/member] did you replace the barb that's threaded into the clamping unit of just lop off the hose and connect to it? All the PTC fittings I've seen have imperial pipe threads.

RMW
 
So after a little goggling it appears there are no metric pipe threads rather G/R British Standard Pipe threads? G being straight and R being tapered.

Looks like Amazon has adapters to npt for those of us trapped in imperial measurement land.

RMW
 
I just replaced the original fittings with metric push/pull.  I love the units but do not leave them on my bench...too much clutter, so I made all the hoses removable.  I did have trouble reconnecting everything as I often go for a month or so before connecting both units together.  I marked the connections to make connecting everything more efficient.  I actually have to setup both units next week to rout and polish six polycarbonate refrigeration baffles for a customer.  Pieces are 6" x 72" so the narrow heads are going to be perfect for this process.
 
Would you add a picture of your fittings in use? Think I'll follow your lead and reduce my hose clutter around the workbench. Thanks.
 
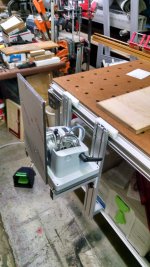
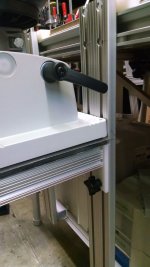
Richard - At their roadshows, I noticed that Festool made MFT side-attached pieces of plywood that are wrapped with wood 'curbs' to 'capture' the base of the Vac-Sys in a vertical position and then suck it to the plywood when it's turned on.  Quick easy way to store and use the unit but also gives you quick removal to place it on a bench top.

Might want to investigate something like that to fit your need...

Here's a quick drawing from memory.  The base essentially is screwed to the side of the MFT and the VacSys just drops in it captured by the ledges.

It was a really slick way to adapt it.

[attachimg=1]


Attachments

  • vacSys base.jpg
    vacSys base.jpg
    84.5 KB · Views: 443
neilc said:
Richard - At their roadshows, I noticed that Festool made MFT side-attached pieces of plywood that are wrapped with wood 'curbs' to 'capture' the base of the Vac-Sys in a vertical position and then suck it to the plywood when it's turned on.  Quick easy way to store and use the unit but also gives you quick removal to place it on a bench top.

Might want to investigate something like that to fit your need...

Here's a quick drawing from memory.  The base essentially is screwed to the side of the MFT and the VacSys just drops in it captured by the ledges.

It was a really slick way to adapt it.

[attachimg=1]

Thanks [member=167]neilc[/member] that is exactly what I was considering.

Of course, I'll need to complicate it a bit, overengineer it, mix in several materials and design to precision tolerances that'll require many hours of trial and error...  [doh]

RMW
 
Richard/RMW said:
Of course, I'll need to complicate it a bit, overengineer it, mix in several materials and design to precision tolerances that'll require many hours of trial and error...  [doh]

So...then you’re a perfect fit within the puzzle. You’re just another engineer. Just quietly recite the engineers mantra...anything worth doing is worth over doing.
 
Cheese said:
Richard/RMW said:
Of course, I'll need to complicate it a bit, overengineer it, mix in several materials and design to precision tolerances that'll require many hours of trial and error...  [doh]

So...then youre a perfect fit within the puzzle. You’re just another engineer. Just quietly recite the engineers mantra...anything worth doing is worth over doing.

Just a wannabe untrained enginerd... As Grandpa's actions taught, "if one nail is good 3 must be better..." and "Why the heck does anyone leave well enough alone?".

Kindred spirits.  [big grin]

RMW
 
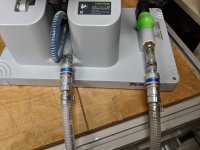
Finally got to installing the QD, it really helps with hose management due to the stiffness of those hoses. Couplers came from McMaster w/ 3/8" barbs.

[attachimg=1]

Now the pump-to-head hose sits coiled on top of the pump and the foot pedal-to-head hose is just hanging off the end of the SYS/MFT cart with the pedal itself nestled out of way underneath next to one of the casters. I can grab the head unit, click-click and I'm in business.

Great tool but the fixed hoses are awkward in a small work area.

FWIW I'd like to make up a couple extra pump-to-head hoses (QD @ each end) but I'd like them to be more flexible. Any opinions on the best type of hose to use? I'd prefer to not use the push-to-connect tube since it's so darn inflexible. I'd like something similar to a good air hose 3/8"-ish.

Is hose rigidity necessary to prevent them from collapsing with the vacuum?

Also, any idea what the ID is of the Festool hose? I had a bear of a time getting 3/8" barbs into it, but 1/4" seemed too small. 8mm perhaps?

Thanks,

RMW


Attachments

  • IMG_20190209_114824 (Medium).jpg
    IMG_20190209_114824 (Medium).jpg
    207.8 KB · Views: 319
I'm working on a dedicated cart for the vac sys to combat any setup and storage issues. Should be nearly finished this week.
 
Back
Top