woodbutcherbower
Member
Greetings from across the pond, FOG’ers. I know I don’t post in this section as often as I should, but life (and mostly work) always get in the way. So to make up for my absence – here’s a long-overdue WBB monster [big grin]
West Hallam Schoolhouse was built in 1862, and like most schools during the ultra-conservative Victorian era, was split into two sections – one half for boys and the other half for girls. It ceased being an active school in 1938, since each half could only accommodate 25 students. Say hello to the boys ‘class of 1897’;
[attachimg=1]
Back then – there were no aerosol paint cans with which to inflict so-called ‘art’ on passers-by. So these closet Rembrandts would go the extra mile by inscribing their names onto a brick whilst it was still green (= soft, unfired clay), and fire it at the local brickworks - then incorporating the ‘graffiti bricks’ as part of the building. I counted 14 of them in total – with this one being the 1908 school principal’s effort. Can you imagine the reaction in 2024 if the school boss sprayed his name on the wall?
[attachimg=2]
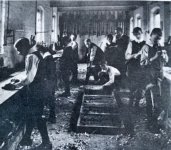
And here's another photo showing the boys engaged in a woodworking class (education done properly back then!!). Hand planes, spokeshaves, scrapers, mallets, chisels, but sadly - not a steam-powered Festool in sight;
[attachimg=3]
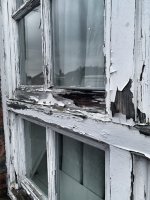
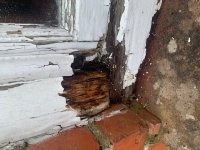
The schoolhouse is what’s known in the UK as a ‘Listed Building’. In 1936, laws were passed to prevent owners of historic buildings from wrecking them either through ill-judged ‘improvements’ - or from demolishing them altogether, and there are currently 400,000 structures in the UK which are legally protected. The boys section of the schoolhouse had been empty for as long as local people could remember, but it had now been acquired by a lady for restoration back to its former glory - and to make it her home. Decades of neglect had resulted in the building deteriorate into a terrible state with almost all external woodwork having become totally rotten – especially the building’s 17 windows which were all in ‘OMG’ condition;
[attachimg=4]
[attachimg=5]
A key part of the Listed Building laws is that the owners of these buildings aren’t permitted to change the external appearance in any way whatsoever unless special consent is granted (spoiler alert = it never is). Any new external work must be an ‘as-close-as-possible’ reproduction of the original - entirely authentic, and fully in keeping with the building’s history.
But to throw a spanner into the gears – any work carried out must also comply with UK Building Regulations (same deal as code in the US), and projects are frequently subject to long delays whilst local Building Control argues it out with Conservation Control. In the case of windows (‘the eyes of the building’), they have to look as identical as possible, but they must also comply with regulations which cover aspects such as thermal efficiency, external weathersealing, security, ventilation capacity and so on. So a nice result of this ‘hot potato’ has been the development of ultra-thin ‘heritage’ double-glazed sealed units which are only 12mm thick (less than half an inch), rather than the standard UK sealed unit thickness of 28mm. These are also made using traditional float glass which contains slight ripples, tiny bubbles and other imperfections. From a coupla yards away – they look identical to original single-glaze, but are fully regulations-compliant. All yours for just 3 x the cost of standard ones, sir.
So after measuring up and doing the necessary math to cost the job out, I quickly realised the intimidating scale of the task (the biggest windows were huge - around 11ft. wide x 7ft. high with twelve 4-pane casements in each one). And there were 17 of them to build in total. What? Just me on my own? You’re kidding, right? So I was completely honest with the customer, and I told her that this was realistically a job for a large commercial machine shop with CNC production facilities – a factory where you can throw in a tree at one end - fully-built, painted window kits come out the other end – which then get assembled and glazed by a team of guys at a bench – and which then get then passed over to an installation crew. But she was totally focused on historical authenticity in every respect, desperately wanting them to be hand-built by a local guy just as they originally would have been. After decades of doing heritage stuff like this, the fact that I’d also been specifically (and flatteringly) recommended to her by local Conservation Control (“Kevin’s your guy”) sealed the deal in her mind - and also reinforced the fact that she wasn’t going to take ‘no’ for an answer. She told me that she was happy to wait for as long as it took, she accepted my quotation, and I accepted the job. So .......
Q = ‘How do you eat an elephant?
A = “One bite at a time”.
I literally didn’t have enough space in my shop to store even half of the timber for the whole lot in one go – let alone having enough space left over to actually build them. So I’m building them in two lots. Batch 1’ consists of the 11 ‘small’ ones = a maximum of 7ft. high x 5ft. wide for the tallest double bays. The remaining 6 ‘monster’ upper-floor and roof-mounted ones will be done as ‘Batch 2’ after these first ones have been completed and installed. Just one week into the build, she called, casually asking me to add on a pair of period-accurate exterior doors for her ‘just whilst I was making the windows’……….
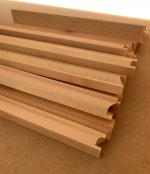
I’m not going to document the entire build – it would be the longest post in FOG history and I’m sure you all have better things to do with your time. But here are a few pictures which initially show the mind-numbing amount of machining I had to do (2200 feet of five different moulding profiles including the sash bars). Days spent standing at the spindle moulder and the router table. This also entailed a £900 order of custom moulder tooling to exactly replicate the variety of mouldings salvaged from existing non-rotted scraps to get the profiles;
[attachimg=7]
[attachimg=8]
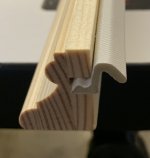
To fulfil the appearance requirements whilst complying with the regulations mentioned above, one of these mouldings had to be a ‘trick’ one which looked identical to the original from the outside, but was extended rearwards and grooved to take Schlegel weatherseals for the opening casements;
[attachimg=9]
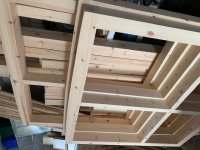
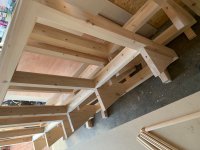
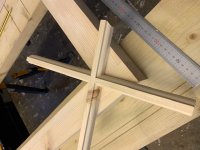
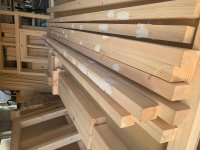
The 4” x 3” for the frames was purchased in the longest-available 5.4m (18-foot) lengths Lots of them. Once the timber was planed, filled and sanded to 120 grit, it was cut up into rough blanks for each frame. Construction was traditional mortise & tenon, plus tight half-laps for each cross-joint. All of these ground-floor windows had a gentle curve on the top – quite common on buildings of this period. So what I always do is to glue on a section of smaller cross-section timber (2” x 1”) to the front edge of the frame, plane it to an approximate curve, and then scribe each one to the exact shape of the brick arch when I install them. It has to be done this way – because every curve is 100% guaranteed to be different from the one next to it. A little later in the post - you’ll see what the strange triangular shapes on the rear of each frame are for;
[attachimg=10]
[attachimg=11]
[attachimg=12]
[attachimg=13]
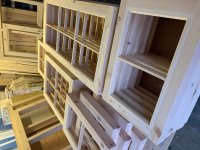
Time for the casements. These were built using 3” x 2” using the same M&T joints for each corner. Since every sash bar joint had to be traditionally scribed, I spent my usual insane amount of time at the router table, microscopically dialling-in the female cutter until the junctions were perfect;
[attachimg=14]
[attachimg=15]
Once this was done, the outside sash bars were fixed to the frames using Titebond III and 23g headless pins, the windows were glazed using the 12mm heritage units mentioned above, and then the inner sash bars were added;
[attachimg=16]
I’d originally quoted the job in Accoya (perfect for windows, but very expensive). This was way over the customer’s budget, so I used slow-growing, dense, tightly-ringed Scandinavian pine - but that meant that a much higher level of protection was going to be needed. So the equally mind-numbing paintjob commenced - consisting of shellac knotting, an acrylic sealer, plus two coats of oil-based primer, plus two coats of oil-based eggshell – with each one of the four oil coats taking two days to dry because the shop is unheated. I fortunately had an oak door to build for one customer, and a kitchen to install for another. It was SO good to take a break from this monumentally repetitive task, just for awhile.
[attachimg=17]
But fast forward a few weeks, and it was finally time for installation. It’s always messy;
(The pic's the expandable thumbnail at the bottom - it won't let me change it [crying])
Removing original windows from a 162-year-old building also dislodges 162 years worth of dust, soot, filth, and the almost-inevitable nests of long-departed wasps. Temporary diversion = maybe it’s just me and my passion for history and fixing up old places – but those wasps could have built that nest just as the Battle of Little Bighorn was raging, or as Henry Ford’s first Model T was rolling off the production line, or as the Titanic was sinking, or as Pearl Harbor was being attacked, or as the Berlin Wall was falling, or as MLK or JFK were being assassinated, - or a zillion other momentous world events. Just think about that, guys …. and understand why I love my job.
(..... and there's another 'unchangeable' thumbnail at the bottom ...)
Mostly.
But back on topic - the mortar crumbles, the old lime plaster falls off the walls on the inside in various quantities ranging from ‘a little filler’ to a ‘911 emergency call to my plasterer buddy’. To get them out as quickly as possible, I usually spade-drill a 32mm hole in each corner of the old casements, and then hack them out with a recip saw, followed by the remainder of the whole frame.
I crashed the server !!!
So you'll find the rest of this is in a hastily-assembled 'Part 2' post .......
West Hallam Schoolhouse was built in 1862, and like most schools during the ultra-conservative Victorian era, was split into two sections – one half for boys and the other half for girls. It ceased being an active school in 1938, since each half could only accommodate 25 students. Say hello to the boys ‘class of 1897’;
[attachimg=1]
Back then – there were no aerosol paint cans with which to inflict so-called ‘art’ on passers-by. So these closet Rembrandts would go the extra mile by inscribing their names onto a brick whilst it was still green (= soft, unfired clay), and fire it at the local brickworks - then incorporating the ‘graffiti bricks’ as part of the building. I counted 14 of them in total – with this one being the 1908 school principal’s effort. Can you imagine the reaction in 2024 if the school boss sprayed his name on the wall?
[attachimg=2]
And here's another photo showing the boys engaged in a woodworking class (education done properly back then!!). Hand planes, spokeshaves, scrapers, mallets, chisels, but sadly - not a steam-powered Festool in sight;
[attachimg=3]
The schoolhouse is what’s known in the UK as a ‘Listed Building’. In 1936, laws were passed to prevent owners of historic buildings from wrecking them either through ill-judged ‘improvements’ - or from demolishing them altogether, and there are currently 400,000 structures in the UK which are legally protected. The boys section of the schoolhouse had been empty for as long as local people could remember, but it had now been acquired by a lady for restoration back to its former glory - and to make it her home. Decades of neglect had resulted in the building deteriorate into a terrible state with almost all external woodwork having become totally rotten – especially the building’s 17 windows which were all in ‘OMG’ condition;
[attachimg=4]
[attachimg=5]
A key part of the Listed Building laws is that the owners of these buildings aren’t permitted to change the external appearance in any way whatsoever unless special consent is granted (spoiler alert = it never is). Any new external work must be an ‘as-close-as-possible’ reproduction of the original - entirely authentic, and fully in keeping with the building’s history.
But to throw a spanner into the gears – any work carried out must also comply with UK Building Regulations (same deal as code in the US), and projects are frequently subject to long delays whilst local Building Control argues it out with Conservation Control. In the case of windows (‘the eyes of the building’), they have to look as identical as possible, but they must also comply with regulations which cover aspects such as thermal efficiency, external weathersealing, security, ventilation capacity and so on. So a nice result of this ‘hot potato’ has been the development of ultra-thin ‘heritage’ double-glazed sealed units which are only 12mm thick (less than half an inch), rather than the standard UK sealed unit thickness of 28mm. These are also made using traditional float glass which contains slight ripples, tiny bubbles and other imperfections. From a coupla yards away – they look identical to original single-glaze, but are fully regulations-compliant. All yours for just 3 x the cost of standard ones, sir.
So after measuring up and doing the necessary math to cost the job out, I quickly realised the intimidating scale of the task (the biggest windows were huge - around 11ft. wide x 7ft. high with twelve 4-pane casements in each one). And there were 17 of them to build in total. What? Just me on my own? You’re kidding, right? So I was completely honest with the customer, and I told her that this was realistically a job for a large commercial machine shop with CNC production facilities – a factory where you can throw in a tree at one end - fully-built, painted window kits come out the other end – which then get assembled and glazed by a team of guys at a bench – and which then get then passed over to an installation crew. But she was totally focused on historical authenticity in every respect, desperately wanting them to be hand-built by a local guy just as they originally would have been. After decades of doing heritage stuff like this, the fact that I’d also been specifically (and flatteringly) recommended to her by local Conservation Control (“Kevin’s your guy”) sealed the deal in her mind - and also reinforced the fact that she wasn’t going to take ‘no’ for an answer. She told me that she was happy to wait for as long as it took, she accepted my quotation, and I accepted the job. So .......
Q = ‘How do you eat an elephant?
A = “One bite at a time”.
I literally didn’t have enough space in my shop to store even half of the timber for the whole lot in one go – let alone having enough space left over to actually build them. So I’m building them in two lots. Batch 1’ consists of the 11 ‘small’ ones = a maximum of 7ft. high x 5ft. wide for the tallest double bays. The remaining 6 ‘monster’ upper-floor and roof-mounted ones will be done as ‘Batch 2’ after these first ones have been completed and installed. Just one week into the build, she called, casually asking me to add on a pair of period-accurate exterior doors for her ‘just whilst I was making the windows’……….
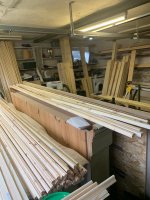
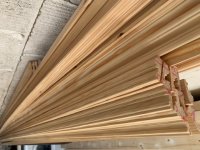
I’m not going to document the entire build – it would be the longest post in FOG history and I’m sure you all have better things to do with your time. But here are a few pictures which initially show the mind-numbing amount of machining I had to do (2200 feet of five different moulding profiles including the sash bars). Days spent standing at the spindle moulder and the router table. This also entailed a £900 order of custom moulder tooling to exactly replicate the variety of mouldings salvaged from existing non-rotted scraps to get the profiles;
[attachimg=7]
[attachimg=8]
To fulfil the appearance requirements whilst complying with the regulations mentioned above, one of these mouldings had to be a ‘trick’ one which looked identical to the original from the outside, but was extended rearwards and grooved to take Schlegel weatherseals for the opening casements;
[attachimg=9]
The 4” x 3” for the frames was purchased in the longest-available 5.4m (18-foot) lengths Lots of them. Once the timber was planed, filled and sanded to 120 grit, it was cut up into rough blanks for each frame. Construction was traditional mortise & tenon, plus tight half-laps for each cross-joint. All of these ground-floor windows had a gentle curve on the top – quite common on buildings of this period. So what I always do is to glue on a section of smaller cross-section timber (2” x 1”) to the front edge of the frame, plane it to an approximate curve, and then scribe each one to the exact shape of the brick arch when I install them. It has to be done this way – because every curve is 100% guaranteed to be different from the one next to it. A little later in the post - you’ll see what the strange triangular shapes on the rear of each frame are for;
[attachimg=10]
[attachimg=11]
[attachimg=12]
[attachimg=13]
Time for the casements. These were built using 3” x 2” using the same M&T joints for each corner. Since every sash bar joint had to be traditionally scribed, I spent my usual insane amount of time at the router table, microscopically dialling-in the female cutter until the junctions were perfect;
[attachimg=14]
[attachimg=15]
Once this was done, the outside sash bars were fixed to the frames using Titebond III and 23g headless pins, the windows were glazed using the 12mm heritage units mentioned above, and then the inner sash bars were added;
[attachimg=16]
I’d originally quoted the job in Accoya (perfect for windows, but very expensive). This was way over the customer’s budget, so I used slow-growing, dense, tightly-ringed Scandinavian pine - but that meant that a much higher level of protection was going to be needed. So the equally mind-numbing paintjob commenced - consisting of shellac knotting, an acrylic sealer, plus two coats of oil-based primer, plus two coats of oil-based eggshell – with each one of the four oil coats taking two days to dry because the shop is unheated. I fortunately had an oak door to build for one customer, and a kitchen to install for another. It was SO good to take a break from this monumentally repetitive task, just for awhile.
[attachimg=17]
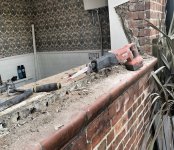
But fast forward a few weeks, and it was finally time for installation. It’s always messy;
(The pic's the expandable thumbnail at the bottom - it won't let me change it [crying])
Removing original windows from a 162-year-old building also dislodges 162 years worth of dust, soot, filth, and the almost-inevitable nests of long-departed wasps. Temporary diversion = maybe it’s just me and my passion for history and fixing up old places – but those wasps could have built that nest just as the Battle of Little Bighorn was raging, or as Henry Ford’s first Model T was rolling off the production line, or as the Titanic was sinking, or as Pearl Harbor was being attacked, or as the Berlin Wall was falling, or as MLK or JFK were being assassinated, - or a zillion other momentous world events. Just think about that, guys …. and understand why I love my job.
(..... and there's another 'unchangeable' thumbnail at the bottom ...)
Mostly.
But back on topic - the mortar crumbles, the old lime plaster falls off the walls on the inside in various quantities ranging from ‘a little filler’ to a ‘911 emergency call to my plasterer buddy’. To get them out as quickly as possible, I usually spade-drill a 32mm hole in each corner of the old casements, and then hack them out with a recip saw, followed by the remainder of the whole frame.
I crashed the server !!!
So you'll find the rest of this is in a hastily-assembled 'Part 2' post .......
Attachments
-
 1.jpg152.4 KB · Views: 306
 -
 9A2.jpg86.9 KB · Views: 268
 -
 9A1.jpg600.8 KB · Views: 270
 -
 9B.jpg433.3 KB · Views: 272
 -
 9C.jpg86.5 KB · Views: 275
 -
 13.jpg694.9 KB · Views: 274
 -
 14A.jpg87.5 KB · Views: 267
 -
 17.jpg163.2 KB · Views: 99
 -
 17B.jpg179 KB · Views: 97
 -
 8.jpg89.5 KB · Views: 271
 -
 7.jpg608.7 KB · Views: 273
 -
 2.jpg162.1 KB · Views: 296
 -
 3.jpg196.9 KB · Views: 271
 -
 r2.jpg120.6 KB · Views: 278
 -
 r1.jpg123 KB · Views: 276
 -
 r2.jpg120.6 KB · Views: 112
 -
 4.JPG159.9 KB · Views: 270
 -
 5.jpg97.9 KB · Views: 270
 -
 6.jpg348.8 KB · Views: 274

