Victorian schoolhouse windows Part 2

Joined
Apr 25, 2021
Messages
1,217
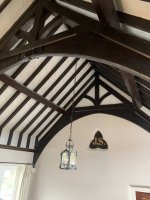
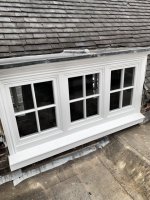
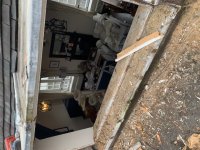
Wouldn't you have thought that I'd have got to grips with this forum by now? So to carry on - here are the two 'unmovable/unchangeable' pics from 'Part 1' .....

[attachimg=1]

[attachimg=2]

OK - I think we're back on track. Here's the rest of it ....

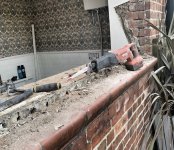
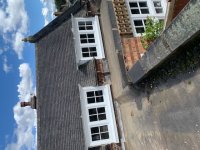
I freely admit that even after 37 years spent doing this - two of the windows gave me ‘the fear’ when I measured the job up. These were the two dormer ones above a flat roof/pitched roof transition, with these dormers having roofs made from crazy-heavy ½” thick lead sheet – and with the windows outwardly presenting zero visible clue as to how they were actually fixed in, or what they were fixed to. One of the reasons why Victorian window and door frames were so chunky (4” x 3” minimum) was that in many cases - they were semi-structural. I’ve done many jobs where components such as door and window frames have literally been the only thing holding stuff up (sheet-lead dormer roofs, in this case) – and I’ve occasionally had unstable brick arches and frame headers in a state of near-collapse as I’ve been taking old woodwork out. No concrete lintels or steel box girders back in 1862. Scary stuff. So every time I do this kind of installation, I always load a set of extendable screwjack props and extending ‘strongboy’ plates onto the van and have them standing right there next to me as I’m hacking old stuff out - just in case. But fortunately – I found a previously-invisible inch-thick iron plate bolted to the joists supporting the leadwork. Thank heavens. So now that ‘the fear’ had subsided - I made some more mess ……

[attachimg=3]

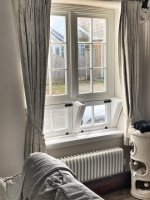
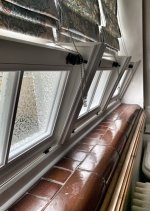
My #1 self-imposed rule on any job is - “Always get the most difficult part done first whilst you’re still fresh”. And so in they went, millimetre-perfect;

[attachimg=4]

[attachimg=5]

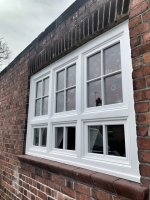
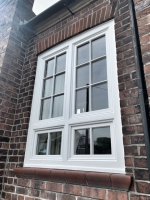
Then the four double bays;

[attachimg=6]

Then the two tall double bays;

[attachimg=7]

Then the three triple bays;

[attachimg=8]

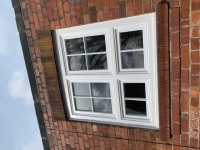
And the strange triangles? The top casements of all of these windows were fixed and non-opening (to stop the kids from escaping, I’m guessing) – but the bottom sections hinged inwards to around 30 degrees. I used black iron casement bolts which located into holes which were batch-cut using a half-inch cutter in an OF2200. So here’s the final result - 100% identical to the originals as per Listed Building requirements. This picture also shows the building’s only remaining original glazed-brick windowsill (I found it buried underneath a slab of improvement’ drywall – you can actually see it right underneath the blade of the Hilti saw in the ‘it’s always messy’ picture above). I cleaned it up using a scraper and hydrochloric acid, and then wax-polished it. The acid-etched privacy glass in these lower casements was matched to the original pattern by an extraordinarily talented local guy who’s done all of my etched and stained-glass stuff for the last 30 years;

[attachimg=9]

[attachimg=10]

And this, my FOG friends, is where I’m currently at with it. ‘Batch 2’ is already underway. Sorry it’s been a long post – but thanks for taking time out of your day to read it. Much appreciated as always.

Best wishes
Kevin

EDIT – Almost forgot to mention the ‘bonus Festool fun fact' !!!!  = the lady customer was so impressed by my CTL26 - that she bought herself a CT15 after I pulled up the UK website and walked her through her options …. 


Attachments

  • 17.jpg
    17.jpg
    163.2 KB · Views: 449
  • 22.jpg
    22.jpg
    117.5 KB · Views: 389
  • 21.jpg
    21.jpg
    131.5 KB · Views: 393
  • 18.jpg
    18.jpg
    135.5 KB · Views: 392
  • 19.jpg
    19.jpg
    140.9 KB · Views: 388
  • 20.jpg
    20.jpg
    104.3 KB · Views: 396
  • 16B.jpg
    16B.jpg
    119.9 KB · Views: 388
  • 16.jpg
    16.jpg
    146 KB · Views: 395
  • 15.jpg
    15.jpg
    129.6 KB · Views: 441
  • 17B.jpg
    17B.jpg
    179 KB · Views: 437
The windows are perfect! Truly amazing work!

I have to say, that first pic though, is off the hook! The wallpaper, the tiles, the bricks and then the Hilti recip. Color and composition = artwork by itself.

Love this, thank you for taking the time to compose all of this. Hope youll share batch #2 with us as well, pretty please. :)

Kind regards,
Oliver
 
Absolutely outstanding and beautiful work. Your attention to detail is amazing, but that’s why you’re the guy.  [big grin]

Thanks for documenting this restoration.

Ron
 
Wow, super cool.  Thanks for posting this.

I agree with the Listed Building person who told the customer “Kevin’s your guy”
 
[member=75780]woodbutcherbower[/member], one question, if I may.  Please understand that this is in no way criticism of your beautiful workmanship.  It seems that none of these windows are designed for emergency egress.  Is there a building code in your area that mandates windows to be egress-capable?  I would not expect dormer windows to be egress-capable, but those closer to occupant accessibility might need to be compliant. 
 
[member=7493]Sparktrician[/member] There’s nothing at all in UK regulations requiring any window to be egress-capable. Although many folks have windows using a side-hinged opener which you could feasibly climb out of, just as many don’t - with the most popular type being a fixed casement at the bottom and a top-hinged casement at the top.
 
Windows look great, the primary school I went to years ago had the exact same "hopper" style sashes.

Part B1 of the UK building regulations covers the requirements for escape windows in detail.

I make hardly any windows and doors these days as it's hard to keep up with the regulations if everything you do is bespoke. The frustrating thing for me is how it comes down to the building control officer, the private ones people use these days seem happy to pass off anything as long as they are getting paid.

Listed building work is generally my preference as it's normally just like for like.
 
Sparktrician said:
[member=75780]woodbutcherbower[/member], one question, if I may.  Please understand that this is in no way criticism of your beautiful workmanship.  It seems that none of these windows are designed for emergency egress.  Is there a building code in your area that mandates windows to be egress-capable?  I would not expect dormer windows to be egress-capable, but those closer to occupant accessibility might need to be compliant.

I would guess that this would be one of those details that gets hotly debated between the building permit/town council types and the historical district folks. Around here the grant exceptions to the modern codes for certain historical requirements. Similar to what I read in part 1, it is mostly about "appearance" to the point of looking correct "from the road" (or sidewalk in one specific neighborhood near downtown) This particular area controls things down to the type and spacing of the plants/scrubs in the front yard. [blink]

In a lot of other places around the city, you can get-by with "replacing without updating" except where safety concerns are involved. Wiring being a notable issue. You can leave all kinds of old knob & tube wiring for decades, but if you open up a wall (for something else) you have to fix it.

The rest of the pics look great too Kevin. Your effort really shows.
I have a question though. How does that roof-line work with those dormer windows? It looks like they tilt back toward the main roof? I would imagine that there is lead sheeting involved, but I would love to see how the water flows when the rain is driving hard.
 
[member=58857]Crazyraceguy[/member] The roofline does indeed have a shallow rearwards fall on it - maybe 5 degrees. The lead sheeting carries on upwards, tucking under the first row of slates for a few inches, and does the same at the sides - the triangular sections are actually white-painted lead sheet. The sheeting was all cleverly fashioned into various slopes and channels which carried the water down to guttering. It looks confusing because some sections of guttering are missing at the sides - I had to take them off to get the windows in - plus there are still gaps between the sides of the frames and the side sheeting. These were injected with white frame sealant after the pics were taken.

And yes - installing these is always hard work. The frames are heavy and there’s always a pile of making-good to do on the internal wall edges where the old ones have come out. My brother comes along to help out on occasions like this. Three per day was our average hit rate.

And yes - she had a finite budget just like the rest of us. This was a big-ticket job as you’ll imagine, but most everything else in the place is big-ticket, too. So she’s spending it where she has  to, but saving it where she can. The roof trusses in the main living space also aren’t in great shape - I’ve already had to get up there and stabilise one of the arches (I fixed up the two black-painted half-inch-thick steel sandwich plates you can see up top if you zoom in) because the two halves have split apart at the apex. I’ve done this dozens of times in the past, though - so it will probably all be OK though. We’ll know inside a year. ‘JS’ btw is the monogram of John Scargill - the wealthy benefactor who first built the schoolhouse.

[attachimg=1]
 

Attachments

  • IMG_4832-compressed.jpeg
    IMG_4832-compressed.jpeg
    274.7 KB · Views: 285
It is a real joy to read these posts of yours! I admire what you can do and the respect with which you approach your projects.
 
[member=75780]woodbutcherbower[/member] Thanks for the clarification. It may be just the camera angle or some parallax, but it looked steeper to me. I'm sure that it is properly flashed or it wouldn't last a single season, but I don't see a way for the water to get away from that valley? Plus, that water running down the dormer part (which I assume is just the smooth lead sheet) would be moving pretty fast.....directly toward the end grain of the last few rows of shingles. Is there some slight slope to that valley, so the water doesn't just lay in the valley? Seems like watching water running off of that in a downpour would be something to see, flowing like a fountain.

I really like the boldness of your plate "patch" on the joint of the arches. It looks like it was part of the design, from the beginning. What was the original joint? I think I see a little bit of a rectangular pocket up there? maybe a floating tenon that was pegged? Is that horizontal beam above it pegged into the arches too? Does something normally hang from that loop?
It's hard to see, but I think I see the typical gate angle brace joint at the top, where the rafters meet the vertical member. (The angled pocket)
Overall, cool looking design, from a time where people cared more about things other than speed.
 
[member=58857]Crazyraceguy[/member] I’m not a roofer so I have absolutely no idea how it works  [big grin] But it does, and it has done for a l-o-o-o-n-g time. There was a monumental thunderstorm the day after these went in (nature’s way of giving the windows a good old test) and not a drop entered the building. Don’t ask me how. I had other things on my mind at the time  [big grin]

Steel sandwich plates are a standard fix for a split apex. The two halves are rabbeted at the ends, and a wedge-shaped iron plate is hammered into the rabbet from the top. The idea is that both halves of the joint are free to expand & contract, but the plate keeps them aligned. In this case, there had been so much contraction that the plate was hanging right out at the bottom of the joint. The sandwich plates have holes which are elongated side-to-side (like slots) so there’s room for movement when the arch expands again. I get them made up by a little fabrication shop a few miles away. One of the guys knocks them up from offcuts in his lunch break = £50 in his back pocket. And the hook? I didn’t even notice it. Maybe a convenient point to attach a noose when Annette (the customer) totals up how much she’s spent? 

And yes - everything’s pegged to everything else.
 
I remember a while back when you gave the rough dimensions of this project. A bit hard to fathom at the time. Seeing the scope is staggering. It’s amazing what you can do on your own!

And as always your craftsmanship is impeccable as has been noted many times.

What I haven’t seen mentioned is the smoothness of the paint job. Was that sprayed or brushed?

 
Thanks [member=297]Michael Kellough[/member] - it was all brushed, with a very, very light 400-grit hand sanding between coats. I just don’t have the facilities to do it any other way. An eggshell finish, however, is very forgiving, and doesn’t show up small imperfections like a hi-gloss finish does. One of the nicest outcomes was some of the kind compliments made by villagers passing by as I was installing the ones next to the road. Many of them thought they were made of uPVC plastic.

Regarding the scale of this - one of the things I love the most about what I do is the fact that every week is different. Not so with this. It’s been mind-numbingly repetitive, and it will have been this way for many months by the time I’m all done with it. There are days when I’ve felt like a machine. I wouldn’t do it again.
 
woodbutcherbower said:
Regarding the scale of this - one of the things I love the most about what I do is the fact that every week is different. Not so with this. It’s been mind-numbingly repetitive, and it will have been this way for many months by the time I’m all done with it. There are days when I’ve felt like a machine. I wouldn’t do it again.

That is part of what gets me down sometimes. A lot of the projects I build, like reception desks, are a one-off. They may be a part of a bigger project overall, but often that doesn't involve me, it's just a bunch of cabinets and countertops, for the rest of the building. Generally, these custom pieces happen last, so they don't become either a physical barrier in the building or turn into a workbench/dumping ground for the other workers on-site. At that point, I'm on to the next.
Then, other times the job is mostly custom stuff, and it seems to never end, like those giant nurse stations I built a couple of summers ago. That job started in 2020 and is still going on. There was light at the end of the tunnel, then came a series of "adds".
When I thought I was finally done, after 8 huge desks, came a mountain of wall panels.

Funny thing is, after these long-drawn out jobs are done, there is always talk among the bosses that the margins drop, the stress is up, and why did we take this on? Then turn right around and do it again [unsure]
 
Wow, wow, wow. What can i say Kev, the standard of work and attention to detail is staggering. Especially keeping the same standard up all the way through the mind numbing repetitive process of the construction of the windows.
I remember last year when you first told about this project you said it was a big un..................it's defo that lol.
I really really do like the back angled casements, they look gorgeous.
It's often said that the UK has lost most of it's old school carpentry skills, your work on this project has blown that straight out the window.
 
kitfit1 said:
Wow, wow, wow. What can i say Kev, the standard of work and attention to detail is staggering. Especially keeping the same standard up all the way through the mind numbing repetitive process of the construction of the windows.
I remember last year when you first told about this project you said it was a big un..................it's defo that lol.
I really really do like the back angled casements, they look gorgeous.
It's often said that the UK has lost most of it's old school carpentry skills, your work on this project has blown that straight out the window.

Cheers Graham !! Words like those coming from a highly skilled, seasoned pro such as yourself mean an awful lot. Thankyou. Many other very skilled & talented people on here also. Best wishes - and keep those vinyls spinning.
 
Back
Top