Video: Festool VAC-SYS

erock

Member
Joined
Apr 29, 2010
Messages
1,251
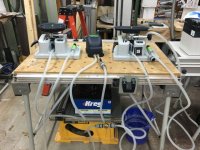
  Hello Guys and Girls.    Here is my latest video.    I've been waiting for the VAC-SYS to swim across the pond for so long. 

I'm very impressed with the unit.  Festool quality that we all expect.  I have no need to use the 30 day return policy.  It's staying in my shop!  [wink]


  Happy woodworking/remodeling/building/FOG-ING !!!!

Eric
 
Eric - I will watch it in a minute, but thanks in advance! Off to You Tube, then the Tool Nut website --!
(Do they have you on some sort of commission plan? If not, they should!)
 
Great video!! I want one of these too and have been waiting. It looks awesome!!
 
Eric, great video, but I was distracted by the back wall.  It seems your collection and homemade sysports have multiplied.  [big grin]
 
That is a great video. I just got one after using it at the most recent Festool class this past week. I can't wait to use it for sanding, Dominoing, routing, and all the other things I can do with it.

 
Wooden Skye said:
Eric, great video, but I was distracted by the back wall.  It seems your collection and homemade sysports have multiplied.  [big grin]

You keeping inventory on my goods bro?    HAHAHAHA !  [tongue]

 
I know you got the single head version Eric, I am still interested to know how the two head version interconnects both heads... though I guess I can figure it out for myself in about a week... [scared]
 
ScotF said:
Great video!! I want one of these too and have been waiting. It looks awesome!!

    You have 30 days to try it out......just saying.    [tongue]      [wink]

Eric
 
copcarcollector said:
I know you got the single head version Eric, I am still interested to know how the two head version interconnects both heads... though I guess I can figure it out for myself in about a week... [scared]

  And report back with a video !!!!!!!
 
Great video thanks Eric.  You wouldn't happen to know how much weight the vac can handle?  Say for some one sculpting a large wooden sculpture.  You should definitely get some swag from toolnut for this video!
 
Nice video, Eric - thanks for taking the time to walk through the unit and the many uses of the Vac Sys.

Would love to see you do more on the various heads and when / how you use them and how they compare on gripping strength.

neil
 
erock said:
Wooden Skye said:
Eric, great video, but I was distracted by the back wall.  It seems your collection and homemade sysports have multiplied.  [big grin]

You keeping inventory on my goods bro?    HAHAHAHA !  [tongue]

If I was really keeping track, I would just open up the Festool catalogue and put a check mark next to everything! [poke] All kidding aside it does fill up the space nicely!
 
Thanks Eric for taking the time to do the video. At first I was really surprised at the decay time of the vacuum once you switched off the pump, then I remembered that the vacuum cavity on the underside of the clamping unit is quite large and acts as a reservoir for a short time.

If a guy just bolted the clamping unit to a bench using the mounting holes instead, without using the vacuum applied to the base unit, I wonder how long the decay time would be then? Probably substantially less.  [tongue]

It is a really nice item though, I'm waiting on some Festo quick disconnects so that I can get mine up & running.  [cool]
 
copcarcollector said:
I know you got the single head version Eric, I am still interested to know how the two head version interconnects both heads... though I guess I can figure it out for myself in about a week... [scared]

In the photo from left to right--SE 1-Foot Valve-SE 2.

Hoses from left to right

Hose from SE 1 to foot valve

Hose from securing valve to vacuum pump in single head configuration, this hose now goes to the tee.

Hose from SE 1 connection to foot valve (same as the first hose, you can follow the loop).

Additional foot valve hose with ball valve, comes with SE 2 kit, the tee is affixed to this hose.

Hose from tee to SE 2.

Hose from SE 2 securing valve goes to vacuum pump.

The valve on the SE 2 hose must be shut off when using only the SE 1.

The hose with the tee is installed by removing a plug from the rear of the foot valve.

No sealer is required during the installation of the hose, it has a gasket seal.

Tom


Attachments

  • IMG_0479.jpg
    IMG_0479.jpg
    67.3 KB · Views: 2,082
[member=4105]tjbnwi[/member]

Quite helpful thanks. Did you make any modifications to the length of the hoses, particularly the one that goes from the foot valve to the "T"?

Add an extra day to my delivery, no shipping notification today :'(
 
copcarcollector said:
[member=4105]tjbnwi[/member]

Quite helpful thanks. Did you make any modifications to the length of the hoses, particularly the one that goes from the foot valve to the "T"?

No modifications to the hoses. This keeps the SE 1 as it designed.

I did make one modification. I store the all of the tool owners manuals beneath the Sysinsert, I had to trim 1/8" off the foam retainers so the lid on the Sys would close properly.

Tom
 
[member=4105]tjbnwi[/member] Is there a special Sysinsert for a Systainer 4 to store the pump?
 
grbmds said:
[member=4105]tjbnwi[/member] Is there a special Sysinsert for a Systainer 4 to store the pump?

The pump did not come in a Sys. As far as I know there is no insert for the pump in a Sys.

There are 2 foam "pillars" that hold the SE 1 and Se 2 in place with the lid closed on their Systainers. It was those "pillars" I had to trim due to the manual thickness under the bottom insert.

Except for installing the hose in the foot valve there are no instructions one how to connect the units together.

Tom
 
Back
Top