Wall Shelving Design Question

leftistelf

Member
Joined
May 24, 2008
Messages
57
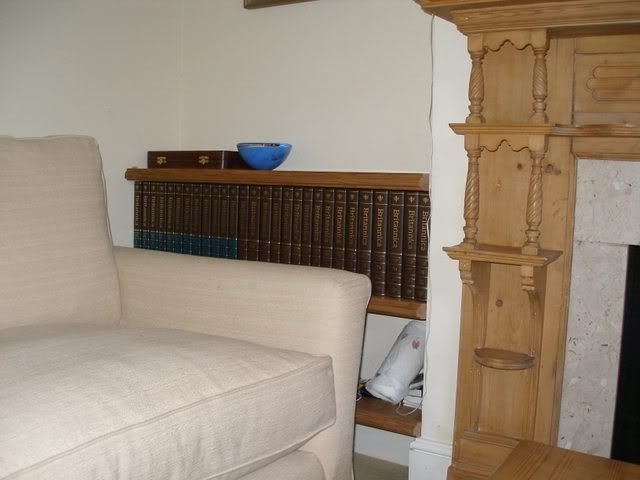
My wife wants to move the books from the office into our living room, and has picked a spot that is in a niche - walls on three sides, with the objective to have the shelves run from the left wall to the right wall and to fit snuggly against the backwall.  The length is about 3' and she wants to FILL each shelf with heavy books.

I could easily buy 2 shelving brackets/shelf, but the brackets generally interfere with the books below and they aren't as aesthetically pleasing.

So, I was considering cutting a dado in narrow pieces (1.5" or so) of hardwood, screwing the pieces to all 3 walls, and then sliding in 3/4" plywood shelf (with a few pocket screws to make sure the shelf doesn't slide out.  Of course, it would be easier to just run a 1x1 around the walls and placing the shelf directly on top, which would also create the added benefit of not interfering with the top of the bookshelf.  I could round over the exposed edge to keep things looking nice.

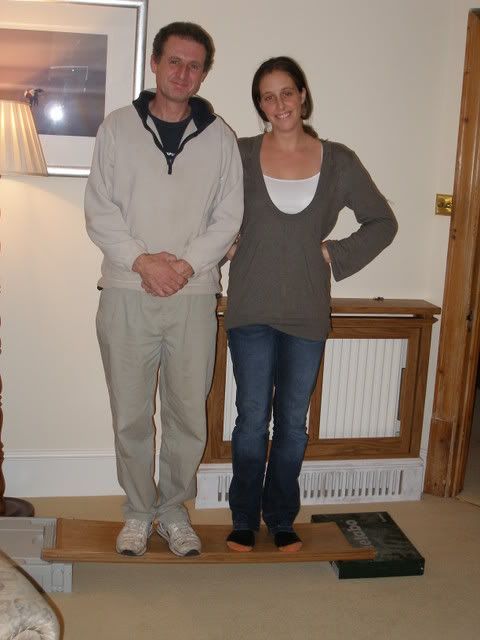
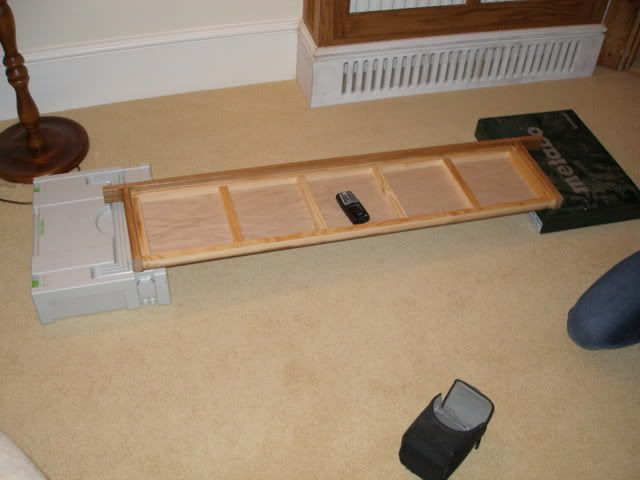
Regardless, my question is a matter of function - would the weight of books sitting atop 3' long shelves built of 3/4" plywood cause the shelf to bow?  Should I just forgo the complex idea and buy a few shelving brackets?

Tools in toolbox: 1400 router and 55 saw.  Probably adding the 125 rotex sander and a jigsaw.

Thanks!
 
Hi, welcome to the forum. :)

      36" is pushing it a bit for heavy  books on plywood.  I have some that are 29" and it is just about the limit.  There are a bunch of ways to do it. No matter how you do it you will sacrifice a little space for strength.  You could ad a hardwood edge to the front and back of each shelf that is 1 -1.5" wide (tall) to stiffen them. You could double the plywood.  Or you could add a devider to the center.  If you do not have a biscuit joiner I would be inclined to go with doubling the plywood.  Are you planning to finish off the exposed edges of the plywood with anything?

      For mounting them, if you want to keep it simple and unobstructed- add a plywood verticle side to each side of the niche. With shelf standards daoed in. That will give you 1/2" adjustments all the way up and help maximise the use of space.  Make sure that you install the verticle side pieces plumb and parallel. or the shelves would need to be different lengths and not fully interchangeable (don't count on the wall being plumb but maybe you will get lucky). You may need to add shims to get things plumb. You can finish off the front edges of the verticles with narrow strips of wood to hide the shims etc.
     

Seth
 
semenza said:
Hi, welcome to the forum. :)

Thanks!  I'm a long time lurker and this forum was the #2 reason behind purchasing Festool equipment.  The #1 reason?  The quality of the equipment.

semenza said:
Are you planning to finish off the exposed edges of the plywood with anything?

I hadn't considered doubling the plywood - it's a good idea.  Would you suggest doubling the .75" or .5" inch?  I was planning to finish the exposed edges with a hardwood cap (dado'ed to fit around the plywood and give the shelves a minor lip (which I'll route to keep the sharp edges from harming the leather bound books.

semenza said:
For mounting them, if you want to keep it simple and unobstructed- add a plywood verticle side to each side of the niche. With shelf standards daoed in. That will give you 1/2" adjustments all the way up and help maximise the use of space.  Make sure that you install the verticle side pieces plumb and parallel. or the shelves would need to be different lengths and not fully interchangeable (don't count on the wall being plumb but maybe you will get lucky). You may need to add shims to get things plumb. You can finish off the front edges of the verticles with narrow strips of wood to hide the shims etc.

I think you nailed the reason I wasn't going to try vertical sides.  I didn't think I'd have a chance getting them plum front-to-back in this particular house.  That's why I was considering fixed shelves (even if I do want to give the Festool gadgets that allow for adjustable shelves a go).  Maybe I need to reconsider...argh...I bet it takes me an hour to plumb this bad-boy, if it can even be done...at least with cabinets you can reach above/below and slide the shims in.  The back of the verticals sides you suggested would be tedious to adjust for plumbness.

Wives...what would we do without them?
 
Hi,

  Well, doubling 3/4" will certainly be strong enough.  1/2"  not sure?    If you are putting a cap dadoed onto the front, then I think you could just go with a wide 1.5" cap on front and back  of single 3/4" plywood to make them stiff enough.  Or the same on double 1/2".      I take it you don't mind a lip sticking up on the top edge of the shelves?    You could dado (rabbet really) it to be nearly flush on the top side. Glue it up, then sand it to be exactly flush.

      On the plumming of the vertical sides. I would be inclined to shim the front or back as needed under the bottom, not along the back edge. And between the wall and side for left / right adjustment when looking at the front.  Once screwed to the wall that should be good. Of course if you want the vertical face pieces to look right they will need to be scribed to the wall.

    How about just building a bookcase to put in the niche?

Seth
 
I have a method for doing these types of shelves in a painted finish - it's quite popular around here.

I use a sandwich of MDF., affixed to the wall via softwood battens.

I'll do a quick drawing showing the method & edit it into this post shortly. In the meantime, here's a few pictures of ones I've done:

[attachthumb=2]
That's a big old CRT set on the big shelf - very heavy. To check the strength of it, I could sit on it in the middle without any noticeable deflection.

[attachthumb=3]
A similar job in a child's room, with a shaped shelf to form a small desk area.

[attachthumb=1]
And one more. The client in this case wanted them 'extra chunky', so they're a little bit thicker.
 
Seth, thanks for the ideas.  That rabbet idea is awesome - it helps avoid the entire lip on the edge.

Jonny - Wow, that looks pretty impressive.  What's your technique for mounting the shelves to the walls in a manner that supports a TV?
 
OK, decided to post this separate, rather than editting it into my previous post.

Take 1 alcove. In this example, the alcove is 1000 wide and 400 deep, and we want our finished shelf to be 350 deep. This method works with solid stone/brick walls, with good sound plasterwork:
[attachthumb=1]

Having decided on the required height, screw 18x18mm battons to the three sides. These want to be around 20mm shallower than the finished depth, so in this case are 330mm out from the back wall. As well as screwing them, I also put some PVA in there too, to make sure they're solidly attached to the plasterwork:
[attachthumb=2]

Next, cut a piece of 18mm MDF to the correct size (in this case, 1000x350). Mark a line 20mm in around the three edges:
[attachthumb=3]

Now cut that section away:
[attachthumb=4]

Cut 2 pieces at 1000x350 from 12mm MDF. If the walls are uneven (and they probably will be!) then cut them slightly oversize & scibe to the wall.

You now have your three sandwich ingredients:
[attachthumb=5]

Now, using 1" no 6 screws and PLENTY of PVA glue, glue & screw the top and middle pieces together. Fill all the screw heads with 2-part filler & sand off:
[attachthumb=6]

Next, screw the bottom piece on, but DO NOT GLUE at this stage. When all three are together, you can put your guide rail on & run the saw down the front edge to flush it off, taking only about 1mm off:
[attachthumb=7]

Remove the bottom piece.

Put a bead of glue around the top edge of the battoning, and fit the top/middle assembly into place, screwing through the MDF into the battoning from the top:
[attachthumb=8]

Using plenty of PVA again, glue & screw the bottom piece on, and then finally fill & sand the remaining screw heads:
[attachthumb=9]

Once finished, they can be painted to match the surrounding walls, of in a contrasting shade as seen below. Note that the bottom one is thicker, being made from 3 layers of 18mm MDF, rather than 12/18/12:
[attachthumb=10]

It may not appear it at first, but this method is extremely strong. Laminated MDF, glued correctly, is always stronger than MDF of equal thickness, eg. 3 pieces of 6mm glued together will be far stronger (and more sag-resistant) than 1 piece of 18mm the same size.

I'm not sure exactly why that's the case, but it is. If you don't trust me, try it yourself - it's an interesting little experiment.....
 
first

libraries allow 35 lbs per linear foot for books, ( 50 kilos per linear metre)

second

this site is useful http://www.woodbin.com/calcs/sagulator.htm

third

look at these photos, they show how strong torsion boxes are

the weight on this shelf 1000mm is 135 kilos  (39 inches, 298 lbs)

135Kg298lb21st4lb.jpg


just to show how realy strong a torsion box is.

the sag was 6mm on the front edge

but remember 3 things

it is an INCOMPLETE torsion box (see below)

it is carrying nearly 3 times the design load of 50 kilos

it isnt fixed to the wall so the back (in this test has a bigger sag)

OpenTorsionBox.jpg


PS

the torsion box is 6mm mdf (oak faced) glued and pinned to 19x19mm softwood

the leading edge is oak 19x32mm oak glued and clamped to the torsion box

mdf was cut to size with ts55  and run through a preciso 70  to square the edges befor fixing the oak edging strip  :)

the 19x19 "frame" is unjointed
 
and just to prove the shelf can take books

one set of encylopedias

hope this might clear up any doubting thomas's

Shelvesinposition.jpg

 
Johnny Round Boy, I like your shelves idea. I will have to try it. I have a neighbor who just had some shelves put in a closet where this would have been perfect. She hired a cheap kid who thought he was a carpenter - put in 2x4 around the alcove to rest the MDF shelf on. Didn't dress up the edges of the MDF or 2x4s. Looks like crap. Your idea is more of what she wanted.

Dirty Deeds, I've built some some cheap torsion boxes and they are outstanding for strength. I cheat and use doors from mobile homes. They are 1/4 inch plywood with cardboard for the torsion interior. Still very strong.
 
Torsion boxes are very strong.  Many years ago my dad and I made one out of 1/4" Masonite and it was strong enough to hold a 20 gallon aquarium.

The thing I don't like about them is they look rather bulky compared to solid wood or even edged plywood.  I made a bookshelf out of solid red oak that is loaded with books and magazines and has no noticeable sag in the shelves.

Tom.
 
leftistelf said:
So, I was considering cutting a dado in narrow pieces (1.5" or so) of hardwood, screwing the pieces to all 3 walls, and then sliding in 3/4" plywood shelf (with a few pocket screws to make sure the shelf doesn't slide out. 

There is a problem I discovered with this method, or indeed just laying a shelf on top of a batten which runs the whole length of the shelf.

The batten impinges upon the space for books on the shelf below. If a book is pushed right to the back of the shelf, as might happen with a 8" wide book on a 8" deep shelf, then the top corner of the book can hit the batten, damaging the book. At first glance, the book looks as though it will happily fit the space, but when the book is pushed to the back of the shelf, it hits the batten which is holding the shelf above.

If you are going to use this method with expensive books, you really need to way to make sure the books won't hit the batten, or pad the batten. Alternatively, train users to ensure that the height of the books placed on the shelf should never exceed a certain amount (the vertical space between shelves, minus the amount of batten protruding below the shelf, minus a little bit for safety(!))

If I haven't explained it well, I can draw a diagram.

Forrest

 
Torsion boxes are a great idea...I'll do a bit of research.

Forrest - That's my concern as well.  Exposed battens will ding the books, particularly the ones on the ends.

Thanks for the good ideas...and great pictures.
 
dirtydeeds said:
and just to prove the shelf can take books

one set of encylopedias

hope this might clear up any doubting thomas's

Shelvesinposition.jpg

How did you mount the t-box to the wall?
 
i took each shelf (semi completed torsion box)

then drilled through the "frame" with an SDS drill into the wall (its a plastered brick wall)

used 6x90mm hammer fixings (2 in each end and 3 on the back)

then completed the torsion box from below (lying on my back) with glue a paslode 18 guage pin gun

the mid shelf was fixed in the same manner

the bottom shelf was slightly different, the frame was fixed in the same manner

but the bottom panel was glued and screwed using 3x20mm screws (its only 9 inches off the floor) using my festool angle drill

if i had had a timber stud wall i would have used screws through the frame into the studs using the festool offset drill
 
dirtydeeds said:
i took each shelf (semi completed torsion box)

then drilled through the "frame" with an SDS drill into the wall (its a plastered brick wall)

used 6x90mm hammer fixings (2 in each end and 3 on the back)

then completed the torsion box from below (lying on my back) with glue a paslode 18 guage pin gun

the mid shelf was fixed in the same manner

the bottom shelf was slightly different, the frame was fixed in the same manner

but the bottom panel was glued and screwed using 3x20mm screws (its only 9 inches off the floor) using my festool angle drill

if i had had a timber stud wall i would have used screws through the frame into the studs using the festool offset drill

Translation anyone?
 
Michael,

I know you would think hammer fixins

was some kinda southern road kill served up at the Sunday Babacoo.

Nope.

And Dirty, is that your hansom self standing on the shelf?

Per
 
per...........................          well i admit to not being the good looking one on the right  ::)

im the 150lb fat bastd

hammer fixings and frame fixings are similar but different, your link is accurate

both have a steel "screw" and an integeral rawl plug

you use hammer fixings for battens and stuff, frame fixings for door and window frames

the frame fixings do not pull the frame into or out of shape

clearly the first is hammer fixed (but can be removed by screwdriver) frame fixings are generally larger than hammer fixings and have PZ3 or PZ4 heads

for UPVC frames you cap the screws with a plastic cover (also supplied)
 
Back
Top