Walnut and Salvaged Steel Coffee Table

rvieceli

Member
Joined
Feb 4, 2008
Messages
2,384
Thought I'd show off a project I finished up and photographed recently.

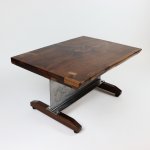
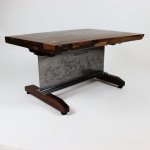
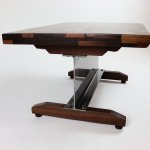
Coffee table made from salvaged steel and locally sourced American black walnut.

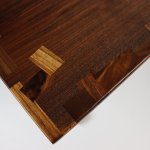
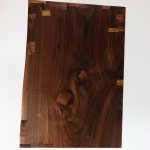
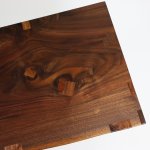
The single slab walnut top has a live edge on one side and measures 32 inches wide by 23.5 inches deep and 1.75 inches thick. A series of inlays are used to repair knots and flaws in the slab top and bottom.

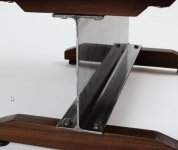
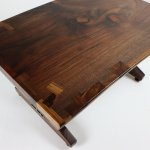
The base incorporates a piece of salvaged structural steel H beam. The beam is 25.5 inches long by 10 inches tall and has 4-inch flanges top and bottom. The steel beam is clear coated. All fasteners are stainless steel.

The walnut feet, angled at each end, are 1.5 inches wide, 2.25 inches tall and 18 inches long, providing a stable stance. Each foot is equipped with adjustable leveling mounts.

The table support arms are also walnut, 1.25 inches wide, 2 inches tall and 15 inches long. The supports are slotted where they are bolted to threaded inserts in the top to allow for seasonal wood movement.

The walnut is finished with a low VOC hard wax oil.

The table is 32 inches wide by 23.5 inches deep and stands 16.5 inches tall.

Ron

[attachimg=1]

[attachimg=2]

[attachimg=3]

[attachimg=4]

[attachimg=5]

[attachimg=6]

[attachimg=7]


Attachments

  • IMG_0364.jpg
    IMG_0364.jpg
    649.1 KB · Views: 988
  • IMG_0376.jpg
    IMG_0376.jpg
    607.6 KB · Views: 966
  • IMG_0378.jpg
    IMG_0378.jpg
    1 MB · Views: 957
  • IMG_0388.jpg
    IMG_0388.jpg
    972.3 KB · Views: 728
  • IMG_0394.jpg
    IMG_0394.jpg
    635.5 KB · Views: 740
  • IMG_0406.jpg
    IMG_0406.jpg
    979.9 KB · Views: 751
  • IMG_0391.jpg
    IMG_0391.jpg
    1.1 MB · Views: 710
Ron, that's cool, I like it.  I don't think I would ever be able to think of stuff like this. [embarassed]

Where did you get the piece of steel?
 
That's a creative marriage of wood and steel!  Nice look and execution!

Thanks for sharing the photos.

Mike A.
 
Thanks everyone.

Wood might move 1/4 to 1/2 maybe

Steel came from a local scrap yard. They had a bunch of short pieces of H beams a while back.

Ron

 
Ron, that's stunning. Great job photographing it also, the fifth photo had me entranced due to the optical illusion of seeing thru the steel.

Did you use origin for the inlays?

RMW
 
[member=8712]Richard/RMW[/member]

Thanks. No Origin Shaper for the inlays. Router and Chisel.

Ron
 
rvieceli said:
[member=8712]Richard/RMW[/member]

Thanks. No Origin Shaper for the inlays. Router and Chisel.

Ron

Dang, that's so... craftsman-like.  [not worthy] Beautiful work.

Was the photo preplanned or serendipitous?

RMW
 
[member=3192]rvieceli[/member] Wow, what a bang up job on the inlays, which make the table much more interesting than if it were just the slab.  Next time I do some slab work, I'm definitely going to try that method.

I noticed that most of the inlays run perpenidcular or diagonal to the slab grain (with a couple of exceptions) -- is that just an aesthetic choice, or is there a structural reason for it?
 
Thanks so much folks. Really proud of the way this one turned out.

Richard, Just dumb luck on the illusion.  [big grin]

[member=37411]ear3[/member] Edward many of the inlays are there to repair cracks or checks in the slab. Those cracks mostly follow the gain in the piece. So it makes sense to have the inlays go across the grain to stabilize that area. I don't trust the long term viability of using just epoxy to fill those cracks so I try not to do too much epoxy fill.

Ron
 
Nice job Ron...very nice job. I really like the inlay within an inlay look.  [big grin]

What prompted you to use square/rectangular inlays?

Are all the inlays walnut and are they all the same thickness?
 
Got it.  Thanks. 

rvieceli said:
Thanks so much folks. Really proud of the way this one turned out.

Richard, Just dumb luck on the illusion.  [big grin]

[member=37411]ear3[/member] Edward many of the inlays are there to repair cracks or checks in the slab. Those cracks mostly follow the gain in the piece. So it makes sense to have the inlays go across the grain to stabilize that area. I don't trust the long term viability of using just epoxy to fill those cracks so I try not to do too much epoxy fill.

Ron
 
Cheese said:
Nice job Ron...very nice job. I really like the inlay within an inlay look.  [big grin]

What prompted you to use square/rectangular inlays?

Are all the inlays walnut and are they all the same thickness?

Thanks [member=44099]Cheese[/member]  the inlays are all walnut. I don’t like to mix species. But there’s enough variations even in the same piece to get different looks. Also the grain direction and pattern gives contrast.

The thickness ranges from about 5/16 to about an inch depends on the repair. With the different thicknesses the pieces can interlock where they over lap.

As for the shape I just like squares and rectangles better. 😃 plus they interlace better

Ron
 
rvieceli said:
Richard, Just dumb luck on the illusion.  [big grin]

No way...

[attachimg=1]

That should be entered in a contest.  [not worthy]

RMW
 

Attachments

  • illusion.jpg
    illusion.jpg
    41.7 KB · Views: 504
Was this for a customer? I'm curious what kind of money such a unique and well executed piece can demand.
 
jpmeunier said:
Was this for a customer? I'm curious what kind of money such a unique and well executed piece can demand.
Agreed... I am a long time wanna be professional photographer.  Sometimes dumb luck happens if you take enough shots but that is exceptional even with some planning.  Love the table too!
 
rvieceli said:
Richard, Just dumb luck on the illusion.  [big grin]
No dumb luck here. Mirror in the symmetry plane will give see through illusion from any angle.
 
I think Svar is right, isn't he?  If the illusion didn't work, it would mean that the legs/feet and the steel were not at right angles, surely?
 
Back
Top