Walnut Dining Room Table

drummaniac

Member
Joined
Sep 17, 2012
Messages
14
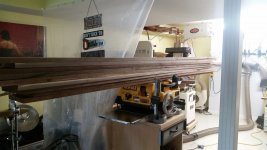
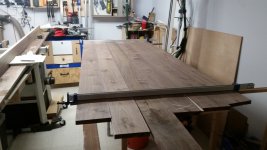
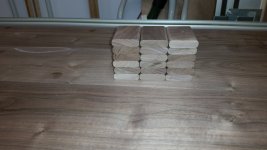
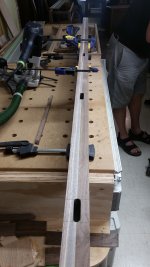
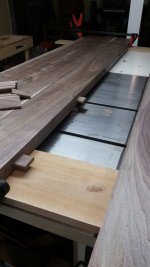
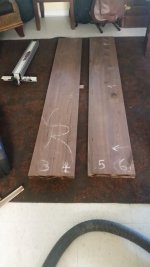
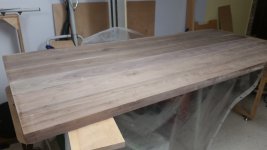
My first large table.  Solid 4/4 black walnut glue up to make 8/4 sections, then planed and jointed to 1-3/4" thick x 6" wide.  I used my TS55 and a pair of rails to do the initial dimensioning of the rough boards and my OF1400 with a 1/2" diameter top bearing bit to square up the mating edges of the sections.  They were just to difficult to maintain a good feed rate and constant pressure through my jointer.  I also used the OF1400 with the edge guide and a 1/2" spiral upcut bit (Whiteside) to cut the mortises in each of the beams.  I made 2-3/4" long tenons from some of the walnut cutoff - kind of an improvised domino of sorts.  I just started on the panel glue up tonight.  Here are a few in progress pictures.
 

Attachments

  • 1.jpg
    1.jpg
    307.3 KB · Views: 844
  • 2.jpg
    2.jpg
    595 KB · Views: 813
  • 3.jpg
    3.jpg
    591.2 KB · Views: 687
  • 4.jpg
    4.jpg
    729.2 KB · Views: 678
  • 6.jpg
    6.jpg
    583.9 KB · Views: 689
  • 7.jpg
    7.jpg
    480.2 KB · Views: 625
  • 8.jpg
    8.jpg
    607.1 KB · Views: 805
I think you're going to need a crane [wink] [big grin]

Can't wait to see more progress [smile]
 
No kidding!  I would guess that each of the sections weighs about 20-22 pounds.  Additionally this is to get a set of 6" wide 8/4 breadboard ends....before it gets mounted on a set of reclaimed cast iron legs.  Just glad I only have to help move it once.
 
drummaniac said:
I used my TS55 and a pair of rails to do the initial dimensioning of the rough boards and my OF1400 with a 1/2" diameter top bearing bit to square up the mating edges of the sections.

Please explain the use of the router to me. Did you place a rail just on top of the boards and slightly set back from the mating edge, and then run the router along the edge with the top bearing riding against the rail? 

Also, this is looking good and I'm look forward to seeing the rest of the build.
 
Jethreaux - just read your thread on your table.  Fantastic work!  I really like how the base turned out.  Very nice contrast to the top and the aging is just right in all the right spots. 

I just started sanding my top this morning with my RO150 and you're right about the dust collection - hardly any residual dust anywhere after several passes with 80 grit.

In regard to how I trued up my mating surfaces for the edge glue up:  I didn't use the rail in this case.  When I put a square against the mating edges I noticed that they weren't perpendicular to the top.  I later discovered my table saw saw blade was slightly angled when I ran the boards through to straighten up the faces which resulted in slightly angled rip cuts.  (note to self to check and re-check that next time)  While the angle wasn't huge, it was enough to cause more separation in the glue joints than was acceptable.  Thankfully I didn't get ahead of myself and just start gluing everything right away and noticed the problem during dry assembly. 

Since the top and bottom faces of the individual boards were parallel and the bottom of the mating face was slightly wider than the top (creating  the slightly angled mating face), I put a top bearing flush cut bit in the router and used the top edge of the mating face as my reference for the bearing to ride against.  That yielded a square face perpendicular to the top.  I checked everything with a square and it was dead on now.  I re-did my dry assembly just to be sure and the seams nearly disappeared.  While I was at it I checked for any bowing or cupping across the entire assembly and found a little over 1/32" at the center.  The ends were nearly exactly even - nothing a little sanding wouldn't take care of.

-break-

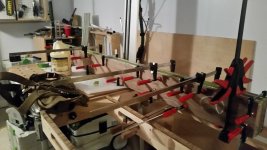
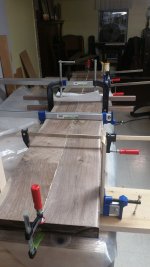
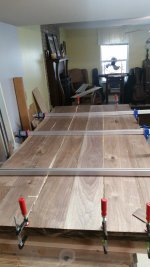
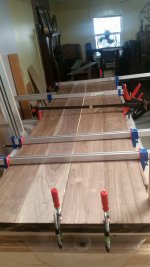
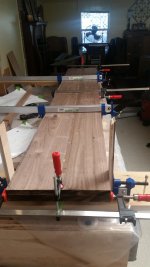
I glued up all of the individual sections over the last few days and the panel is now complete.  After I laminated the 4/4 I milled up to create 8/4, I laid out the joinery, cut the mortises, made the tenons, dry assembly (found the angle problem), and then fixed the angle problem.  After another dry assembly, I glued up each "section" at a time (each section is two of the laminated beams edge glued with the loose tenons in place).  I did each section individually so I could more easily control the alignment of the mating surfaces. 

Instead of trying to do 6 boards at the same time (spread glue, put in tenons, align and join faces, maneuver clamps, etc) it was far easier to just do 2. 

After all 3 were assembled, I repeated the process and glued up 2 of the larger assemblies (now 4 boards wide ~24" total), then glued up the last section. 

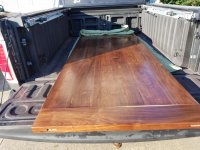
The top is now 36" wide x 82" long.

Time to trim up the ends, scraped the squeeze out, and put in some quality sanding and filling time.  Luckily the tenons aligned the top of the table almost perfectly so there isn't much to do to account for any differences between the boards.  I had hoped this would take care of most of the issues and it worked beautifully.  I had originally planned to glue up 2 boards at a time then run those 3 assemblies back through the planer to flush up the tops and bottoms but it turned out that that wasn't going to be necessary.  Here are a few pictures of the glue up process.  I just started sanding this morning so more to follow shortly.
 

Attachments

  • 20160625_160353.jpg
    20160625_160353.jpg
    661 KB · Views: 491
  • 20160625_123004.jpg
    20160625_123004.jpg
    654.8 KB · Views: 350
  • 20160625_112054.jpg
    20160625_112054.jpg
    466.2 KB · Views: 335
  • 20160625_112036.jpg
    20160625_112036.jpg
    541.7 KB · Views: 362
A few more progress pictures.  Top and bottom have been sanded to 150 grit.  I'll take the top to 220, maybe 300, after I fill a few areas. 

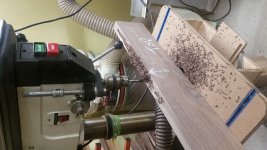
I also made the breadboard ends and cut their mortises.  I hogged out the bulk of the waste at the drill press with a 1/2" forster bit, then straightened up the channel with a spiral upcut bit in my OF1400 with the edge guide attached.  Since the ends are the same thickness as the top, I was able to use the same router setup from when I cut the small mortises on the mating faces of the table sections.

Next up will be the tenons cut into the ends of the table top and a dry fit of those joints.
 

Attachments

  • 20160626_213809.jpg
    20160626_213809.jpg
    4.6 MB · Views: 496
  • 20160627_222619.jpg
    20160627_222619.jpg
    3.3 MB · Views: 457
drummaniac said:
Jethreaux - just read your thread on your table.  Fantastic work!  I really like how the base turned out.  Very nice contrast to the top and the aging is just right in all the right spots. 

I just started sanding my top this morning with my RO150 and you're right about the dust collection - hardly any residual dust anywhere after several passes with 80 grit.

In regard to how I trued up my mating surfaces for the edge glue up:  I didn't use the rail in this case.  When I put a square against the mating edges I noticed that they weren't perpendicular to the top.  I later discovered my table saw saw blade was slightly angled when I ran the boards through to straighten up the faces which resulted in slightly angled rip cuts.  (note to self to check and re-check that next time)  While the angle wasn't huge, it was enough to cause more separation in the glue joints than was acceptable.  Thankfully I didn't get ahead of myself and just start gluing everything right away and noticed the problem during dry assembly. 

Since the top and bottom faces of the individual boards were parallel and the bottom of the mating face was slightly wider than the top (creating  the slightly angled mating face), I put a top bearing flush cut bit in the router and used the top edge of the mating face as my reference for the bearing to ride against.  That yielded a square face perpendicular to the top.  I checked everything with a square and it was dead on now.  I re-did my dry assembly just to be sure and the seams nearly disappeared.  While I was at it I checked for any bowing or cupping across the entire assembly and found a little over 1/32" at the center.  The ends were nearly exactly even - nothing a little sanding wouldn't take care of.

Thanks for the comments on my table, and thank you for explaining your use of the router.
 
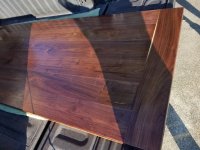
A couple pictures of the finished tabletop.  Glad it's done, but sad to see it go at the same time.
 

Attachments

  • 20160902_083815.jpg
    20160902_083815.jpg
    2.1 MB · Views: 619
  • 20160902_083821.jpg
    20160902_083821.jpg
    2.9 MB · Views: 517
Looks very well made but I'd gladly sacrifice a half inch of length to get rid of that contrasting arc of sapwood.
 
Really nice work. I have been working with rough sawn walnut quite a bit lately, and it really makes a good looking piece. Just like every large project, glad to see it finished.... Ok now time for next project.

Still not sure I follow the jointer use, have been using a small jet jointer to square up edges for any glue ups. Ok I re-read and see that pieces were too large to run consistently thru jointer.

 
Back
Top