WoodWhisperer
Member
- Joined
- Jun 25, 2013
- Messages
- 175
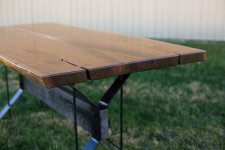
Been wanting to make a new kitchen table for a long time. Settled on making a walnut live edge table and couldn't be happier!
[attachthumb=1]
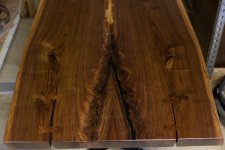
The booked matched slabs in the rough. About 2 1/2" thick x16-18" wide and 84" long.
[attachthumb=2]
First thing to do is to flatten the slabs. Used two 2x4's that a joined straight for the guide rails. Made a sled for the router to ride on. Used a 1 1/2" wide straight router bit.
[attachthumb=3]
[attachthumb=4]
Used the TS 55 to rip the two inside edges off. Once I ripped them both I put the two straight edges together and re-ripped them at the same time with the saw blade centered. This gave me a perfect joint.
[attachthumb=5]
After I glued and clamped together.
[attachthumb=6]
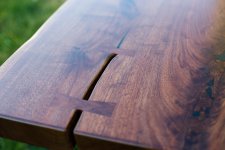
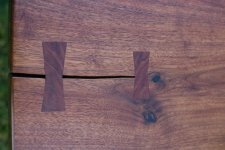
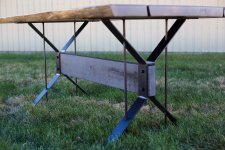
Decided to add a few (4) bow ties. Cut the bow ties out with a jig saw and removed most of the material for the bow tie hole with the 1400 router. Finished it with a chisel.
[attachthumb=7]
[attachthumb=8]
Filled all the knot holes and defects with a two part epoxy and black pigment.
[attachthumb=9]
Sanded it down from 120,180, and finished it off with 220.
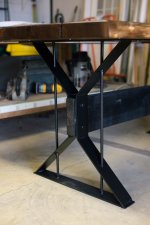
The finish I applied was boiled linseed oil and wipe on satin poly(4coats)
[attachthumb=10]
[attachthumb=11]
[attachthumb=12]
[attachthumb=13]
[attachthumb=14]
The kids approve, I think?!!
I had a lot of fun on this build. Learned a lot and enjoyed the process.
Thanks for the look!
Sean
[attachthumb=1]
The booked matched slabs in the rough. About 2 1/2" thick x16-18" wide and 84" long.
[attachthumb=2]
First thing to do is to flatten the slabs. Used two 2x4's that a joined straight for the guide rails. Made a sled for the router to ride on. Used a 1 1/2" wide straight router bit.
[attachthumb=3]
[attachthumb=4]
Used the TS 55 to rip the two inside edges off. Once I ripped them both I put the two straight edges together and re-ripped them at the same time with the saw blade centered. This gave me a perfect joint.
[attachthumb=5]
After I glued and clamped together.
[attachthumb=6]
Decided to add a few (4) bow ties. Cut the bow ties out with a jig saw and removed most of the material for the bow tie hole with the 1400 router. Finished it with a chisel.
[attachthumb=7]
[attachthumb=8]
Filled all the knot holes and defects with a two part epoxy and black pigment.
[attachthumb=9]
Sanded it down from 120,180, and finished it off with 220.
The finish I applied was boiled linseed oil and wipe on satin poly(4coats)
[attachthumb=10]
[attachthumb=11]
[attachthumb=12]
[attachthumb=13]
[attachthumb=14]
The kids approve, I think?!!
I had a lot of fun on this build. Learned a lot and enjoyed the process.
Thanks for the look!
Sean
Attachments
-
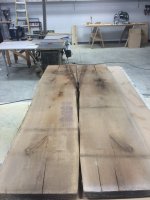 image.jpg509.6 KB · Views: 451
 -
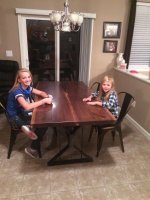 image.jpg644.8 KB · Views: 634
 -
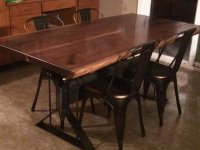 image.jpg498 KB · Views: 520
 -
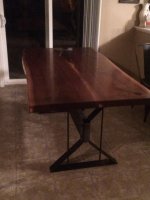 image.jpg525 KB · Views: 493
 -
 image.jpg579.4 KB · Views: 419
 -
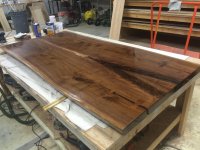 image.jpg666.1 KB · Views: 888
 -
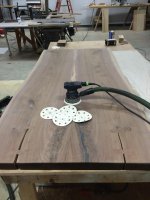 image.jpg538.3 KB · Views: 403
 -
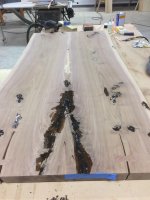 image.jpg551.7 KB · Views: 460
 -
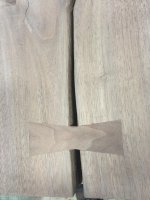 image.jpg727.3 KB · Views: 309
 -
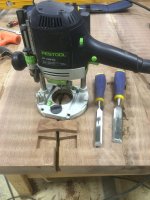 image.jpg657.8 KB · Views: 571
 -
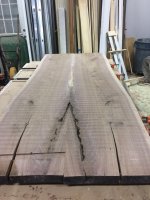 image.jpg651.2 KB · Views: 475
 -
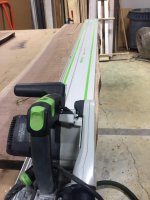 image.jpg515.7 KB · Views: 431
 -
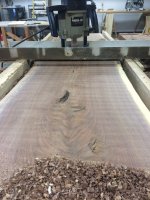 image.jpg779.6 KB · Views: 462
 -
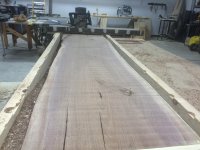 image.jpg661.8 KB · Views: 549