When building cabinet carcass - how do I drill pilot holes / screw straight?

rst said:
The Big Gator guides are great, I service, sell and install commercial steel and aluminum entrances and am a 40 year locksmith.  When installing commercial locksets, exit devices and magnetic locks ,it is often imperative that the through holes line up perfectly...the Gator guides make that possible and reduce the headaches of misaligned holes especially in the field on retro fits.

Oh yes. Please don't get wrong here. I have great respect for Big Gator guides.
In my situation, the screw is coming at 5/16 away from the edge and it's in the middle of the 30 inch wide carcass. So about say 12 inches away from either side. So in that situation the clearance between the Gator guide hole and the edge of Carcass is too narrow to keep it as a guide.
 
tofu said:
Are you screwing without gluing? Might want to use Pocket holes in that case.

If you're using fat screws to act like dowels (kinda like confirmat), I make an L shaped jig to get the spacing and angle dead on.

If gluing, I find it faster to just rabbet and shoot brads while the glue dries.

This joinery has two festool dominos on either ends. There is glue and screws in this build.
I can also use Kreg pocket hole instead of Screws. On the Kreg, I can go only upto 1 and 1/8 (with the stock being 5/8)
In case of a screw I can go upto 2 inches, Assuming 2 inches is much better bond than 1 and 1/8
Both cases Kreg or Screw I plan to glue.
 
2 inch screws are too long. 1 1/2 to 1 5/8 with glue is sufficient. You don't need a jig, just eyeball it. Get you a good countersink bit and drill away. Practice first if need be on some scrap.
 
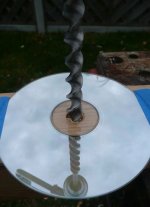
Mirror placed flat on your material. Align drill bit with its reflection. FYI, same approach used in hand sawing by sighting stock reflection in saw blade.
Pictured is a CD, which I think stands for perpendiCular Drilling or something. It was popularized in the 1990s by a tool company AOL.

[attachimg=1]
 

Attachments

  • drill.JPG
    drill.JPG
    25.9 KB · Views: 1,187
When I plan to use Glue and screws together, I begin by drilling pilot holes. Put the two boards together using a few clamps, make pilot holes. Put screws then remove them. Apply the glue, put back the screws and add clamps if the screws are more then 6" apart. That way no slipery joe :)
 
Michael Kellough said:

Yea.  I know.  I've done it.  You don't even need a true caul for this job cause you don't need equal pressure all the way.  A fairly strong straight board with a block or two in the middle.  You can use a scrap piece of 2x4 in a pinch. 

But a long reach clamp would still be awesome. 
 
My preferred method is to drill all parts with the drill press. (don't know if you have one) On a 24" gable I would have 4 screws top and bottom. I would set up a fence back 3/8" from the centre of the bit and mark the centre on the fence and then 4 marks to locate the holes where I wanted them left and right of centre. If I had a vertical partician I would mark the centre of the partician on the horizontal pieces and with no fence on the drill press drill as far in as possible from the front and back on the centre line.

I always used 5/8 for gables and backs and 3/4 for horizontals. I would keep your dominoes back from the front and back, so they don't interfere with those screws. 

For me, I could drill most of the holes by hand without blowing out the side but once in a while I would run a screw out the side of a piece.
 
I think the biggest thing you need to consider is a shorter screw.  1 5/8 is plenty long enough to fasten two 5/8 panels together until the glue sets up.  That will reduce your chances of getting enough off the screw pokes out.  1 1/4 might work if you recess the screw head but I've had them pull out.  But 1 5/8 nearly always works well. 

I have at least one cordless drill, a Ryobi, that has a bubble level built in.  If the pieces are flat this can be handy.  I also have a drilling guide I can fasten the drill to but I don't drag that out for screw holes.  But if they are causing you enough grief you could.

I use a drill bit with a built in countersink (Milwaukee at the moment but I have used others) and drill at least partially into the second piece before putting the screw in.  In hard wood I will go the full screw depth.  A hole to guide the screw also helps it not wander off.

Another simple thing is to hold a speed square next to where you are drilling with your other hand (left for me) as a reference to what square is.  A short combination square or engineers square would also work. 
 
if yer talking about screwing the sides together, I just make a jig rabbit 3/8 deep and make the side 3/8 from the edge of the side. I also now have a marking gauge with a pencil i set to 3/8 or 9mm if yer using metric
 
I too like to make cabinets with a combination of dominoes and screws - it’s a good system.

My own home-grown technique is to assemble the cabinet with the dominoes, cramp up square then drill the pilot holes for the screws right through the cabinet sides (obviously having marked up accurately the board centres). I have a little drill guide that is perfect for this - an old Porter Cable Port-align, an eBay bargain.

In plywood, you will probably want to follow up with a clearance hole and countersink in the side piece; if the drill bit is not long enough for the full depth pilot hole, you can deepen this once you have disassembled the carcass.

(In melamine faced chipboard, I like to use Confirmat screws for which there is a special stepped drill bit.)

Cheers

 
[member=2839]scholar[/member]

I used to make mines that way. Dominos for aignment purposes then screw the sides. wors great.

I just got lazy quit doing it. But I start again
 
Back
Top