X-Carve small CNC from Inventables

Stone Message

Magazine/Blog Author
Member
Joined
Apr 13, 2011
Messages
4,550
Hi Everyone,

I have been working on a long term project to build a small CNC from a kit supplied by Inventables in the US. They have invited me to do this and sent the kit to the UK in order for me to make a series of videos. I have also had help from Vectric who have supplied a limited 1 year license for V Carve Pro to cover the period that I will be making videos.

So far I have made 7 videos, 5 of which cover the construction and commissioning. If you only want an overview then do look at the Introduction video. If you need a little bit of background (very simple stuff) on CNC work then look at the video describing how it works.

Here are the links:

Introduction to the Inventables work:


How a CNC Works:


Construction Videos:


I am sorry to dump so many videos at once but the will be more later in the year.

Peter
 
I've watched most of your videos on the assembly, Peter.  And I know Zach, the founder.  Great guy and company here in Chicago.

I'll be curious how the Xcarve works in 3d.  I can see its benefit in cutting out panels and look forward to more videos, Peter.
 
neilc said:
I've watched most of your videos on the assembly, Peter.  And I know Zach, the founder.  Great guy and company here in Chicago.

I'll be curious how the Xcarve works in 3d.  I can see its benefit in cutting out panels and look forward to more videos, Peter.

I have every confidence that the X-Carve will perform well in 3D but it will need the right software to do that. I think that I can use V Carve Pro to get part of the way there but might see if I can get a short term license for Vectric's Aspire to make a better job.

I can imagine that Zach is a great guy judging by the way the company deals with its customers and how it has established such a good reputation in a relatively short time.

Cheers.

Peter
 
Mine's being delivered on Tuesday and I can't wait to get started!  If I may ask, Peter, approximately how much time do you have into the build?  (Apologies if you mentioned it in the videos)
 
felkadelic said:
Mine's being delivered on Tuesday and I can't wait to get started!  If I may ask, Peter, approximately how much time do you have into the build?  (Apologies if you mentioned it in the videos)

I did note the times for most sections but the filming started to distort this a bit. If you are not filming, having to walk the dog or go to the bathroom too often then I think that you could easily do the whole thing in less than a day. However, I really would like to stress the need to take care with the wiring (don't mix up the connections) and also watch the electronics. The Inventables instructional videos are superb and their written instructions are excellent so it is difficult to go wrong.

I have tried not to duplicate any of the Inventables stuff in my videos but have emphasised those areas where I think it might be easy to go wrong.

Good luck and have fun.

Peter
 
Excellent videos, Peter.  I suspect that there will be an X-Carve in my future.  [smile]
 
Hi Peter
Absolutely amazing videos, so informative.
I have just today placed an order for a fully loaded x-carve, with delivery due end of November.
Couple of questions for you if you would be so kind.

What size is the spiral wrap you got for the cables?
What size heat shrink or spiral wrap is needed for the large amount of cables (the bunched cables that you didn't shrink with heat)?
Where can i order the 8 pin part from and what is it called?

Many Thanks
 
Hi James

The spiral wrap is very small but expands easily as you may have seen in the video. I believe it was 6 mm in diameter.

The shrink wrap was not the best solution in that area but I used 25 mm (or 1"). I think spiral wrap, say 12 mm, would be just as good. I bought the spiral wrap from ebay - it was about £5 for 10 m (and I have quite a bit left).

The header came from CPC (http://cpc.farnell.com/pro-signal/18689/header-female-stackable-2-54mm/dp/CN18765?MER=e-bb45-00001001) and is a 0.1 header. Part number 18689. You will have to open an account and you will be annoyed by the postage.

Many thanks for the kind words.

Do PM me if you need any help.

Good luck.

Peter
 
Hi Peter
Many thanks for the reply it's much appreciated.
I just ordered the header and yes the postage price is terrible in this day and age  [big grin]
I have a fair few weeks wait for my machine so i'm doing everything i can possible now to make the jump into the cnc world as smooth as possible so lot's of forum reading and videos to view.
I also have to build a stand for the x-carve. Is 1m x 1m big enough or do you need a bit extra room at the sides and back of the x-carve? i plan on having it butt against a wall.
Thanks
 
Hi James

You will need a bit of extra room all around if you want to put a retaining edge on the stand. There are some bits that stick out left and right as well as fore and aft so you cannot rely on the base board dimensions. I am unable to get to the workshop from where I am but should be able to do some measurements, should you need them, perhaps later this afternoon.

How will you protect the X-Carve when it is not in use?

Peter
 
Thanks Peter that would be great, Height including any needed clearance would also be appreciated.
I plan to have a lid on hinges much like your setup and make it 90cm high so it meets with my MFT/3's and can be used as am assembly worktop when the machine is not in use.
Then figure out some kind of dust extraction so i can have it closed when operating on a long job to keep noise levels down.

Regards
 
jmac80 said:
Thanks Peter that would be great, Height including any needed clearance would also be appreciated.
I plan to have a lid on hinges much like your setup and make it 90cm high so it meets with my MFT/3's and can be used as am assembly worktop when the machine is not in use.
Then figure out some kind of dust extraction so i can have it closed when operating on a long job to keep noise levels down.

Regards

Hi James,

If you PM me your email address I will send you a set of my CNC cabinet plans. The X and Y space that I allow for X-Carve is about 50 mm more than it needs to be but in the Z direction it is within about 15 mm.

I think that it is a good idea to have a second use for the CNC cabinet. Mine is designed to become a track saw cutting station and general assembly surface. I have a pair of drawers on the front and on the back.

The dust collection is easy with the lid raised and I will provide support for the dust hose from the lip of the lid when it is hinged open. I think that dust collection with everything closed down will be quite a challenge as the dust hose needs to be routed low down and probably in the same plane as the cables. You will need a very flexible dust hose and a good design !

Peter
 
Great Peter
I popped you a PM.
I just ordered this relay: http://www.amazon.co.uk/gp/product/B008MU0DV6?psc=1&redirect=true&ref_=od_aui_detailpages00 so i can power the dewalt router with the CNC controller.
While on the subject of the dewalt router i notice the american version they call the "DWP611" the AC lead comes out the back side of it while on our UK model it comes straight out the top, I think the USA version makes for a neater looking setup.
 
Hi James

I have sent the plans. That relay is a great idea, presumably it takes its switching power from the 24 v spindle power lead.

Yes, I noticed that slight difference between the routers. It still works although it does make the clearance above a little more critical if you want to run it with the cabinet lid down. You could fit a little gadget on the outside of the rubber boot in order to force it to form a gentle right angle bend.

Peter
 
Received them many thanks Peter
This is a diagram from Inventables forum:

n33iejj.png


There is also another post where a user modified the dewalt router so he can change the speed of it remotely.
I'm not sure how much i personally want to modify the dewalt router as i imagine there will be additional spindle options along soon like 0.8kw+ aircooled and water cooled ones etc. Cutting a bit of the end of the lead and fitting a new plug doesn't bother me though, the lead on the router is pretty long to begin with.

Thanks

Peter Parfitt said:
Hi James

I have sent the plans. That relay is a great idea, presumably it takes its switching power from the 24 v spindle power lead.

Yes, I noticed that slight difference between the routers. It still works although it does make the clearance above a little more critical if you want to run it with the cabinet lid down. You could fit a little gadget on the outside of the rubber boot in order to force it to form a gentle right angle bend.

Peter
 
Hi James

How will you deal with the dust? The Dewalt pushes air through the motor and down onto the work piece. Without dust collection it is going to become very messy.

Peter
 
I really like the first offering as it looks easy to make and allows a reasonably clear view of what is going on.

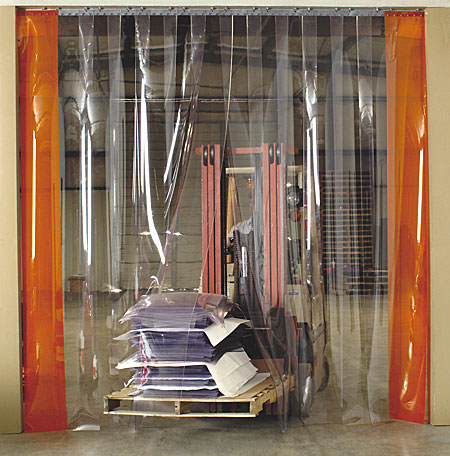
Do you know what material is used around the outside as the "curtain"  ?

Peter
 
Vinyl Door Strip like this:
ALECO-Anti-Static-Vinyl-LSS-_i_LBV135218.jpg


Yes been able to see what's going on is a must in my opinion especially as the dewalt router has a snazzy led.

096e3ecd126d9aae4489a59e74f097b16eb6044f.JPG


52f938a48417d002743e5a9db2466988fb2816ab.JPG


8094299137eb19c770b4b84d357833f491436d7e_1_375x500.JPG


cd74fd56ed8dfd0a454e9cda72061052542ace15_1_375x500.JPG


8f23deebb5aabc12b37d69ee13f1d4e7080827d7_1_690x407.jpg


Back
Top