(Yet another) 80/20 MFT/SYS Cart

looks good. Are your casters about 125 mm high overall?

is there enough space for another systainer drawer on top of the two already there?

Ron
 
rvieceli said:
looks good. Are your casters about 125 mm high overall?

is there enough space for another systainer drawer on top of the two already there?

Ron

127mm or 5".

There is room for a level of sys-1 above the sys-2's. Each shelf is 2 deep (700mm) so in a perfect world I could get 18 total.

I don't keep my TS or routers in systainers, so they may not live in the cart anyway. I think everything I have is in 1's or 2's. Still hope to sneak in a couple shallow full depth drawers anyway for dogs, rip guides, clamps, etc.

RMW
 
Can anyone provide info on best place to buy 80/20?  I had never heard of it until I started following this thread.  Tks.  M
 
They have an EBay store that sells most of what they have and the service is outstanding.  If you contact them on their web site they will have their nearest distributor contact you and send a catalog.
 
rst said:
They have an EBay store that sells most of what they have and the service is outstanding.  If you contact them on their web site they will have their nearest distributor contact you and send a catalog.

Their eBay store is where where I buy all my stuff. If there is anything in the catalog they don't have in the eBay store just contact them before paying and they will add it to you order. As [member=25351]rst[/member] stated they have great service.

RMW
 
Yesterday was the perfect spring day at the shore, blue sky and 60's. The boss was away and, upon serious consideration of the day's potential it was, ahem, decided that finishing the honey-do's was not the highest and best use of the day. I'll take my beating like a man when she gets home.

First order of business was the make the long-anticipated material stop/support for the Milwaukee cold-cut saw (+/- 1 hour):

[attachthumb=1]

[attachthumb=2]

[attachthumb=3]

[attachthumb=4]

Next I cut all the 80/20 for the cart (+/- 45 minutes):

[attachthumb=5]

Then clamped everything to power tap the ends (+/- 20 minutes):

[attachthumb=6]

Finally drilled the access holes (this took over an hour as it required thinking):

[attachthumb=7]

[attachthumb=8]

Finally dry-fit assembly (about 90 minutes):

[attachthumb=9]

[attachthumb=10]

[attachthumb=11]

And, for those of you who can't avoid being distract by shiny red objects in the background, somewhere around 2:00 I tossed a 4# top round roast on the Joe, and around 4:00 finished it off with the reverse sear. Yes, it was as delicious as it looks, sliced thin and served with au jus on fresh rolls.

[attachthumb=12]

Lessons learned:

  • The time spent on the saw was well worth it, the cuts were perfectly square and each batch of extrusions exactly the same length, critical when it comes time to assemble it all.
  • The plans were a good guide but it was necessary to triple check everything before cutting/drilling. Only after the project is complete will the printed plans truly be complete and accurate.
  • The dry-fit assembly is a necessary step, now I can measure the exact size of the plywood panels from the cart, then cut to fit.
  • Time passes fast when you are working on a project long in the planning.

Off to get some plywood!  [thumbs up]

RMW
 

Attachments

  • ScreenClip [2].png
    ScreenClip [2].png
    1.8 MB · Views: 3,667
  • ScreenClip [12].png
    ScreenClip [12].png
    2.7 MB · Views: 2,072
  • ScreenClip [11].png
    ScreenClip [11].png
    1.6 MB · Views: 5,768
  • ScreenClip [10].png
    ScreenClip [10].png
    1.3 MB · Views: 4,482
  • ScreenClip [9].png
    ScreenClip [9].png
    1.8 MB · Views: 7,670
  • ScreenClip [8].png
    ScreenClip [8].png
    1.8 MB · Views: 1,973
  • ScreenClip [7].png
    ScreenClip [7].png
    1.4 MB · Views: 2,180
  • ScreenClip [6].png
    ScreenClip [6].png
    1.5 MB · Views: 3,230
  • ScreenClip [4].png
    ScreenClip [4].png
    1.2 MB · Views: 3,519
  • ScreenClip [5].png
    ScreenClip [5].png
    1.7 MB · Views: 3,276
  • ScreenClip [3].png
    ScreenClip [3].png
    1.5 MB · Views: 2,133
  • ScreenClip [1].png
    ScreenClip [1].png
    1.7 MB · Views: 2,416
Damn you! First, tempting us with those fine aluminum extrusions, but then that nice roast.... Thankfully no shot of a tasty brew! Looks great!
 
This looks incredibly sharp and well done.  I would really love to see you get some plans together  ;D ;D
 
supimeister said:
This looks incredibly sharp and well done.  I would really love to see you get some plans together  ;D ;D

Thanks [member=18813]supimeister[/member] - the plans are a work in progress - here's the evolution so far:

[attachthumb=1]

[attachthumb=2]

[attachthumb=3]

I'm learning that getting a usable, accurate set of plans (that could be used/understood by a 3rd party) involves actually making the thing on the plans and then going back and filling in the blanks afterwards.

This project pushed me over the edge to buy Sketchup Pro, now I am forced to put it to good use to justify the cost.

RMW


Attachments

  • ScreenClip [15].png
    ScreenClip [15].png
    657.3 KB · Views: 1,935
  • ScreenClip [14].png
    ScreenClip [14].png
    1.3 MB · Views: 1,970
  • ScreenClip [13].png
    ScreenClip [13].png
    1.6 MB · Views: 4,364
Super helpful - thanks for sharing! 

I would likely change one small thing for my own needs.  I want to be able to put my mft/3 on top of an 80/20 base and have it align with another mft/3. So rather than use the 1530 to create an mft/3-esque top, I would just use my mft/3 instead.
 
looks great so far, cannot wait to see the finished product.  Love the Komodo Joe as well, I am a BGE man myself.  keep the picks coming. 
 
[member=32513]m1sanbo[/member] - I had the BGE for 15 years, loved it but when it met it's demise last year (operator error) a crop of new eggs were available and I looked at them all. Fred's Music & BBQ in Shillington PA has the BGE/Joe/Primo so I could see them all side-by-side.

In the end I decided on the Joe mostly because of the new adjustable grates w/ceramic plates and I thought there was a touch better overall quality, but it is close. It didn't hurt that the Joe is about $100 less than the egg, but that was just a bonus. Having used both now I learned the Joe is much easier to reach and hold a low temp on (seals a little better), while the egg is easier to hit a 900 degree sear, and just generally a little better @ grilling.

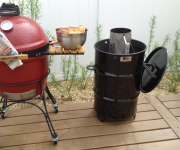
Here's Joe's country cousin, the latest addition to the fleet, a Pit Barrel Cooker. It followed me home (found it on my doorstep on Friday) & mom let me keep it...

[attachthumb=1]

[attachthumb=2]

2 5# chickens split in half yesterday, today there is a 10# brisket waiting to take the plunge  [drooling]. I love springtime! Made-in-America by a vet, 1-Click, 300 bucks, shows up 4 days later and the quality it awesome.

[member=28075]ivanhoe[/member] - hang tight, several tasty brews waiting for today's cook [poke] most likely some of the 2014 crop of Celebration Ale.

[member=18813]supimeister[/member] - nice job on the chop saw cart, but "inspired?"... Aw shucks...

Thanks,

RMW
 

Attachments

  • ScreenClip.png
    ScreenClip.png
    2.1 MB · Views: 1,136
  • ScreenClip [1].png
    ScreenClip [1].png
    1.3 MB · Views: 1,267
Richard  - The Pit Barrel videos look good. Are you liking it?

Please let us know?

Ron
 
rvieceli said:
Richard  - The Pit Barrel videos look good. Are you liking it?

Please let us know?

Ron

[member=3192]rvieceli[/member] - having trouble controlling the temp and getting the cook time down, most certainly operator error, as the reviews are all glowing.

Today's brisket cooked too fast (170 degrees in 2 hours) so I had to foil it too late (for 1 hour) then rest it for an hour & then tossed it back on to try to give it a bit of sear, overall it was tough and flavorless. Part of it may have been the piece of meat, it was from BJ's and only the flat, not a Prime cut. Looks like it is destined to simmer in some au jus before using the rest for sammiches.

Par for the course with a new smoker. The only other brisket I have done (on a kamado) slow smoked overnight and was a full packer brisket from Amish country, so it does not really compare. That piece of meat had all of us making nummy noises when we sampled it.

The issue I have so far is the instruction on settings are dumbed-down in an attempt to make them foolproof. They tell you @ sea level to set the bottom damper @ 1/4 open, but since it is a circular opening with the cut out as the damper it is hard to tell what is really "1/4 open".

Similar issue yesterday with the chicken but in reverse, they cooked over 3 hours but were still 125 degrees. I started with the damper more closed-down, then tried to raise the temp by opening it up. I finished them off in a 325 degree oven out of frustration. the meat was very moist with a great smokey flavor.

Time will tell, most probably I just need to learn how to use it properly.

RMW

 
Last weekend I set up to start cutting plywood, made one squaring cut and BLAMMO!! the CT hose pulled the TS off the top of the stack of BS I had set it on and it got to take a trip to the Festool day-spa. About $100 later it should be heading home next week.

So instead of finishing the MFT/SYS cart I got a wild hare and decided to add to the fleet:

[attachthumb=1]

[attachthumb=2]

This should be a multi-purpose cart, 3-4 drawers with one tall enough to hold the routers and my small spindle sander along with some mounting plates. I plan to add a folding wing that the routers, jig saw and sander can drop into and this will also be my router table, etc. I'm interested in any idea anyone has along those lines for bench-mounting power tools.

The interesting thing is, as I eyeball and estimate how much storage I will get from these 2 carts, it looks like I will be able to lose some of the stationary cabinets.

Off to the ShopBot "camp" tomorrow here in SNJ, whetting the appetite from more CNC tools.

RMW
 

Attachments

  • ScreenClip.png
    ScreenClip.png
    2.1 MB · Views: 3,574
  • ScreenClip [1].png
    ScreenClip [1].png
    1.4 MB · Views: 4,477
rvieceli said:
Richard -check out this thread by Scorpion on garagejournal:

http://www.garagejournal.com/forum/showthread.php?t=174553&page=31

Mini tables start on page 31

Thanks Ron. I had seen that thread a while back, probably before those tables were made. IIRC that thread cost me several hours of my life, too many great ideas to absorb in a short time.  [doh]

That is basically what I was looking to do, need to spend some more time reviewing the thread again, there is a lot more to it that when last I looked.

Thanks again.

RMW
 
Back
Top