Yet Another Modified Paulk Style Workbench - Using Shaper Origin for Templates

sandy

Member
Joined
Feb 4, 2008
Messages
115
I had purchased a Shaper Origin when it was introduced at the Festool Connect in Lebanon in 2017, but I never took the time to figure out how to use it.  I have also purchased Ron Paulk's Workbench plans (both the originals and the Compact versions), but I do not have a van or pickup truck, so I knew that even the "Compact" one would not fit into my SUV.  I recently decided to learn how to use my Shaper Origin along with Fusion 360 to build a SubCompact version of Ron's workbench.  After reviewing the plans for the Compact (3' x  6') Workbench, I realized that by reducing the size to 29" x 68" I would need only one sheet of 1/2" plywood, rather than the two sheets specified in the Compact Workbench plans.  As the sides require four oval cutouts, and the ends and center require an additional three ovals, I decided to make templates of 1/2" MDF to pattern rout the two different sized oval cutouts, and I decided to design the templates as my first Fusion 360 / Shaper Origin project.

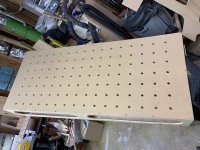
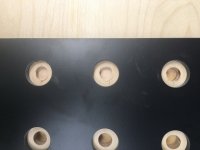
For the top I decided to use 3/4" MDF, rather than 3/4" plywood, as I thought it would result in a flatter, more durable top.  I had previously come up with an interesting way to form an MFT-style top (20mm holes on 96mm centers) that I would also like to share here.  I start with a slightly oversized piece of MDF.  Using my TS55 and a long rail I cut a straight edge along the long dimension.  Using a TSO guide I then cut a square corner.  Next, I determine the number of rows/columns of 20mm holes that I will be drilling.  As the table has a cross support in the middle, it meant that I would need an even number of holes in the long dimension in order to avoid having holes drilled into the center support, so the next step is to convert the finished length (68") of the top to 1727 mm.  Dividing that by 96mm tells you that you can have 18 holes (You actually get 17.99 which means 17 holes, plus the start hole).  17 x 96mm = 1632 mm, plus the extra 20 mm, gives you 1652 mm along the length of the top, so that means that you will have (1727 - 1652)/2 = 38 mm to the center of the first hole from the edge.  As I thought that 38 mm would be too close to the edge to be of any real use,  I added 96 mm to that to get 134 mm to the center of the first hole, while still having an even number of holes, now 16, rather than 18.  Similarly, I determined that I could have 7 holes in the shorter (29" dimension) with the first hole being 70 mm from the longer edge.  Given that the first 20mm hole will be 134mm from the short edge and 70mm from the long edge, I now placed a mark at that point.

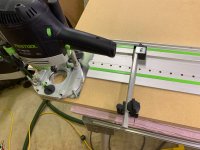
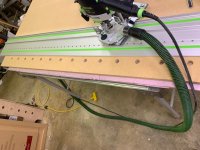
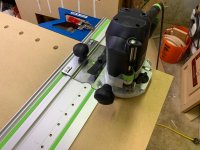
Next, using a long "holey" rail, my OF1400 router with a 20mm bit, the LR32 system, and the TSO square guide, I laid the rail on the top, and I aligned the tip of the 20mm bit with the mark for the first hole.  I then slid the TSO guide against the top, and clamped the rail to the top.  At that point I proceeded to drill the 16 holes along the top, knowing that they would all be aligned with the long edge of the top.  Once the first row of 16 holes had been drilled, I needed to drill the additional six holes in each of the 16 columns.  To do that I switched to a shorter "holey" rail.  The trick to getting all of the column holes in the correct location is to plunge the 20mm bit through the bottom of the router, and to place it into the first hole that was drilled into the top.  Next, place the LR32 plate onto the rail and insure that it snaps into one of the holes.  Now slide the TSO guide against the long edge of the top, and clamp it in place.  Once you have done that you will be able to complete the top with no further changes in the location of the TSO guide.  You can now drill the remaining six holes in the first column.  Next, and for the remaining columns, you will plunge the bit, place it into the first hole of the next column, and slide the rail, with the attached TSO guide into position, and drill the remaining holes in each column.  Once the top has been completely drilled, it is attached to the base, and a pattern router bit is used to trim the top to the size of the table.

 

Attachments

  • IMG_1221.jpg
    IMG_1221.jpg
    914.9 KB · Views: 753
  • IMG_1241.jpg
    IMG_1241.jpg
    658 KB · Views: 4,866
  • IMG_1242.jpg
    IMG_1242.jpg
    668.7 KB · Views: 692
  • IMG_1243.jpg
    IMG_1243.jpg
    695.8 KB · Views: 650
  • IMG_1249.jpg
    IMG_1249.jpg
    742.6 KB · Views: 594
  • IMG_1253.jpg
    IMG_1253.jpg
    726.4 KB · Views: 828
Nice work.  Did you use the Festool branded 20mm bit?  Those holes look super clean -- no burning at all, which I experienced boring MDF using the Bosch bit no matter what speed or plunge rate I used.
 
Yes, I used the Festool 20mm router bit, and the holes came out very smooth.  I also use a pink foam "spoil board" under the MDF when I plunge the holes.  Let me know if you need the Festool bit part number.  If so, I will check it when I next go to my shop.
 
Nicely done, I still haven't had time to do anything beyond some diameters in acrylic and play with the grid function.  Or learn Fusion
 
ear3 said:
Did you use the Festool branded 20mm bit?  Those holes look super clean -- no burning at all, which I experienced boring MDF using the Bosch bit no matter what speed or plunge rate I used.

I also used the Festool 20 mm bit on a 1400 and a Woodpeckers template on 18 mm BB ply. All holes were clean with no burning what-so-ever.  [big grin]. High recommend.
 
Nicely done. I've made a few tops now using the LR32 system. My method involves starting with an oversized top and some tall dogs. It's time consuming but the results are dead on. I think your Shaper could've easily handled the 96mm grid of 20mm holes.

Shaper is on my 'want' list some years down the road. I think I'll learn Fusion 360 before even considering a purchase so I can hit the ground running. Also need to dream up some real usage scenarios so it doesn't just sit there.
 
I have now made three tops using the LR32/TSO Guide Rail Square/OF1400, and while I have other jigs and systems that I could use (including the Parf Guide II), I am convinced that the combination of tools and method that I described is, by far, the quickest and most accurate way to make an MFT style top.  Also, unlike some other methods, there is very little wasted MDF, whereby I can easily make three MFT/3 tops out of a single 4’ x 8’ sheet of MDF.

Using the Parf Guide requires numerous positionings to lay out the initial 5 mm “pilot” hole grid, followed by further numerous positionings of the drill guide to drill the 20 mm holes.

Using other jigs also requires that they be repositioned numerous times, and the final holes are drilled, rather than plunge routed.  The jigs that do use a router do so with oversized holes that are then pattern routed in multiple passes, and they also require repeated repositioning of the jig.

By using the LR32 system each hole is plunge routed to 20 mm in a single plunge, and the number of repositions of the rail are minimized, as they are limited to a first series of holes for the initial row, adjacent the long edge, followed by additional repositions for each column.  Also the method is self-aligning, so it is as accurate as the LR32 spacing and the “squareness” of the TSO GRS.

Using my Shaper Origin would require multiple passes for each hole, an oversized blank, and a lot of Shaper tape.

As I still have a 32” x 48” piece of MDF, I may make another new MFT/3 too in which case I will time how long it takes to do so.

Sandy
 
sandy said:
I am convinced that the combination of tools and method that I described is, by far, the quickest and most accurate way to make an MFT style top. 

Using other MFT jigs requires that they be repositioned numerous times, and the final holes are drilled, rather than plunge routed.  The jigs that do use a router do so with oversized holes that are then pattern routed in multiple passes, and they also require repeated repositioning of the jig.

I've made just 1 MFT with a Woodpeckers template and I agree with your assessment 100%.  [big grin]  [thumbs up]

I started off using the Woodpeckers preferred method of using a 1/2" bit to produce a 20 mm diameter hole. This is what can happen if you don't check every single hole for roundness before you move the template.

[attachimg=1]

This method is so slow and so cumbersome that I modified the Woodpeckers centering ring and used a Festool 20 mm router bit instead.

And while the Shaper would easily make an MFT,  time-wise I think your solution would best the Shaper by a 2x-3x time factor. I'm just irritated I didn't think of this solution before I spent $180 on the Woodpecker stuff.  [sad]


Attachments

  • 5535.JPG
    5535.JPG
    766.1 KB · Views: 2,461
Great tutorial! It is nice having the TSO guide-rail squares - makes using the tracks so much more accurate! Thanks for the detailed explanation and pictures!
 
Great method and explanation! As I do not have the long holy rail, can anyone provide input as to how to follow this method with a short holy rail?

My initial thought is to follow the instructions and create a small grid within the reach of the small holy rail.  I then connect a normal rail to the small holy rail and follow the same steps using the normal rail to extend the reach of the small holy rail. This should provide the same accuracy if I take the time to make the rail connection is dead straight.
 
sandy said:
I have now made three tops using the LR32/TSO Guide Rail Square/OF1400, and while I have other jigs and systems that I could use (including the Parf Guide II), I am convinced that the combination of tools and method that I described is, by far, the quickest and most accurate way to make an MFT style top.  Also, unlike some other methods, there is very little wasted MDF, whereby I can easily make three MFT/3 tops out of a single 4’ x 8’ sheet of MDF.

Using the Parf Guide requires numerous positionings to lay out the initial 5 mm “pilot” hole grid, followed by further numerous positionings of the drill guide to drill the 20 mm holes.

Using other jigs also requires that they be repositioned numerous times, and the final holes are drilled, rather than plunge routed.  The jigs that do use a router do so with oversized holes that are then pattern routed in multiple passes, and they also require repeated repositioning of the jig.

Have you tried the Dominofix jig ?

I’ve used most , except the woodpecker - which I can tell without using is substandard.  The dominofix is by far the fastest, and mine is quite accurate. It uses a 20mm boring bit in one pass just like your lr32 setup.
 
[member=60392]JG[/member]

If you are only interested in making replacement tops for an MFT/3 table, the regular 1400 mm holey rail is all you need.  If you’re interested in making an MFT style top that is considerably longer, the long holey rail for the first row is best, but it’s not required, as you can...

1.  Use your rail and TS55 to create a known straight edge along the short side of your MDF.  Use the TSO Guide Rail Square and your rails, with connectors, to create a perpendicular cut on the long edge of the MDF.  You now have a known right angle corner.

2.  Place a mark at the center of where you want the first hole to be.  On an MFT/3 replacement top the mark would be 71 mm from each edge of the new corner.

3.  Lay the holey rail along the short edge, and space it from the short edge by the distance you determined the first column to be from the edge.  For an MFT/3 replacement top, that would be 71 mm.

4.  Use the LR32, the holey rail, OF1400, and 20 mm router bit to create the first column of holes after you have first placed the LR32 jig on the holey rail with its pin through a rail hole and confirmed that the tip of the 20 mm bit is lined up with the mark for the first hole.  Clamp the rail to the MDF, and plunge through the MDF, preferably with a foam spoilboard under the MDF, and the holes spaced at 96 mm (3 pin holes) apart.

5.  With the router off, plunge the 20 mm bit into one of the holes in the first column that you just created.  Then, slide the holey rail under the LR32 jig, and move the rail so that the pin on the jig goes into one of the holes in the rail.

6.  With the 20 mm bit in a hole and the LR32 jig sitting on the rail with a pin in one of the holes, attach the TSO Guide Rail Square to the holey rail, and slide it against the short, squared end of the MDF, then create as much of the row as the length of your holey rail permits.  Repeat for each hole in the original column.

7.  At this point you will have to extend the rows, but you know how far the first row must be from the long edge, so plunge the 20 mm bit, insert it into one of the holes in the first row, make the pin of the LR32 jig go into a hole in the rail, adjust the far end of the rail to the appropriate distance for the first row, e.g., 71 mm, and create the new holes for the first row.

8.  With the first row complete, follow the steps above to form the remaining columns.

9.  Cut the remaining short and long edges to their final dimensions.

Sandy
 
[member=67935]xedos[/member]

I have not tried the Dominofix jig, but from what I’ve seen it appears to be quite good, because it uses 30 mm holes sized for the 30 mm router guide, so you can simply plunge the 20 mm bit, as with the LR32.  Slight disadvantages of the Dominofix are that you have to move it after every four plunges, and, more significantly, it is a bit trickier to put the centers of the holes in the first row a distance other than 86 mm from the edge of the board, which means that an MFT/3 replacement top would have the first row of holes 76 mm from the edge, rather than the desired 61 mm from the edge.  That can be rectified by cutting the piece down after all of the holes have been routed.  Advantages of the Dominofix over the LR32 system is that, at $129, it is considerably less expensive than the LR32 system or a long rail for the LR32 and with the one jig there is no limit to the length or width of the top that you can make.

Sandy
 
It occurred to me that I can use my Shaper Origin to create a jig just like the Dominofix.  I have some 1/2” MDF in my shop that I can use to try it, although 1/2” phenolic would probably be better.  If I try it, I may address the issue I noted regarding placement of the initial hole so that it will match an MFT/3 top.  Also, I could try making them to use either a 30 mm or a 3/4” guide bushing.  As I’m still playing with Fusion 360 and the Shaper Origin this could be an interesting project to try, so if I try it, and if it works, is anyone interested in me supplying them?

Sandy
 
[member=37411]ear3[/member]

The 20 mm router bit that I use is Festool 491072.  It sells for $69.

Sandy
 
Back
Top