Your most disappointing woodworking purchase.

I forget the brand name, but the one we used to have, in the old shop, was Italian made. Maybe started with an "M"? I t was a 30" cut and 350mm blade?
The thing about it was, it had a safety cable that would restrict its movement. It worked very much like a seatbelt in a car, pull slowly and it moves just fine, jerk to quickly and it locked right up. It could not climb and accelerate.

They used it in the countertop department, cross-cutting 25" x 145" particle board slabs. In the new facility, they have a vertical panel saw to do that task now.

From what I ever heard, where most people got into trouble with RAS, was from turning the blade parallel to the back fence and ripping solid wood with it.
 
Crazyraceguy said:
I forget the brand name, but the one we used to have, in the old shop, was Italian made. Mayb started with an "M"? I t was a 30" cut and 350mm blade?
The thing about it was, it had a safety cable that would restrict its movement. It worked very much like a seatbelt in a car, pull slowly and it moves just fine, jerk to quickly and it locked right up. It could not climb and accelerate.

They used it in the countertop department, cross-cutting 25" x 145" particle board slabs. In the new facility, they have a vertical panel saw to do that task now.

From what I ever heard, where most people got into trouble with RAS, was from turning the blade parallel to the back fence and ripping solid wood with it.

I never made any rip cuts on my RAS, and I cannot contemplate making one in the future.

For picture framing, before I got my dedicated miter sliding table saw, the RAS excels.

Mount an aluminum framing square to a piece of particle board and use a 90 degree angle (square) to slice through the 90 degree angle yielding a 45 on either side.  Then add some washers under the square so it makes an effective fence for the rabbet on your picture framing moulding. 

The miters will be complimentary, even if imperfect.  So if one angle is 44.9 degrees, the other will be 45.1 degrees.  Assembled it will always be 90 degrees.  I used it for a while and it did a good job.  I’m pretty sure I had the angle set at 45/45, but my frames were alway exactly square.

But even as I cut angles, I kept my saw seeing at 90 degrees and I never change it. 
 
Packard said:
Mount an aluminum framing square to a piece of particle board and use a 90 degree angle (square) to slice through the 90 degree angle yielding a 45 on either side.  Then add some washers under the square so it makes an effective fence for the rabbet on your picture framing moulding. 

The miters will be complimentary, even if imperfect.  So if one angle is 44.9 degrees, the other will be 45.1 degrees.  Assembled it will always be 90 degrees.  I used it for a while and it did a good job.  I’m pretty sure I had the angle set at 45/45, but my frames were alway exactly square.

I have seen that done several times, by people who prefer to cut miters on a table saw, using a sled.
Many of the parts I have to cut are way too long for cutting like that, which is the point of a 120" table to one side of my miter saw station, and over 60" on the other.

The thing I don't understand is the hubris of miter saw manufacturers in the adjustment plate of the miter angles. They all seem to be a big half-circle with detents. They have some adjustment slots to move the ring, to bring the saw into square on the center detent, but if the 45 degree miter cuts are not accurate at that point, you are stuck. You can't adjust one parameter independently of the others.
My old DeWalt (3 saws ago) did have that feature, but they abandoned that in later versions, probably for $ reasons?
Even my new Makita has this problem. It wasn't off much, but getting the 45s right made the 90 not square. I fixed it with a couple of strokes of a file, but it shouldn't have to be like that.
 
The Lion Miter Trimmer (or the Chinese version) is the perfect resolution for that issue.  It can take slices off the miter so thin that you can use it as tracing paper.

It has a cam adjustment and once you lock it in, it stays locked in.  Be careful of the blades—they are really sharp.

I don’t use it the way he does in the video.  I bring blade to the closed position, push the stock against the blade.  Then I move the blade to the open position and I advance the material the very smallest amount that I can. I got pretty good at it.  When I was using it regularly, I could make those “tracing paper” thin slices with regularity.

The Chinese versions seem to be equal to the old made in the USA version, but the blades are not quite as good.  But still, a good solid piece of equipment.  It can be replaced by a good hand plane and a shooting board, but the miter trimmer is cheaper than a good plane, and it requires less skill.


P.S.:  When I started this thread I had no idea of the number of dissatisfied woodworkers there are.  If there are any retailers or manufacturers out there reading these threads, take notice.  You (collectively) need to do better.
 
Packard said:
P.S.:  When I started this thread I had no idea of the number of dissatisfied woodworkers there are.  If there are any retailers or manufacturers out there reading these threads, take notice.  You (collectively) need to do better.

I'm just waiting for a Triton Duo Doweller owner to post! I think that has to be the pinnacle of rubbish and/or utterly useless tools! ;-)
 
Crazyraceguy said:
...
The thing I don't understand is the hubris of miter saw manufacturers in the adjustment plate of the miter angles. They all seem to be a big half-circle with detents. They have some adjustment slots to move the ring, to bring the saw into square on the center detent, but if the 45 degree miter cuts are not accurate at that point, you are stuck. You can't adjust one parameter independently of the others.
My old DeWalt (3 saws ago) did have that feature, but they abandoned that in later versions, probably for $ reasons?
Even my new Makita has this problem. It wasn't off much, but getting the 45s right made the 90 not square. I fixed it with a couple of strokes of a file, but it shouldn't have to be like that.
There must be something making that impractical/limited.

Otherwise, I would expect the KAPEX to have an option/accessory/upgrade to support that instead of a dedicated saw - the Symmetrix - being made to address the use case. Metabo also makes an analogue to the Symmetrix, so it is not just Festool.

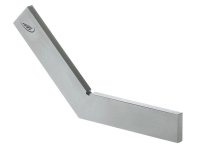
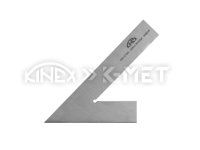
One thing which comes to mind is ignoring the detents and just using a 45˚ or 135˚ "square" when truly exact cuts are needed:
View attachment 1View attachment 2

Never got along the concept of "detents" and "accuracy" going together.
luvmytoolz said:
I'm just waiting for a Triton Duo Doweller owner to post! I think that has to be the pinnacle of rubbish and/or utterly useless tools! ;-)
Their "CMS" system should come atop of that.

I am oh so grateful to the poster who rightly trashed their modular system just about the time I was to get it ..
 

Attachments

  • 4006-02-200-max-1000.jpg
    4006-02-200-max-1000.jpg
    26.4 KB · Views: 37
  • H0395137-max-1000.jpg
    H0395137-max-1000.jpg
    25.3 KB · Views: 36
mino said:
I am oh so grateful to the poster who rightly trashed their modular system just about the time I was to get it ..

That might have been me.  I was tempted to use the TWX7 Workcentre as my contribution to this list, but decided the Holzmann HOB 260NL had a higher frustration factor.
 
Crazyraceguy said:
Packard said:
Mount an aluminum framing square to a piece of particle board and use a 90 degree angle (square) to slice through the 90 degree angle yielding a 45 on either side.  Then add some washers under the square so it makes an effective fence for the rabbet on your picture framing moulding. 

The miters will be complimentary, even if imperfect.  So if one angle is 44.9 degrees, the other will be 45.1 degrees.  Assembled it will always be 90 degrees.  I used it for a while and it did a good job.  I’m pretty sure I had the angle set at 45/45, but my frames were alway exactly square.

I have seen that done several times, by people who prefer to cut miters on a table saw, using a sled.
Many of the parts I have to cut are way too long for cutting like that, which is the point of a 120" table to one side of my miter saw station, and over 60" on the other.

The thing I don't understand is the hubris of miter saw manufacturers in the adjustment plate of the miter angles. They all seem to be a big half-circle with detents. They have some adjustment slots to move the ring, to bring the saw into square on the center detent, but if the 45 degree miter cuts are not accurate at that point, you are stuck. You can't adjust one parameter independently of the others.
My old DeWalt (3 saws ago) did have that feature, but they abandoned that in later versions, probably for $ reasons?
Even my new Makita has this problem. It wasn't off much, but getting the 45s right made the 90 not square. I fixed it with a couple of strokes of a file, but it shouldn't have to be like that.

When I bought my DeWalt 12” miter saw, most of the other options had as-cast detents.  The DeWalt had a plate with stamped detents.

The as-cast was inherently inaccurate; the stamped plate was inherently repeatable, and assuming the stamping die was made correctly, inherently accurate.

I’m of the opinion that the as-cast was a good starting point, with machining needed to finish it off.
 
For a framer or home-gamer, they would probably never even question it (or know it was adjustable) and things would be fine for the life of the tool.
I use an SCMS in a much more precise (yet still higher volume) than most users ever would.
From what I have seen, all of the modern ones have the stamped detent plates, but you are literally at the mercy of "acceptable manufacturing tolerances" at that point.
For 98% of users, it's good enough.
Thankfully, the detents are somewhat trapezoidal and spring-loaded. This allows for some very slight widening of the stamped notch. It was enough to get the 90 degree cuts perfect after moving the whole plate to get the 45s right too.
 
Packard said:
The Lion Miter Trimmer (or the Chinese version) is the perfect resolution for that issue.  It can take slices off the miter so thin that you can use it as tracing paper.

It has a cam adjustment and once you lock it in, it stays locked in.  Be careful of the blades—they are really sharp.

Indeed - and don't forget that the blade has a cutting edge on both ends. Care and concentration required, as ever!
Further, I can confirm, from recent experience, that this device will slice through flesh and bone with contemptuous ease. (My first serious woodworking incident... though I got off way more lightly than I might have done, thanks in no small measure to the UK's wonderful National Health Service.)
 
The real issue with those trimmers is that they are for perfecting the joint. They will not cut the miter in the first place, something else has to do that and get reasonably close to size, before they come into play.
 
Crazyraceguy said:
The real issue with those trimmers is that they are for perfecting the joint. They will not cut the miter in the first place, something else has to do that and get reasonably close to size, before they come into play.

Absolutely.  They were the perfect accessory to the old Stanley miter saw (manual saw).  It was discontinued about 40 years ago, but I think Ive seen it advertised lately.

It is basically a substitute to a shooting board.  But requires less money and less skill.  And it is for correcting poor miters or square cuts. 

When I first started picture framing, I used it regularly.  The demands on miters for picture framing is much higher than for woodworking.  Wood working joints get sanded and finished after assembly.  Picture framers miters get glued only.  You have no opportunity to fix anything after the cut.  The moldings are pre-finished and sometimes very expensive.  I used to use a lot of gold leafed moldings (real gold).  If you are charging someone $20.00 to $40.00 per foot for molding, your miters had better be good. 

On the other hand, I would use decorative molding to finish off mat boards.  These are very small profiles.  I would use an anvil cutter (designed for pruning bushes) to get an approximate miter and use the Lion trimmer to make the actual cut.  The trimmer is capable of cutting small profiles without pre-cutting.

There are (expensive) miter cutters that use a guillotine but takes small bites at a time.  They are popular for frame shops in malls and there is no noise.

These are made in ??Sweden?? (I am not sure) by Morsø.  They always (always) turn out perfect miters.  The only real disadvantage compared to saws, is that they cannot cut aluminum (poster) moldings and they are slower (but silent).  Very nice stuff.

I have not priced these out in the last 30 years, but they were never cheaper that a high quality saw like the Hoffman saw. 

They yield very smooth (almost polished) cuts.  I’ve always wondered if that super-smooth finish affected the strength of the glue joint.  I have no idea.


When I was in college I was a helper at a one-man framing shop.  He used a Stanley manual miter saw (very good) and a Lion miter trimmer.  The drums of death beat for the Stanley, as it cost more than the motorized miter saws of the 1970s.

But a cool piece of equipment.
 
Euclid said:
Packard said:
The Lion Miter Trimmer (or the Chinese version) is the perfect resolution for that issue.  It can take slices off the miter so thin that you can use it as tracing paper.

It has a cam adjustment and once you lock it in, it stays locked in.  Be careful of the blades—they are really sharp.

Indeed - and don't forget that the blade has a cutting edge on both ends. Care and concentration required, as ever!
Further, I can confirm, from recent experience, that this device will slice through flesh and bone with contemptuous ease. (My first serious woodworking incident... though I got off way more lightly than I might have done, thanks in no small measure to the UK's wonderful National Health Service.)

I think because it has no motor, is totally silent, and has no hand guards, people treat the miter trimmer with less fear and awe, than they do a table saw, band saw or radial arm saw.

I “discovered” how sharp they are by handling the blade for installation into the device (the blade just came back from the sharpening service).

The scariest blade I have ever seen was at a paper mill. The cutting area was about 6 feet wide and its purpose was to slice through a stack of paper about 2 feet high.  The blade itself was about 8 feet long and about 6 inches thick.

The blade came down with a resounding “woomf” as it cut cleanly through the stack of paper.  As the cut was finished, I saw one member of out tour group standing off to the side throwing up.

The tour guide said that they averaged 1 or 2 people throwing up on each tour.  I can’t imagine what the process was for re-sharpening that blade.
 
smorgasbord said:
=KVArf6YYTaUtvrSq


My regret is that she placed the camera low and angled up so for the entire video I am looking up into her nostrils.

If you are doing a video and it includes a person, make certain that the camera is level and adjust the height of the camera to get the right view of the person. Don’t aim up.

Also, don’t aim down, especially if the subject is bald. [eek]
 
Cheese said:
Ya, I still own a RAS...a Dewalt/Black & Decker 12"...I'm the original owner since the 70's...anyone want to purchase it?

Maybe. Which model?

I'm one of the Luddites that still likes and uses the RAS. I have two DeWalts, one from the early 60s and one from just after WWII (46 or 47, I can't remember without looking up the serial number again). I much prefer the RAS to either a table saw or SCMS for crosscut work. And, yes, I rip with it from time to time. It's easy to do wrong, but if you read the labels on the saw and use the tiniest bit of thought and logic, it's as safe or possibly even safer than a table saw. My little MBC will be one of the last tools out the door when the time comes for me to let go of things.
 
Packard said:
My regret is that she placed the camera low and angled up so for the entire video I am looking up into her nostrils.

Maybe she's just really tall with a limited tripod? Hey, maybe her short tripod is our biggest regret?  [wink]
 
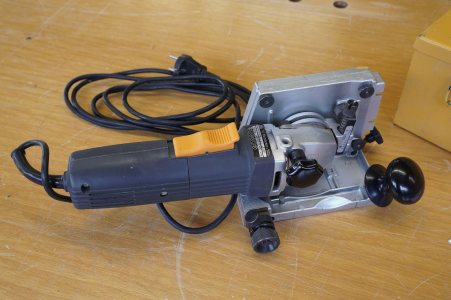
ELU DS140 ...can also cut longer slots for home made biscuits, or use it a small circular saw with a fence, which is something I've used it as a massive amount. And the micro adjustment is next level stuff.

If you ever see one second hand, they're well worth getting.
I'm always interested in discontinued tools that are worth getting, but as I already have a Lamello Top-20 bought decades ago, not sure what this would add. The Top-20 also has a "blade distance from base" adjustment mechanism that is actually calibrated in mm with detents, and can plunge deeply for the largest S-6 biscuit. Would the Elu add the ability to use it as a small plunge saw? The Top-20 has a reasonably strong spring mechanism so you can't plunge and then move the tools, you take separate plunges along a track.
 
Would the Elu add the ability to use it as a small plunge saw?
Absolutely, this is exactly how I use mine to cut grooves, undercut door jambs, etc. It's unique in that unlike every other biscuit joiner it actually pivots just like a plunge saw. For grooves just use the fence or a timber clamped as a guide and set the depth, to undercut door jambs, flip it on it's side, and set the height and go for it.

The fine height adjustment is on the left in the pic, and if undercutting jambs allows you to get the bottom of the blade within roughly 4-4.5mm off the floor, plus the 4mm blade thickness, so 8.5-9mm minimum cutting height roughly from memory. Depth is fully adjustable with the adjustment screw to the right in the pic.

The entire motor body can also be set in any position with the large locking black knob you can see near the motor vent, so in a tight spot you can set the motor at a 90 degree angle to the plate for minimum room required. When I did the herringbone wall panelling, I used this tool to trim the edge of them to give the correct amount of clearance to be able to fit the panelling on the adjacent wall. Not sure how I would have done that with any other tool to get a perfect narrow slot the entire way floor to ceiling. I bought mine new when it was first released and I've never been tempted to sell it even though I rarely ever do biscuits anymore, it's just too uniquely handy. It also comes as standard with the fence, a 45 degree base, and a zero clearance insert, as well as a dust collection attachment.

Especially considering the age, there's an insane amount of engineering design and thought that went into this unique tool.
 

Attachments

  • elu.ds140.png
    elu.ds140.png
    2.3 MB · Views: 0
Last edited:
Back
Top