Zebrawood (Bocote)/Maple Step-Stool w/ Dovetail Joinery

DavidCBaker

Member
Joined
May 31, 2010
Messages
537
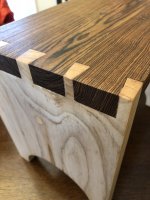
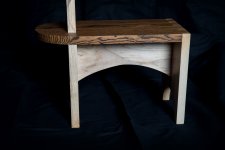
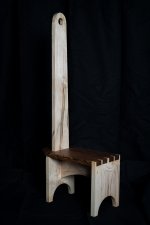
Just finished this. Maple and zebrawood (I think--I just grabbed a piece lying in the garage). Used some dovetail joinery with a Leigh Jig and the OF 1400. I don't have a table saw or bandsaw in the current shop, so there were some challenging moments. The coolest discovery (for me) was finishing it, after sanding, with several coats of Festool's heavy-duty waterproof oil, using a polisher between coats. Super easy to apply and after drying it is surprisingly tough/durable. I love the look of it, too. I may be using that more in the future. It really brings out the wood and it's so simple and easy.

[attachimg=1]

[attachimg=2]

[attachimg=3]
 

Attachments

  • stool.angle.jpg
    stool.angle.jpg
    1.7 MB · Views: 1,590
  • stool.side.jpg
    stool.side.jpg
    1.6 MB · Views: 1,154
  • stool.upright.jpg
    stool.upright.jpg
    2.6 MB · Views: 1,521
David, very nice project! The dovetails look great and I think that wood might be bacote, sure looks like it. Great photos as well!
 
duc996 said:
David, very nice project! The dovetails look great and I think that wood might be bacote, sure looks like it. Great photos as well!

You are absolutely right. I changed the heading. :) I need to label my wood!!!! Another hobby is photography.

Thanks!
 
David said:
duc996 said:
David, very nice project! The dovetails look great and I think that wood might be bacote, sure looks like it. Great photos as well!

You are absolutely right. I changed the heading. :) I need to label my wood!!!! Another hobby is photography.

Thanks!

It shows, the photos look great!
 
Very nice.

However, I can't see the detail of the wood or dovetails with pictures of the size in the original post.  It is like looking at a 4" x 6" print.

This is an example of why I prefer thumbnail pictures.  With thumbnails, one click and the picture is enlarged enough to see detail.  A second click and the picture is even larger.
View attachment 1


Attachments

  • stool.angle.jpg
    stool.angle.jpg
    1.7 MB · Views: 223
Nice job...love the contrasting woods. Also like the Ambrosia Maple, I'm currently making some drawer fronts from the stuff.

I find myself gravitating to the SurFix system more & more. It started with Outdoor oil on teak garden furniture, then One-Step oil on maple drawer boxes and then some Outdoor oil on a walnut kitchen countertop.

Curious what wood you used for the plug on the front of the stool?
 
Michael Kellough said:
Very nice! Usually don’t like contrasting wood colors but this looks great.

TY, Michael. I always like contrasting wood colors, for some reason. It's an addiction for me.
 
RobBob said:
Very nice.

However, I can't see the detail of the wood or dovetails with pictures of the size in the original post.  It is like looking at a 4" x 6" print.

This is an example of why I prefer thumbnail pictures.  With thumbnails, one click and the picture is enlarged enough to see detail.  A second click and the picture is even larger.
View attachment 1

Is this better? I didn't realize the distinction in how to post photos. Just shot this with my iPhone. I'm hesitant to let you see TOO much of it--my mistakes are going to pop out! :)
 

Attachments

  • IMG_0324.jpg
    IMG_0324.jpg
    1.8 MB · Views: 329
Cheese said:
Curious what wood you used for the plug on the front of the stool?

I used a maple plug, but apparently it's a lighter maple. I wanted to make my own plugs, but I had trouble getting the cutter to work.
 
David said:
RobBob said:
Very nice.

However, I can't see the detail of the wood or dovetails with pictures of the size in the original post.  It is like looking at a 4" x 6" print.

This is an example of why I prefer thumbnail pictures.  With thumbnails, one click and the picture is enlarged enough to see detail.  A second click and the picture is even larger.
View attachment 1

Is this better? I didn't realize the distinction in how to post photos. Just shot this with my iPhone. I'm hesitant to let you see TOO much of it--my mistakes are going to pop out! :)

Much better.  You can really see how beautiful the wood is now, too.  Thanks for posting.
 
duc996 said:
David, very nice project! The dovetails look great and I think that wood might be bacote, sure looks like it. Great photos as well!

I agree - it looks like Bocote rather than zebrawood to me - it's the end grain and the appearance of the flat sawn grain on the edge that make me think that, plus the overall color seems a little darker than zebrawood.
 
HarveyWildes said:
duc996 said:
David, very nice project! The dovetails look great and I think that wood might be bacote, sure looks like it. Great photos as well!

I agree - it looks like Bocote rather than zebrawood to me - it's the end grain and the appearance of the flat sawn grain on the edge that make me think that, plus the overall color seems a little darker than zebrawood.

Yep, absolutely. I blew that one. I need to label my wood scraps. Or just pay more attention! :)
 
David said:
I used a maple plug, but apparently it's a lighter maple. I wanted to make my own plugs, but I had trouble getting the cutter to work.

[member=8542]David[/member] Firstly I like the look of that step stool and will have to make something similar for my good lady when we finally move house.
( fed up with getting the small step ladder out when she wants to sort kitchen wall cabinets out  [big grin] ).

Secondly: Plug cutters can be infuriating, tried various types and they all seem to work best in a good drill press but I have had to use portable presses in the past with variable results and even had a go freehand that led me to a nice little cheat.
Get a strip off wood around between 6 and 10mm thick (1/4 to 3/8") and cut through with the plug cutter then use this strip as a guide to cut the required plugs.

Lastly: Keep all offcuts from the boards being used to try and better match the grain, it will never be perfect but wood from the same board will be the closest and if the plug cutter is of the tapered variety cut from the opposite side than the face material to help with growth ring orientation. Some timbers can be easy to match but Maple can be a pig to do.

Rob.
 
Excellent thoughts, sir. Really appreciate it. I've pretty much decided that I need a drill press to do this well. I like your others ideas, too.
 
Rob-GB said:
Secondly: Plug cutters can be infuriating, tried various types and they all seem to work best in a good drill press but I have had to use portable presses in the past with variable results and even had a go freehand that led me to a nice little cheat.
Get a strip off wood around between 6 and 10mm thick (1/4 to 3/8") and cut through with the plug cutter then use this strip as a guide to cut the required plugs.

All good info... [big grin]

A drill press is a must for cutting hole plugs. Because it feeds the bit perpendicular to the surface once it cuts through the strip it releases the plug evenly and it's captured in the plug cutter. Here's a strip of Jatoba and you can see how uniform all of the holes are. This strip is 1/4" thick.

The second photo is a shot of some Jatoba border that has Jatoba plugs in it. The photo was taken from 4"-6" away and you can barely see the plug. At normal vision levels, say 5' to 6', the plugs are invisible.
 

Attachments

  • 5253.jpg
    5253.jpg
    2.5 MB · Views: 286
  • 5277.jpg
    5277.jpg
    2.1 MB · Views: 268
Back
Top