#3 Cherry Castoffs Telescope Accessories Box.

HarveyWildes

Member
Joined
May 3, 2016
Messages
984
I bought a bunk of #3 cherry about 14 years ago - drove out to Iowa and filled up a horse trailer.  I was building our house at the time and bought enough to do the trim and the interior doors, plus extra.  Well I got to the trim, but not the doors, so I still have half a bunk left.  My son needed to do some trim recently, so he came up and got some, but he put a few boards off to the side.  He thought they were too bad to be used for anything, so I took the challenge.

These are the boards I started with.
 

Attachments

  • Box_Boards_1.jpg
    Box_Boards_1.jpg
    716.9 KB · Views: 206
  • Box_Boards_2.jpg
    Box_Boards_2.jpg
    548.5 KB · Views: 215
Next I filled all the voids with epoxy, dyed black, and glued them up.


Attachments

  • Box_Boards_3.jpg
    Box_Boards_3.jpg
    1.2 MB · Views: 211
  • Box_Epoxy_Kit.jpg
    Box_Epoxy_Kit.jpg
    1,010.8 KB · Views: 198
Next the box joints.  This is a tool box, so I wanted a working box look.

I used a splitter on my dust extractor to hook up both the router and the Leigh dust collection accessory on my router jig (PC, the inexpensive version).  Attaching the hose to the Leigh accessory was ugly but it held out for all of the cuts.

Note that the box joints don't extend over the whole side.  That is to allow me to cut out a section for a drawer front - see finished pictures below.
 

Attachments

  • Box_Router_Setup_2.jpg
    Box_Router_Setup_2.jpg
    884.7 KB · Views: 219
  • Box_Router_Setup_1.jpg
    Box_Router_Setup_1.jpg
    1.1 MB · Views: 220
I tried to use the sap wood as a decorative feature on the top and bottom panels.  The top has an added piece for handle support.  I liked the top better before I added it.

Then the smoke hit.  This is the view from my shop of smoke from the Cameron Peak fire the day after I took the above picture.  Things calmed down a bit after that, but the fire blew up again a couple of days ago.  It's now the largest fire in Colorado history.  I'm watching for evac notices as I write - about 3 miles from our house at the moment.

Makes woodworking interesting.
 

Attachments

  • Box_Smoke.jpg
    Box_Smoke.jpg
    825.6 KB · Views: 217
  • Box_Top_Bottom.jpg
    Box_Top_Bottom.jpg
    1.5 MB · Views: 212
And here are pictures of the finished box.

The third picture shows the drawer detail.  I put a key at the back of the drawer to keep it from falling out, but the key can be removed to take the drawer out if needed.  There is a rounded domino on the front of the box that slips into the top to keep the drawer closed.  The drawers ended up being more smooth and tight than I had expected.

The last picture shows the box with stuff in it, including custom Kaizen foam inserts for the eyepieces and other stuff.

Note that I got several ideas from other makers, then added some features of my own.


Attachments

  • Box_Finished_1.jpg
    Box_Finished_1.jpg
    790.3 KB · Views: 268
  • Box_Finished_2.jpg
    Box_Finished_2.jpg
    1 MB · Views: 283
  • Box_Finished_3.jpg
    Box_Finished_3.jpg
    1.1 MB · Views: 227
  • Box_Finished_4.jpg
    Box_Finished_4.jpg
    1.3 MB · Views: 291
That's a really cool way to integrate the drawers.  And the finish really brings out the natural beauty of the wood.

Pic is a little small so it was hard to make out what kind of tools were in there -- what types of stuff is the box going to hold?

Scary to see the fires so close -- wishing you luck and perseverance.

 
What is in the compartment that slides out on the left? I was thinking filters, but looks like you don’t have astrophotography stuff there.
It’s very attractive, and will leave me unsatisfied with my Nanuk and Pelican cases for sure.
 
We ended up having to evacuate because of the Cameron Peak Fire.  We are back in our house, but are still under voluntary evacuation, so we're not unpacking much.  I hope to get to the bigger pictures in a few days.  Fortunately we haven't lost anything yet - just packed up a bunch of the important stuff into a car and a couple of trucks.  We had help from a son and good friends.  We feel like turtles carrying our house on our backs.

Important stuff in this case includes (because of extra space in one of the trucks) Festool, Veritas, and Lie Nielsen.
 
Nice job, would really like to see bigger photos if you can.

Good to see another astronomer using his woodworking skills. Many of my projects are now building telescopes (Dobsonians) or accessories for myself or friends.

Hope those fires stay away. A couple of years ago I was at the Texas Star Party when fires were close and the smoke effectively put paid to serious observing.
 
Hoping for the best.  Stay strong and stay ready.

HarveyWildes said:
We ended up having to evacuate because of the Cameron Peak Fire.  We are back in our house, but are still under voluntary evacuation, so we're not unpacking much.  I hope to get to the bigger pictures in a few days.  Fortunately we haven't lost anything yet - just packed up a bunch of the important stuff into a car and a couple of trucks.  We had help from a son and good friends.  We feel like turtles carrying our house on our backs.

Important stuff in this case includes (because of extra space in one of the trucks) Festool, Veritas, and Lie Nielsen.
 
The fires got between a foot and two feet of snow this weekend.  We are back in our house and have unpacked, so I don't feel like a turtle any more.  There is still some chance that the fires will kick back up in the next month - we had 6-8" back in early September and the Cameron Peak fire grew another 80,000 acres after that.  But I'm being an optimist and hoping that the this snow will allow firefighters to get the fires under control.  [member=37411]ear3[/member], thanks for the encouragement.

A huge thank you to all of the firefighters and other public servants who have worked on the NoCo fires this fall, and to all of you who help to keep the rest of us out of trouble.

So... I finally got larger photos up and posted to the above thread.  For those of you interested in the detail, you should be able to see more of it now.

[member=1170]Stan Tillinghast[/member], they are filters.  I don't do astrophotography, but I do attach filters to my eyepieces to enhance the views.  I got the Orion 20 piece set and I've been experimenting, but it's been limited because of the fires.

[member=72891]AstroKeith[/member], building a Dobsonian - awesome!  I'd like to see a thread on the woodworking for that.  And yup, the telescope views have pretty much sucked for the last two months.  I got one clear night (Oct. 6) to see Mars at its closest.
 
HarveyWildes said:
[member=72891]AstroKeith[/member], building a Dobsonian - awesome!  I'd like to see a thread on the woodworking for that.  And yup, the telescope views have pretty much sucked for the last two months.  I got one clear night (Oct. 6) to see Mars at its closest.

Great to hear you are OK, and the bigger photos are excellent. Nice job.

Might be easiest if I just give a link to my own website where the build and re-build of my telescope is described.
AstroKeith Dobsonian re-build
 
[member=72891]AstroKeith[/member] (and any other woodworker/astronomers), a question related to super-accurate woodworking for astronomy.

I have an Apertura (rebranded Zuhmell) 8" Newtonian scope.  I've been thinking about adding scales for azimuth and altitude that I can use to get the scope pointed in approximately the right direction without adding electronic controllers.  I have a couple of ideas.

Altitude.  My first inclination (bad pun) was to use a manual, homemade inclinometer.  Then I thought about a Wixey digital angle gauge.  The digital angle gauge should be accurate to better than 1/2 degree (one woodworker reported 12 arc minutes), which I think would be fine with me, and already has the magnets to attach to the tube.  To zero the gauge, I wouldn't even have to level the base, just the tube, which I would do with a level.  I'm not sure how accurate this step would be, but I would think I could get that to within 1/2 degree, for an overall error of less than 1 degree.  While that's not good enough for zeroing in on an object (or for a good 90 degree table saw cut), it should be fine for making sure that I'm in the right general neighborhood.  The alternative to the Wixey would be wooden inclinometer that would attach to the tube with rare-earth magnets, but it's hard to imagine that I could make a smallish one with more accuracy than the Wixey gauge.

Azimuth is a thornier problem.  I'm thinking of building a "secondary" 1" thick Baltic Birch base that my Dobsonian "primary" base would fit on  The secondary base would have a raised ring with an azimuth scale, and the primary base would have a pointer at 90 degrees to the axis of rotation of the tube.  I believe I can get at least 1/2 degree accuracy on the scale.  The problem is getting north on the scale aligned with true north, which I would also want to do to within 1/2 degree.  Any ideas would be appreciated.  I would try to build a robust levelling mechanism into the secondary base, so that I could depend on a flat surface for the primary base.

My inspiration is Tycho Brahe's set of instruments.  Apparently he was able to build instrument for measuring altitude and azimuth that were accurate to 2-6 arc minutes, depending on the instrument.  The instruments were built of wood and brass, and had scales on the order of 5 to 6 foot radius.  That seems like a worthy woodworking challenge for pushing the limits of naked eye observation.  (Some people think that Kepler did some underhanded scheming to get hold of Tycho's 30 years of measurements, they were so good.)  I don't know if I'll ever try to build something on that scale, but it seems like solving some basic problems for my Dobsonian mount would be a good first step.

At any rate, since you have tackled some thorny telescope mounting problems, I thought you might have some insight into what I'm thinking.

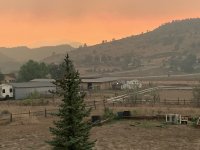
Also, fires are all 100% contained now, viewing is much better.
 
I think Azimuth is easier. I would make a ring that fits snuggly around your existing base board and has a lip or flanges to keep it in place (ie not dropping down). Mark your scale on the ring and put a pointer on the telescope rocker box base. Point the scope at Polaris and slide the ring around to 'zero'. If needed a thumbscrew could be added to the ring to 'lock' it to the base board. Although I think you could rout out the ring quite accurately and include some synthetic felt to add friction to keep it in place.

Altitude is more tricky and I suspect you dont want to add a cumbersome mechanism that has to be carefully re-attached etc?

The commercial inclinometer has many merits, not least it means the scope base dosent have to be accurately levelled. As you say you would probably get 1deg accuracy. But you have a finder scope and learning to then zero in on the object is all good practice!

If you wanted to stay mechanical, how about a toothed drive belt running over a pulley on the telescope altitude axis and another smaller one lower down on the rocker base. You could arrange a 1:4 ratio so a 360deg rotation of the pointer equals a 90 degree movement of the scope. The pointer scale could be made to rotate a little for calibration, perhaps again using Polaris.
 
Back
Top