5/8" mitered corner with Domino??

humantorch

Member
Joined
Nov 20, 2013
Messages
47
Hey all,
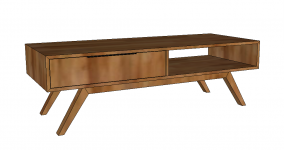
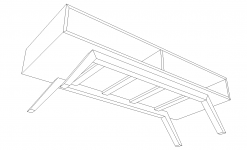
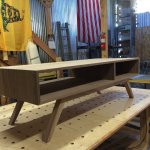
Wondering what the sensibility of using dominos in a 5/8" thick miter is. I'm making a coffee table aprox 22" x 60" and really want to miter the ends to get that waterfall effect. Problem was I had a pretty nasty 'snafu' with my planer and had to bring the walnut all the way down to just over 5/8" thickness. The body is comprised of 4" walnut strips and there is a divider/support in the center of the unit as well as a back on the part with the drawer.
This is my first time using dominos in a miter and I'm nervous to say the least. Any help would be greatly appreciated!!
Thanks
[attachimg=1]
 

Attachments

  • Screen Shot 2015-01-05 at 10.00.17 AM.png
    Screen Shot 2015-01-05 at 10.00.17 AM.png
    122.4 KB · Views: 2,178
[Disregard:    According to the accepted rule of thumb, domino should be no more than 1/3 wood thickness, so technically you are still in the clear with a 5mm domino.  If the dominoes are basically for aligning the boards during glue up rather than structural, I wouldn't be worried, though you could step down to 4mm as well.]

Update:  I see now that you mean for joining the sides (so structural) rather than aligning the boards.  The easiest way to see is to do a test run on a scrap piece planed to 5/8".  Make sure that the fence is set to the lowest possible depth setting, meaning, closest to the  inner part of the miter.  You may have no choice but to use 4mm dominos, which are 20mm long.  If you find they work, you have to be very careful during glue-up, and make sure you don't put a lot of excess glue in hole, otherwise there will be a hydraulic effect and you might blow out the wood.  Only apply glue to the domino itself.

Hypotenuse of 5/8" wood at 45 degrees is around 22.5mm, so you should be just under the limit with a 10mm plunge as close to inner edge as possible.  But again, test it out on scrap first.

I will have to defer to someone else though about the advisability of joining something this size with 4mm dominos, since I've only ever used a minimum of 5mm in similar builds
 
I would try a 4mm in a scrap piece before going to final project.
 
Thanks guys. I'll definitely be testing in scrap but I feel a little better about the integrity of the joint now. I just want someone to be able to sit on it and not make me look like a fool.  [eek]
 
I like the piece, it has a nice mid 20th century feel.

4 mm should work on the case. I would be concerned about the joint between the leg and stretcher.

Jim
 
If a 4mm tenon doesn't work, a stopped spline would.

I think I would find a way to reinforce the leg-to-stretcher joint. That looks like a certain point of structural failure.
 
Birdhunter said:
If a 4mm tenon doesn't work, a stopped spline would.

I think I would find a way to reinforce the leg-to-stretcher joint. That looks like a certain point of structural failure.

Thanks for the input! This is what I had in mind for the base structure...with the additional stretchers spanning the legs provide this support?[attachimg=1]
 

Attachments

  • Screen Shot 2015-01-08 at 7.42.24 AM.png
    Screen Shot 2015-01-08 at 7.42.24 AM.png
    44 KB · Views: 1,924
Do test pieces and you should get by fine.  Be very careful on how deep you set the Domino to route.  You may not "pop through", but you will get the hole so close to the surface that a puddle of glue at the end on the domino will cause the wood to swell up and telegraph thru.  I would even consider shortening the dominos a little.

Assembly --- I have been wanting to put a video together for quite some time and never have gotten around to it.  Assembling this type of structure can be difficult as you have to work so quickly to get the thing together before everything starts swelling from the glue and you can no longer draw it tight.    I use 4 sets of Blokkz clamps and lots of clamps as shown in this picture.
Source for the Blokkz clamps is Rockler. Link to Rockler Blokkz

Source for the steel rod (it is NOT pipe --- wrong exterior dimension) is Tractor Supply Link to tractor supply web page for steel rod

Look at the photo, I will insert it now and make an explanation
[attachimg=1]

Ok -- here goes!  What on earth are all of the clamps about?  First --- this is one corner of a chest of drawers that is 22" or so front to back, 24" across, 60" high.    MONSTER

2 of  Rocklers Clampit Squares are loosely clamped underneath Rockler Clampit Assembly Square    These are there for quality control purposes to keep an eye on what is going on there.  They really aren't visible although parts of clamps are showing.  I have gained enough confidence that I only occasionally do this now.

Four Blokkz clamps are at the edges and clamped with the red handled clamps and tightened (pads underneath) TIGHTLY

Middle 2  Blokkz clamps are laid in place with pads forward as shown.

Snake the pipes through the Blokkx clamps as shown (remember there are 2 pipes, 4 Blokkz on each)

Draw everything together by tightening the Blokkx clamps with the 4 Irwin Quick Grips.
DO NOT STICK FINGERS IN JOINT WHILE TIGHTENING [scared] [scared] [scared].  There are unbelievable forces at work here.

Why does this work??  That circle at the end of the Blokkx is eccentric and the whole thing is bringing the joint together with forwards and downwards pressure as the clamp tightens.  The middle clamps rotate on the steel rod

I see why I have not  gotten a video done.  I think I have put a half hour just into this reply and I already had the picture!

I wish every "gizmo" I have purchased exceeded my expectations like this .

I believe there are 12 clamps involved in this corner.  Rockler likes me!
 

Attachments

  • _MG_1361 720x480.jpg
    _MG_1361 720x480.jpg
    77.4 KB · Views: 1,737
RDMuller said:
Do test pieces and you should get by fine.  Be very careful on how deep you set the Domino to route.  You may not "pop through", but you will get the hole so close to the surface that a puddle of glue at the end on the domino will cause the wood to swell up and telegraph thru.  I would even consider shortening the dominos a little.

Assembly --- I have been wanting to put a video together for quite some time and never have gotten around to it.  Assembling this type of structure can be difficult as you have to work so quickly to get the thing together before everything starts swelling from the glue and you can no longer draw it tight.    I use 4 sets of Blokkz clamps and lots of clamps as shown in this picture.
Source for the Blokkz clamps is Rockler. Link to Rockler Blokkz

Source for the steel rod (it is NOT pipe --- wrong exterior dimension) is Tractor Supply Link to tractor supply web page for steel rod

Look at the photo, I will insert it now and make an explanation
[attachimg=1]

Ok -- here goes!  What on earth are all of the clamps about?  First --- this is one corner of a chest of drawers that is 22" or so front to back, 24" across, 60" high.    MONSTER

2 of  Rocklers Clampit Squares are loosely clamped underneath Rockler Clampit Assembly Square    These are there for quality control purposes to keep an eye on what is going on there.  They really aren't visible although parts of clamps are showing.  I have gained enough confidence that I only occasionally do this now.

Four Blokkz clamps are at the edges and clamped with the red handled clamps and tightened (pads underneath) TIGHTLY

Middle 2  Blokkz clamps are laid in place with pads forward as shown.

Snake the pipes through the Blokkx clamps as shown (remember there are 2 pipes, 4 Blokkz on each)

Draw everything together by tightening the Blokkx clamps with the 4 Irwin Quick Grips.
DO NOT STICK FINGERS IN JOINT WHILE TIGHTENING [scared] [scared] [scared].  There are unbelievable forces at work here.

Why does this work??  That circle at the end of the Blokkx is eccentric and the whole thing is bringing the joint together with forwards and downwards pressure as the clamp tightens.  The middle clamps rotate on the steel rod

I see why I have not  gotten a video done.  I think I have put a half hour just into this reply and I already had the picture!

I wish every "gizmo" I have purchased exceeded my expectations like this .

I believe there are 12 clamps involved in this corner.  Rockler likes me!
RDMuller,

Thanks for the pic and description of your setup. That looks very useful for a lot applications.

Thanks,

Dan.
 
humantorch,
That is a great design.  I like the proportions and the Mid-Century Modern feel.  I was thinking about building something in a similar design for my son.  Please keep us up to date with photos as your build progresses.

I think the concern that others have voiced is about the joint where the leg attaches to the stretcher.  How do you plan to join it and to strengthen it to keep it from pulling apart?  Will you use dominos there or something else?

RDMuller,
Nice solution!  Thanks for sharing it.

Mike A.
 
I, too, share the concern over a single 4x20 domino in that corner. I really think you need to make a prototype and TRY to break it before you decide what to do.

Make your joint in two pieces of wood similar to what you'll be using, with one piece being the length of the leg. The other can be longer, but not shorter. Allow plenty of time for your glue to dry, then try to make the joint fail - first using only your hands and arms, then clamping one side in a vise and pushing down on it with all your weight. If it holds up to you hanging on it, you're probably OK. If it fails you need to move to plan 'B'...

OH - be careful when you do this. Try to plan out what will happen if the joint fails - i.e. where your hands and body will tend to go quickly and suddenly - so that you don't get hurt. We don't want to hear about any damage other than to the domino joint, OK?

[big grin]
 
well...all went well!
My first attempt was a failure but once I got the domino even closer to the inside edge by setting the fence of the machine to it's absolute lowest position, this afforded me the ability to apply more glue without concern for excess swelling. I clamped the joint to a table and put all my weight on it...nothing.
The piece is glued up now and all looks well.
Thanks for all the input and help!

[attachimg=1]
 

Attachments

  • IMG_2700.JPG
    IMG_2700.JPG
    151.5 KB · Views: 2,615
Mike,
Here's a shot of the dry fit. Still have to add a drawer to the void on the right.
[attachimg=1]
 

Attachments

  • IMG_2702.jpg
    IMG_2702.jpg
    1.5 MB · Views: 1,880
Looking good!  I can't wait to see the finished piece. 

How did you address the leg assembly?  Did you use dominos?

Thanks, Mike A.
 
yessir, the legs are all assembled using 10x50mm dominos.
Starting the finish first thing this weekend and then hopefully take it to get some photos by the end of the week. I'll be sure to post em in here. Thanks for all the advice and compliments friends! Very excited I've found this forum.
 
Back
Top