80/20 MFT Style Folding Table

odessaboots

Member
Joined
May 30, 2020
Messages
27
Hi there,

First time posting, so let me know if this is in the wrong place.

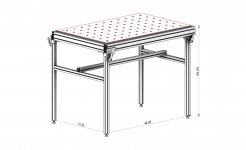
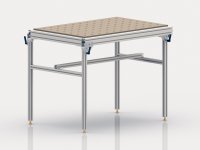
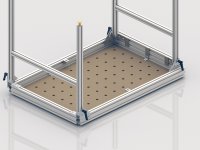
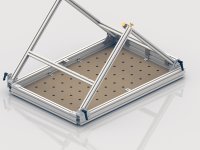
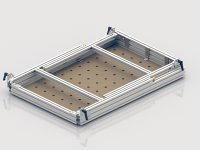
I am working on plans for a portable 80/20 MFT style table, think folding not rolling. I have been inspired by a lot of what [member=8712]Richard/RMW[/member] and [member=67145]Dusty.Tools[/member] have been doing with these carts.

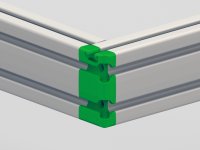
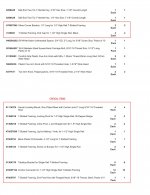
This being my first time working with this stuff, and for simplicity and times sake, I am going to purchase a Festool top, so that I have the same exact dimensions as the MFT/3. I have used an MFT/3 briefly before and found the size acceptable, especially for what I need. The frame will be made from 80/20, and all components will come from that kit of parts.

I need this table to be semi-portable, meaning I do not plan on taking it to job site after job site, rather, I have limited space, and between projects need to be able to fold this up and store it. It cannot be mounted to a wall, as I have no wall space to speak of - my "shop" right now is my patio.

I am an architect by trade, so I took the liberty of modeling the build exactly as I wanted, and have attached images here. I would love any feedback anyone has, or if there is something basic I am missing that makes the operation I am showing not work.

Looking forward to any insight or feedback from the folks here, thanks!

Odessaboots

[attachimg=1]
[attachimg=2]
[attachimg=3]
[attachimg=4]
[attachimg=5]
[attachimg=6]


Attachments

  • Axon.jpg
    Axon.jpg
    580.3 KB · Views: 17,578
  • View 1.jpg
    View 1.jpg
    857.5 KB · Views: 18,643
  • View 2.jpg
    View 2.jpg
    734.9 KB · Views: 20,546
  • View 3-A.jpg
    View 3-A.jpg
    540.2 KB · Views: 21,475
  • View 3-C.jpg
    View 3-C.jpg
    559.7 KB · Views: 17,473
  • View 3-E.jpg
    View 3-E.jpg
    522.5 KB · Views: 15,756
[member=73124]odessaboots[/member]  [welcome] to the FOG

The only thing I can think of are the corners. The 80/20 on the short sides might need to be offset in order to slide in a clamp.

You have a pretty nice design. I would be interested in the parts number on your final drawing  [big grin] keep posting.
 
I assume those are cad-type images, not actual pictures of the product ?  They are of incredible quality.  Be a heckuva an advertising brochure.  Will follow your progress. 
 
Love your work on this!  I wonder if it would be better long-term to have two extrusions going across underneath (instead of one).This would allow you to place a shelf on it for added storage when it is set up.  And if you do go this route, you may want to have the shelf slightly lower...

Otherwise, keep it coming!  I'd love to see your final part #s and dimensions as well :)
 
Very nice design.  I would recommend that you have the middle long support flush with the extrusion, instead of sitting on it.  While you are at it if you had 2 of them like the previous poster said you could have a shelf.  Would be very interested in a parts list and cad once you are done.
 
Rick Herrick said:
I assume those are cad-type images, not actual pictures of the product ?  They are of incredible quality.  Be a heckuva an advertising brochure.  Will follow your progress.

Thank you! They are renderings from the modeling software I used, and since renderings are something I do for work frequently, I can get decent images without a lot of trouble.

vkumar said:
Very nice design.  I would recommend that you have the middle long support flush with the extrusion, instead of sitting on it.  While you are at it if you had 2 of them like the previous poster said you could have a shelf.  Would be very interested in a parts list and cad once you are done.

I like this idea a lot, and in fact, if I used a 10-series extrusion, I could actually get the shelf to sort of drop into a 1/4" recess between the two leg cross bars, preventing it from moving without me having to lock it down. I originally left the extrusion on top in case I needed to be able to sort-of apply outward pressure for stability, but I will probably do as you suggest and simply cut the bars to length once I get them.

Mario Turcot said:
[member=73124]odessaboots[/member]  [welcome] to the FOG

The only thing I can think of are the corners. The 80/20 on the short sides might need to be offset in order to slide in a clamp.

You have a pretty nice design. I would be interested in the parts number on your final drawing  [big grin] keep posting.

The corners are tricky. I might have to mill access grooves for the top slots, but the corners are pulled back slightly in the design I posted, so that I can access the side slots on all four sides. I am planning on 3d printing a custom cap that will still give me side access, while allowing me to clean up the corners (I hate snags).

I will certainly keep everyone here updated as this takes shape (if it takes shape). I have reached out to Faztek and 80/20 for quotes, so we shall see.

 
Was reading through the infamous "Tooling (Re)Organization" thread over at Garage Journal, and was also inspired by [member=67145]Dusty.Tools[/member] work regarding 80/20 partially overlapping corners and 3d printed corner fittings to allow for access to the slots while maintaining a clean, snag free corner.

Spent some time sloppily modeling a test piece. Thought the color was a nice touch! Need to find some time to print, although I should wait to see if I am even going to order and build this table.

Definitely gaining momentum though from the encouragement here and my desperate need to build something.

[attachimg=1]
[attachimg=2]
[attachimg=3]
 

Attachments

  • Side 1.jpg
    Side 1.jpg
    373 KB · Views: 14,587
  • Front 1.jpg
    Front 1.jpg
    279.2 KB · Views: 14,508
  • Joint 1.jpg
    Joint 1.jpg
    971.2 KB · Views: 16,581
So, I built this table in June, but I had a child last month, so it has been too hectic to show any progress.

Unfortunately, I only have one image of the table complete. I want to take more next time I set it up, but I dont have any time for projects at the moment.

I ended up ordering the extrusions separate from the components, so I had to trust my parts list that I had created instead of one done by a vendor.

Overall, it turned out really nice, and my sacrifice sheet at the end works perfectly for crosscutting. I custom printed some brackets that attach via the slots on the underside to hold the top up, and this allowed me to shim the sacrifice sheet so it is perfectly flush with the MFT top I used.

Anyways, happy to answer any questions, but otherwise, I would recommend 80/20 style stuff for custom tables, super sturdy and the sky is the limit with possibilities.

Also, not pictured, I made some supports for vertical sheets that slot onto the legs using carriage bolts and 3" nylon standoffs with ball knobs. They work super well!

[attachimg=1]
 

Attachments

  • IMG_20200627_130543.jpg
    IMG_20200627_130543.jpg
    886.1 KB · Views: 17,109
Gotten a few requests, so I am going to post the parts list. I ordered the extrusions from 80/20. I order all of the components from Mcmaster-Carr. It is not the cheapest, but the shipping is immediate, and I have an account set up with them. 80/20 prices were slightly less for some components, and slightly more for others, so it didn't seem worth it to me to mix and max. I order a lot from Mcmaster, so this was combined with a huge order I had with them.

First image is the parts list, in red are the items that are essential to the build, the others are nice to haves.
Second image is the 80/20 order for the extrusions.

Not listed is 1 MFT top, which I had to cut down to size to fit within the frame I ordered, because I changed install methods after I ordered the extrusions. I originally had the top sitting on top of the frame, but I ended up recessing the top into the frame leaving 1/2" sticking up. This allowed me to use the Kreg clamps on the top rails, which worked so so well.

Hope this helps everyone. It was super satisfying to model it in 3d, work through all the components and uses I had in mind, and actually order and assemble the table and have it work so well.

Cheers.

[attachimg=1]
[attachimg=2]
 

Attachments

  • Packing Lists for mft Page 001.jpg
    Packing Lists for mft Page 001.jpg
    124.1 KB · Views: 14,073
  • Packing Lists for mft Page 002.jpg
    Packing Lists for mft Page 002.jpg
    97.3 KB · Views: 13,971
[member=73124]odessaboots[/member]

Thanks very much for sharing the parts list!  Nice work on the table.
 
delpal said:
Sweet table!

Where do the 2 pieces  - 5" extrusions go?

Thanks! They are on the underside, they allow the angled brackets that support the pivot arm to mount offset from the main 3015 extrusion. I through drilled two holes in them, and fastened them to the inside of the 3015 extrusion.

If you look at my initial renderings, you will see a piece on the bottom of the 3015 on the one side of the table with flat brackets and the angled supports I am talking about. The 5" pieces effectively replace that piece, since I only need the support at the corners, and are placed on the inside face of the main rail, not the bottom face.

 
Odessabooots, do you have any idea what the weight saving is over a standard MFT? I posted on FOG about working with low back pain, and one of the problematic things, especially with limited space, is raising and folding an MFT table.
 
Stan Tillinghast said:
Odessabooots, do you have any idea what the weight saving is over a standard MFT? I posted on FOG about working with low back pain, and one of the problematic things, especially with limited space, is raising and folding an MFT table.

Unfortunately, I do not think there is significant weight savings. The aluminum is pretty beefy, and the hardware adds up. I was super impressed by how stable it was though. The table has no movement even under heavy use. Stout is how I would describe it.
 
Stan Tillinghast said:
Odessabooots, do you have any idea what the weight saving is over a standard MFT?
I have a similar size table made of t-slot extrusions. It's much heavier than MFT. You can look up weight of 80/20 per foot.
 
Stan Tillinghast said:
Odessabooots, do you have any idea what the weight saving is over a standard MFT? I posted on FOG about working with low back pain, and one of the problematic things, especially with limited space, is raising and folding an MFT table.

If you have the space and do not need to fold it up, the benefit of the t-slot table is that casters are super easy to add, and would make moving it a snap.
 
Sounds good, but not clear to me how I can find out more about the “t-slot table”. Do you have a link by any chance?
 
Back
Top