a different looking mantel

Crazyraceguy

Member
Joined
Oct 16, 2015
Messages
4,887
I have built a lot of mantels over the years, some with vertical surrounds, some just floating, ornate with crown moulding and others that are just barn beams, but I have never done one that was double sided.
I have seen fireplaces like that, usually gas units in retail locations or restaurants.
This one goes to the car dealership that I have been working on for the last few weeks. Why the veneer? I don't know. The rest of the job has been a handful of laminate (HPL) colors.
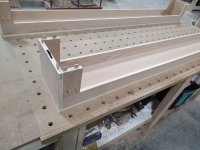
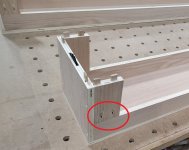
The main boxes are just a shell to cover existing support blocking. It's just 3/4" plywood halves that are aligned with Dominos and snap together with some Lamello Clamex connectors. The veneer is some really good looking rift white ash. Sadly though, it is going to get stained to match one of the laminate colors.
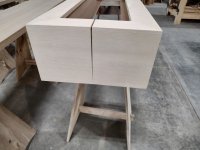
You would be forgiven if you missed the seam. It happened to someone at the shop today. I was asked if I veneered over the joint, so it couldn't come apart. I knocked it apart to show him....stunned. I just hope it remains that good after it gets stained. The edges are "end grain" so they may darken more?
I just wish that the veneer would have been long enough to wrap around the corners, but it was only 8' sheets.
 

Attachments

  • double side mantel raw.jpg
    double side mantel raw.jpg
    260.7 KB · Views: 229
  • double side mantel.jpg
    double side mantel.jpg
    260.4 KB · Views: 219
  • double side mantel open.jpg
    double side mantel open.jpg
    197.2 KB · Views: 227
That is an amazingly well done join!

Looks like you're using Kreg joints? Any reason for this over the Dominos, for extra strength maybe?
 
That seam is perfect. Even knowing where it is and zooming, it was difficult to find. Excellent work
 
Michael Kellough said:
Amazingly good fitting butt joint!

Just Domino’s and the Tenso connector hold it in alignment and together?

Yes, just 6mm Dominos and one Tenso per side. This should be the easiest install ever. It is sized to just snap over an existing support.
luvmytoolz said:
That is an amazingly well done join!

Looks like you're using Kreg joints? Any reason for this over the Dominos, for extra strength maybe?

I have never even seen the Kreg joints? didn't know there was such a thing. The thing I like about the Lamello Tenso is that they are totally tool-less to assemble and nothing shows afterword. The are not "permanent" though. The will snap back apart, if you can create enough force in the right direction.
This is the point of the Dominos. Once those are glued in, it will take major violence and destruction to get it apart.
 
PaulMarcel said:
That seam is perfect. Even knowing where it is and zooming, it was difficult to find. Excellent work

Thank you. That means a lot coming from you. I have seen the impressive stuff you have done.
 
Really impressive! How did you apply the veneer so that the seam is basically invisible?
 
Are they not Kreg type screw fasteners? Or are they for the Lamello fasteners?
 

Attachments

  • double side mantel raw.jpg
    double side mantel raw.jpg
    214.5 KB · Views: 92
Those are pocket holes, but that doesn't necessarily mean they're Kreg.

Just like not all tissues are Kleenex and not all copiers are Xerox machines.

Although I'm sure the folks at Castle would have some thing to say about "Kreg" becoming the go-to name for pocket holes, too...  [big grin]
 
[member=75933]luvmytoolz[/member]  yes those are Kreg pockets, but that is just part of the glued sections. Those will not come apart again.
I thought you were referring to something that I had missed out on somehow?

[member=75217]squall_line[/member] I am a bit mixed on the castle pockets. They work, don't get me wrong, the company has had one for years. I find that there are some problems with them though. Since the cutters for the pocket and drilling are separate, there can be alignment issues. The main problem though is that they are effectively exclusive to 3/4" material. You can insert thicker material, but you can't move the pocket to center it. (at least on the older, floor standing model we have) "Thicker" is also limited to about 1", because of the clamping mechanism. There is also the lack of portability. Order of operations comes in there. If you need to add a pocket somewhere in an assembly, you're out of luck.
The advantages of the drill-bit style (Kreg or others) are exactly the opposite of that. You can go thinner and quite a bit thicker (centered). The alignment is never a thing, as the holes are simultaneous. Plus, there are many ways to use the same drill bit to get the same results. We have a full-sized floor model that is 100% air-driven, no electricity required, except to run the compressor of course. Then there are a lot of different hand-held or bench mounted alternatives.
For me though, the biggest advantage of the drill-bit style, is the plugs. Often this doesn't matter, because the pockets are inner structure fasteners (never seen). Once in a while, like in this case, the pockets are on the surface somewhere. They will not be seen, because they are veneered or laminated over, but I prefer to fill the holes to keep them from being punctured or dented later. It's not hugely important on vertical surfaces or under the thicker laminates. On horizontal surfaces with veneer or the thin (vertical grade) laminates, it's just a safer bet to fill them.
You can fill Castle pockets, but it takes much more fiddling.
 
tsercitpo said:
Really impressive! How did you apply the veneer so that the seam is basically invisible?

Not to sound like a broken record, but "track saw". It's actually a combination of that an a nifty little rolling blade cutter that I stumbled across a few years ago. It's like a mini pizza cutter. As a left-handed person, I have always struggled with scissors and similar cutting tools. I bought one of the rolling things as an alternative to that for cutting fabric and discovered that it will cut veneer too. It does really well with the paper-backed stuff, but it will cut the wood backed stuff too. This thing gives you a zero-kerf cut, so the pieces go back together very well. I only use it for short cuts, like the miters on the top/bottom corners. Those seams on the ends were done by cutting a single piece from an 8' strip and then cutting it in two. That's where the track saw comes in. Taking out only 2mm in the kerf makes it less noticeable. The cut is good enough to put back together without having to be "straightened", which would take even more from the kerf area.
This very straight-grained ash also helps with making it invisible.
It got stained and lacquered Saturday, but hasn't been reassembled yet, so I don't know if it will look that good ever again? I assume the end-grain will absorb the stain differently enough to expose it?

It's funny how things go in phases. I haven't done much veneering lately and now I have 2 jobs going at once. This one with the ash and another with white oak, which is a room divider screen panel.
i'm only about half way through with "working on parts", so no assembly pics of that one yet.
 
Back
Top