A lump of wood that is very quickly getting thinner

Wuffles

Member
Joined
May 23, 2013
Messages
1,315
So, I've never posted anything that I'm actually working on, mostly because I am embarrassed at my skill level compared to some on here, but this, well, anyone could do this the same way I am, so thought I'd share it.

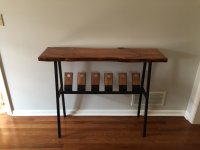
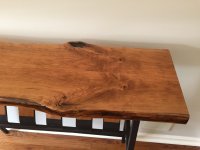
Hopefully it'll become a "something", ideally an outdoor coffee table, if I can figure out how to weld some legs up for it.

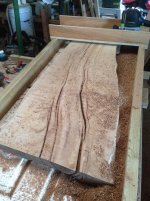
It was very uneven, so I've resorted to building a larger milling jig out of a spare door and some 4x2s I had lying about the place. Each time I mill something like this I ponder getting an OF2200, but the 1400 just keeps on going.

One day.

Anyway, it cost me a tenner at the wood recycling place in a town nearby, which I was happy with.

[attachimg=1]
 

Attachments

  • 2015-05-20 20.21.41.jpg
    2015-05-20 20.21.41.jpg
    318 KB · Views: 2,551
man, that's quite a bit of there!!  good on ya mate, i'm too lazy for something like that....unless someone's payin??  haha
nice idea coming up with a GIANT router sled
 
Very cool. I was thinking of doing the same thing for some large boards. What router bit did you use? How do you keep the board from moving when passing over it with the router?
 
It's an Axcalibur branded bit, probably not very good, but then it doesn't have to be really. It's just a "milling" bit, which I assume could be larger with a 2200, but this one slips through the 40mm bushing I use on the sleds and doesn't take too long. I will probably buy a better branded bit once this one it done.

I've got this particular lump wedged up on non slip wedges plus it's shimmed with bits of ply so it must be the weight of the wood itself that's doing the job of stopping it from moving as the ply shims aren't stuck to anything.

My smaller sleds have sandpaper glued to the tray to stop things from moving, but then smaller bits want to fly. WHen I have to shim them up I put in a strip of non slip matting.
 
Wuffles,
That's a really nice setup.  Now I know what I can do with that door I've got hanging around in the garage!

That will turn out to be a spectacular looking slab.  What do you plan on doing with the voids?  Fill with epoxy?

Thanks for sharing!

Mike A.
 
Heres a project I did with a pair of book matched natural edge pieces of cherry.  I welded a base and made some wine holders under the top for a "mini" wine bar.  I finished the top in "liquid glass".  It was my first time using liquid glass and, after a week of hesitation, it was actually an easy process.  Anyways, just an idea for you.  Good luck and can't wait to see what you come up with.  Keep us posted!
 

Attachments

  • IMG_0016.jpg
    IMG_0016.jpg
    1.1 MB · Views: 647
  • IMG_0017 (1).jpg
    IMG_0017 (1).jpg
    1.3 MB · Views: 656
Well, I had decided to go down the route of glow in the dark powder mixed with epoxy to fill the voids as I thought it'd be fun for a patio table.

Out of curiosity, is it a different product for the finish coat "liquid glass"? As I had planned to encase the whole thing in epoxy but hadn't thought that far ahead.

There are some large structural bow ties on the underside to hold it all together but I'm waiting for a template I've designed to come back from the cutting shop before I put some structural/decorative ones along some of the wobbly cracks in the top. Figured the epoxy would hold it all together, but hopefully there'll be some detail in the light and the dark.

Also, can you sand/polish epoxy?
 
[member=20162]Wuffles[/member] - great project, looking forward to seeing it completed.

I've been dreaming of doing a live edge outdoor table, if I can ever get the rest of the project list pared down (he says while surfing the FOG during project working hours...).

You should be able to polish up the epoxy, I've seen it used in this manner and it was very clear. The good boat builders stuff (West/System 3) is your best bet, but be careful of UV exposure. Here's some info on that topic:

http://www.oneoceankayaks.com/Epoxtest.htm

RMW
 
It's one of many projects that are ongoing, was raining the other day so I set to work on it.

I'll use the unbranded epoxy I got from eBay for the filling and then get something posh for the cover I think. I was planning to kind of encapsulate the whole thing somehow, unless this is a daft idea.

I also have NO idea how much luminous powder I mix into the epoxy. You might see this thing from space if I get it wrong.
 
Yes, I'd watched that, and read an instructable about it too, but nobody gives detail on how much to mix. Probably need a welding mask by the time I've finished adding the powder.
 
Always double triple check you have taped all the voids that run completely through the wood, or you will have a glow in the dark bench top.

Hopefully (when I've purchased some more powder) it'll be filled next week. Would have been done today if it weren't for my only double checking. I think I wasn't quite prepared for how runny the epoxy was going to be.
 
Richard/RMW said:
[member=20162]Wuffles[/member] - great project, looking forward to seeing it completed.

I've been dreaming of doing a live edge outdoor table, if I can ever get the rest of the project list pared down (he says while surfing the FOG during project working hours...).

You should be able to polish up the epoxy, I've seen it used in this manner and it was very clear. The good boat builders stuff (West/System 3) is your best bet, but be careful of UV exposure. Here's some info on that topic:

http://www.oneoceankayaks.com/Epoxtest.htm

RMW

Interesting read. From what I can glean, the West System will probably give me the best results. I've been using some cheap'n'cheerful from eBay for mixing in the powder as I don't think it really matters what that ends up like, but for coating the top I suppose it does matter. I certainly don't want to be stripping it back in a year. I may as well have used oil.

Expensive stuff though.

Now, if anyone's following this I would like some advice.

I only have sanding disks up to 240grit, and I imagine I want to go a great deal higher if I were to try and sand back the epoxy, a GREAT deal having seen what 240grit does to the resin already. Anyone got any experience of that or should I just aim to NOT be trying to do that and leave it to set nice and flat. Reason I ask is that I would like to encase the whole slab in resin and can't quite figure out how I might go about doing that without there being drips all over the place, which will need sanding.

Or am I way off the mark on this.

Edit: Having just read a primer on sanding/polishing resin...well, you can forget that!

So, I need a definite plan as to how to do this without having to overlap the resins as I do each side. Or just oil it.
 
[member=20162]Wuffles[/member] another option is Epifanes varnish. A friend used is on outdoor tables and it has held up well. These photos were @ ~ 1 year:

[attachthumb=1]

[attachthumb=2]

https://www.epifanes.com/introduction

I am visiting him this week, will see how they held up over the next year+

RMW
 

Attachments

  • ScreenClip [2].png
    ScreenClip [2].png
    854 KB · Views: 352
  • ScreenClip [3].png
    ScreenClip [3].png
    908.8 KB · Views: 316
Just read an Amazon review and apparently they use it on the Cutty Sark...I'm sold!
 
Thanks Richard, that's exactly what I was looking for. Will speed things up immensely. Going to buy a can of it and see what it comes out like. Cheaper than resin too.

The filled resin I did looks really cool, especially in the dark with the powder added. Am very happy with the result, so didn't want to screw it up at the last hurdle.

Will chuck up a photo a bit later on.

And now I have a glow in the dark bench too, which is cool. And a glow in the dark floor, various jigs that were under the bench and even a bit on my shoes.
 
Look forward to seeing the photos.

My friend's place is out in Central PA, I plan on hitting a lumber mill or 2 while out there and hope to come home with a couple live edge slabs to play with.

RMW
 
I've left it in an unfinished state until I've got the legs sorted out. I'm seeing a man tomorrow about knocking up some legs, not as ornate as I'd hoped, for technical reasons*

He's going to show me how to stick weld too, picking up an old buzz box for more legs in the future.

*fat people looking for a resting place
 
Back
Top