“Top”, so I don’t forget which side was referenced for the “centered” dominos.The level of detail in the pencil marks is amazing!!! I see "center line", "wide", "37mm". What does the "T" mean?
bob
You are using an out of date browser. It may not display this or other websites correctly.
You should upgrade or use an alternative browser.
You should upgrade or use an alternative browser.
A William Morris inspired Craftsmen bed........
- Thread starter fritter63
- Start date
Sparktrician
Member
Critter, I can't wait to see the finished product! 
luvmytoolz
Member
Man that timber is just beautiful, great work!
Kudos to Saroyan Hardwoods of Fresno. I gave them the specs for bd ft and different thicknesses and asked them to "select for good ray fleck". They picked it out for me and even delivered to my barn (the driver helped me unload it!) for $50 (they already have a route out to this area, 2 hours west of them).Man that timber is just beautiful, great work!
Major (12 mm) joinery finished on the King bed frame, seen here leaning agains the queen size. I'm waiting for the deliver of the new Woodpeckers story stick system to mark out and join the slats on that one. Got plenty to do in the meantime.

luvmytoolz
Member
You've gotta be happy with that! Very nice!
bobtskutter
Member
How did you remove all the pencil marks? Erasers (need to the US term for that not the British ") ), alcohol, sanding.
), alcohol, sanding.
Thanks
Bob
), alcohol, sanding.Thanks
Bob
Will probably erase most of it then sand. Everything needs a good sanding anyway.How did you remove all the pencil marks? Erasers (need to the US term for that not the British
Thanks
Bob
As Sedge said in his video on the DF700 connectors:”we got all these great sanders for that!”

So this weekend was spent making the corbels for each side of the head and foot boards. This is the part I've always dreaded in past Craftsmen projects, that is making the plywood template for routing that gentle curve. But this was different, "Now I have a CNC too!" (sorry to reference "Die Hard" in June!).
Fortunately, the plans that I purchased for the bed included a "full sized" (when printed) template of the corbels as well as the dimensions.
So this was my approach:


Fortunately, the plans that I purchased for the bed included a "full sized" (when printed) template of the corbels as well as the dimensions.
So this was my approach:
- Save off the page form the PDF document as a JPEG file
- Import the JPEG into Fusion 360 as a "canvas"
- Scale the canvas along one of the known dimensions in the image (in this case, the 2 inch top section
- create a Fusion sketch on top of the canvas plane
- Use the sketch tools to overlay a drawing of the corbel that is scaled to given dimensions
- For the curve, I created a "control spline" with two control points that started and ended along the corresponding straight line segments
- Dragged the control points until the curve lined up with the one in the sketch
- Extruded the closed sketch profile to a 3D solid
- Replicated the corbel into 3 other copies, spaced out just enough for a 1/4" bit to get between them
- Flipped over a couple of the pieces for better tight spacing
- Created a manufacturing program (in the CAM side of Fusion) which located the models in a virtual model of the piece of (cut off) wood I had. I selected only 4 of the corbels, then replicated in the a linear pattern in one direction to create a total of 8 pieces.
- Total depth of cut was 3mm for a 1/4" bit (I've broken one in oak trying to go too deep!)
- I added some rater beefy tabs to keep them all together while cutting
- After the CNC ops were done, I used the bandsaw the isolate each corbel from the matrix, which left the tab remnants to be cleaned up.
- Chucked up a flush trim bit in the router table, and then ran each corbel against it to remove the tabs and any leftovers on the bottom side of the cuts.
Here is the machine "IRL"......


And in the interest of full disclosure and transparency, I also spent the weekend fixing my 3 domino boo boos.... 
My biggest complaint about the domino is that it makes easy to work too fast and make "stupid mistakes", or as Coach Mctaggert used to tell us in high school "mental errors".....
On two of the legs, I made domino cuts that should have been on the narrow setting, but forgot to change if from "wide". Pictures below show my approach to fixing that (not crucial, but these were the "positioning" dominos that make glue up easier for alignment.
I also managed to START cutting on one leg when I forgot to change the depth from 1/2" to 1 3/8".... . I had originally decide to make that location for my custom nameplate to be installed, then remembered "I'm a luthier, damnit! I can fix that like an inlay and make it almost invisible!" So.... I measured the opening and modeled a domino inlay to those exact dimensions, then I duplicated to total of 9, and wrote a CAM program in Fusion 360 where each was cut with increasing and decreasing "stock to leave" values, incrementing .001 Inch (.03 mm) at a time. One of those had to be a tight fit! I numbered them after they were cut as to which was which, and used the drum sander to sand away the backing stock, turns out that the .001" offset (total of 2 thousandths under) was the one (which is my basic rule of thumb on inlay fits unless they're very complicated. Pictures below!


My biggest complaint about the domino is that it makes easy to work too fast and make "stupid mistakes", or as Coach Mctaggert used to tell us in high school "mental errors".....
On two of the legs, I made domino cuts that should have been on the narrow setting, but forgot to change if from "wide". Pictures below show my approach to fixing that (not crucial, but these were the "positioning" dominos that make glue up easier for alignment.
I also managed to START cutting on one leg when I forgot to change the depth from 1/2" to 1 3/8"....
. I had originally decide to make that location for my custom nameplate to be installed, then remembered "I'm a luthier, damnit! I can fix that like an inlay and make it almost invisible!" So.... I measured the opening and modeled a domino inlay to those exact dimensions, then I duplicated to total of 9, and wrote a CAM program in Fusion 360 where each was cut with increasing and decreasing "stock to leave" values, incrementing .001 Inch (.03 mm) at a time. One of those had to be a tight fit! I numbered them after they were cut as to which was which, and used the drum sander to sand away the backing stock, turns out that the .001" offset (total of 2 thousandths under) was the one (which is my basic rule of thumb on inlay fits unless they're very complicated. Pictures below!
Last edited:
OK FOG, I'll the other post the pictures in another post.... 


Double post
Last edited:
My Woodpeckers story stick system arrived yesterday, so today was spent marking the domino locations for the King headboard and footboard. That was after our weekly bike ride (18 miles today), so by the time I finished that it was 90 degrees in the shop, so that was all I got done today. Recorded a high of 104 (on the patio) today.
Since the spacing between the dominos is 2 inches exactly, I only marked the narrow (locator) cuts with the story stick system, then used a Starret rule (1" wide) as a spacer to mark the matching lines.


Since the spacing between the dominos is 2 inches exactly, I only marked the narrow (locator) cuts with the story stick system, then used a Starret rule (1" wide) as a spacer to mark the matching lines.
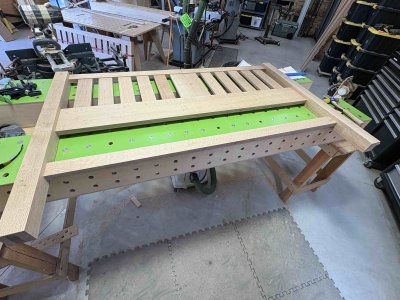
Today's progress: joinery for the King head and footboard slats finished. Also started prepping for layout of the 14mm connectors on the bed rails, and built a vertical mounting jig (including a 3d printed part I found) for the domino so I can use the Seneca Dock Plate XL...


Today's progress: significant! Got the side rails dimensioned and joinery done for 14mm dominos and domino connectors. Can now fully dry assemble the beds.d


luvmytoolz
Member
Nice! That feeling when you can finally see the creation assembled is priceless!
Sparktrician
Member
Looking good, Critter!!! ")
Corbel joinery done. I decided to use 8mm dominos which are WAY overkill, but it let me cut the corbel side with the DF500 and the Seneca Dock Plate XL, and then the matching mortises to the center of the legs (1 3/8" fence depth) with the DF700 really easily. However, decided to just limit them to 15mm depth on each side (20 would have interfered with the 12mm dominos on the other side of the leg, and the corbels are rather narrow on the bottom).
So, just need to chop the ends of a bunch of 8mm pins.
Once again, really loving that Woodpeckers story stick system!
Only joinery left to do is the top caps, and then the slat supports (going to do something really cool there), after that I'm running out of ways to screw it up, and it's about to become a sanding, gluing, and finishing project.
Cool note: that 3D printed dock I made for the DF500 is REVERSIBLE, so I can mount it towards me for easy setup, then it around for working the clamp and making the plunge cuts.
Last edited: