Mark Katz
Member
I have a Felder AD-741 Jointer/Planer and also two accessory aluminum table extensions. Being a 2003-era machine, the extensions are mounted via an "F-coupling". These extensions can be used at either end of the jointer bed and at the outfeed end of the planer bed. They are easily mounted and removed and can be used in any combination as needed. Normally I have one always mounted on the planer outfeed and the other is stored until needed.
I also have a similar vintage MM-16 bandsaw and often have need for an outfeed support for longer pieces - generally I use a roller stand for this but it is not a great solution.
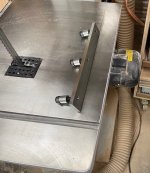
Felder sells a bracket that can be mounted to any equipment (whether Felder or not) that gives that equipment an F-coupling similar to that which is found on their machines. I bought one of those and mounted it to my MM-16, giving it an additional 20 inches of outfeed support. Here's the Felder bracket prior to installation.
[attachimg=1]
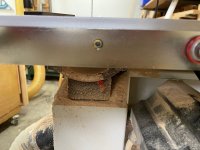
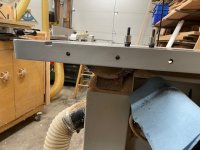
Here's how I installed it.
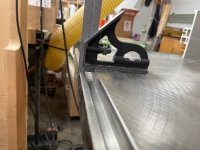
The coupling surface on the Felder machine sits about 11 mm below the surface of the jointer or planer bed. Ideally, the new bracket should sit an identical amount below the bandsaw table. To accomplish this, I set a combination square to the height difference between the jointer bed and the coupling surface and used that setting to align the bracket bar below the bandsaw table. I made sure that the three mounting holes were clear of any ribs underneath the bandsaw table.
[attachimg=2]
[attachimg=3]
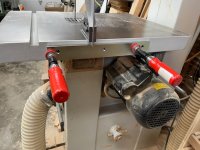
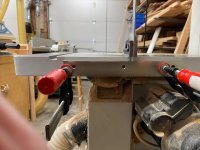
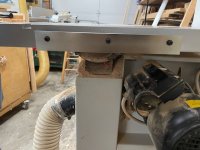
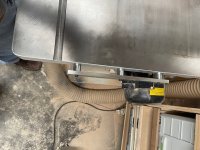
The next step was to drill 10mm holes (for 10mm metric bolts) in the cast iron table aligned with the holes in the bracket.
I had read that to drill holes in cast iron it was easier to drill a smaller hole first and then enlarge it with the actual size drill. This turned out to be a less than ideal method. More on that later. The holes in the bar were tapped for an M10-1.5 bolt, so they were actually about 8mm wide. I bought a bushing from McMaster-Carr that had an 8mm outer diameter and a 5.1 mm inner diameter. Placing the bushing in the holes in the bar, I used a 5mm drill bit to drill three 5mm holes in the cast iron bandsaw table.
[attachimg=4]
[attachimg=5]
[attachimg=6]
Next, I needed to expand those holes to provide clearance for the 10mm bolts. I used a succession of larger and larger drill bits to expand the 5mm holes to 13/32" which is slightly larger than 10mm. This was a difficult and somewhat dangerous process as each larger drill bit would grab as it went through the smaller hole, twisting the drill and my wrist each time it grabbed. In retrospect, I think I would have been better off just making a small starting depression with the 5mm drill and using the 13/32 bit to drill the through hole.
[attachimg=7]
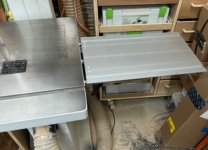
I mounted the bar onto the bandsaw using the provided spacers and then attached the table extension. Even with the care I used in positioning the bar, the extension ended up slightly lower than the table (maybe by 1/16"). This should work OK, but maybe someday I'll expand those holes and allow the bar to be raised a bit. The table extension itself has some height adjustment but I don't want to touch that because it is set to match the AD-741 mounting positions.
[attachimg=8]
[attachimg=9]
[attachimg=10]
I also have a similar vintage MM-16 bandsaw and often have need for an outfeed support for longer pieces - generally I use a roller stand for this but it is not a great solution.
Felder sells a bracket that can be mounted to any equipment (whether Felder or not) that gives that equipment an F-coupling similar to that which is found on their machines. I bought one of those and mounted it to my MM-16, giving it an additional 20 inches of outfeed support. Here's the Felder bracket prior to installation.
[attachimg=1]
Here's how I installed it.
The coupling surface on the Felder machine sits about 11 mm below the surface of the jointer or planer bed. Ideally, the new bracket should sit an identical amount below the bandsaw table. To accomplish this, I set a combination square to the height difference between the jointer bed and the coupling surface and used that setting to align the bracket bar below the bandsaw table. I made sure that the three mounting holes were clear of any ribs underneath the bandsaw table.
[attachimg=2]
[attachimg=3]
The next step was to drill 10mm holes (for 10mm metric bolts) in the cast iron table aligned with the holes in the bracket.
I had read that to drill holes in cast iron it was easier to drill a smaller hole first and then enlarge it with the actual size drill. This turned out to be a less than ideal method. More on that later. The holes in the bar were tapped for an M10-1.5 bolt, so they were actually about 8mm wide. I bought a bushing from McMaster-Carr that had an 8mm outer diameter and a 5.1 mm inner diameter. Placing the bushing in the holes in the bar, I used a 5mm drill bit to drill three 5mm holes in the cast iron bandsaw table.
[attachimg=4]
[attachimg=5]
[attachimg=6]
Next, I needed to expand those holes to provide clearance for the 10mm bolts. I used a succession of larger and larger drill bits to expand the 5mm holes to 13/32" which is slightly larger than 10mm. This was a difficult and somewhat dangerous process as each larger drill bit would grab as it went through the smaller hole, twisting the drill and my wrist each time it grabbed. In retrospect, I think I would have been better off just making a small starting depression with the 5mm drill and using the 13/32 bit to drill the through hole.
[attachimg=7]
I mounted the bar onto the bandsaw using the provided spacers and then attached the table extension. Even with the care I used in positioning the bar, the extension ended up slightly lower than the table (maybe by 1/16"). This should work OK, but maybe someday I'll expand those holes and allow the bar to be raised a bit. The table extension itself has some height adjustment but I don't want to touch that because it is set to match the AD-741 mounting positions.
[attachimg=8]
[attachimg=9]
[attachimg=10]
Attachments
-
 IMG_1542.jpeg71.6 KB · Views: 327
 -
 IMG_1541.jpeg79 KB · Views: 315
 -
 IMG_1543.jpeg96.8 KB · Views: 317
 -
 IMG_1545.jpeg86.2 KB · Views: 307
 -
 IMG_1546.jpeg80.3 KB · Views: 285
 -
 IMG_1547.jpeg83.8 KB · Views: 295
 -
 IMG_1549.jpeg86.1 KB · Views: 359
 -
 IMG_1550.jpeg84.8 KB · Views: 296
 -
 IMG_1551.jpeg104.4 KB · Views: 286
 -
 IMG_1552.jpeg53.7 KB · Views: 308