My 850 is on the way back after repair(should arrive today) 1 week turnaround is excellent considering where I am in relation to the service center. The 65 has been teasing me on the recon list, popping on and off. As long as they were able to repair my 850, I don't really need the 65, but it would be nice to leave the 850 on the bench and still have the 65. It doesn't take much to take the 850 out of the bench unit so I'll just save my money. Next on the list: DominoXL.
You are using an out of date browser. It may not display this or other websites correctly.
You should upgrade or use an alternative browser.
You should upgrade or use an alternative browser.
Adjust HL850 Planer
- Thread starter sgt_rjp
- Start date
I got my planer back yesterday and did some tests but got the same results. The slip from support said it tested good. Do I just not understand how this is supposed to work? I thought that the blade was supposed to be even with the back plate, and that's the only way I can see it working . Mine sits about .13mm proud. With the blade sitting proud of the plate, as long as the piece is wider than the blade, it's going to leave a track. I know that the blades on a jointer should be slightly proud of the out-feed table, but I thought that hand planers were supposed to be even. Any thoughts?
waho6o9
Member
Following this thread with interest......
I had posed the same question to support and just got a response. They said that their technician "adjusted and calibrated the unit, so it should be within factory specifications" and to call their application specialist on Monday when he's back in the office. I'm anxious to get to the bottom of this. I don't want to keep wasting peoples time if I just don't understand the tool, but the other things that I've read seem to reinforce my line of thought. Well, except the jointer tuning.
waho6o9
Member
Maybe post pictures and results of boards that
were planed?
were planed?
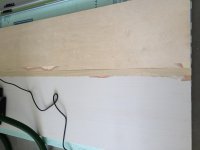
There's lots of things to critique, but here's a picture to give you an idea of what I'm trying to do. The 1x2 in the middle stands proud of the rest. I had thought I could lay the planer just left of center, and then just ride up the center. By this point, since I already knew it wasn't working like I thought it would, I was trying to ride the center. I probably tilted a little bit midway to cause the bite. And the bottom bite was purely a mistake.
After it's planed/sanded smooth, I use the ts55 to cut it in half. This leaves a 3/4" band on each shelf. A very simple process if the blade was even with the sole plate.
After it's planed/sanded smooth, I use the ts55 to cut it in half. This leaves a 3/4" band on each shelf. A very simple process if the blade was even with the sole plate.
Attachments
- Joined
- Nov 3, 2007
- Messages
- 5,092
The front of the sole is the reference surface and is raised/lowered relative to the cutter head to either expose more or less cutter.
Perhaps I'm not understanding something?
Tom
Perhaps I'm not understanding something?
Tom
- Joined
- Nov 3, 2007
- Messages
- 5,092
sgt_rjp said:Right, so the front plat dictates how much will be removed. So, wouldn't it stand to reason that if the front plate is even with the rear plate, that nothing would be removed? In my case, around .13mm is removed.
I don't think that is necessarily a valid assumption.
sgt_rjp said:And in the case with the earlier mentioned shelves, if there was .2mm sticking up in the middle, and I set the front plate .2mm below the front plate, I'll end up with a .33mm channel down the middle.
My 850 has a front handle with a scale to determine how thick the cut will be relative to the front plate. In other words, the front handle twists to vary how much the front plate retracts below the cutter. To put it even another way, the front handle twists and the scale tells the operator how much cutter is exposed relative to the front plate.
I don't know of any other stated reference other than the v-groove for chamfering.
Tom
- Joined
- Nov 3, 2007
- Messages
- 5,092
I think the very fact that there is a "Park" position indicates that the cutter is proud of the plate at zero depth.
The Park position retracts the cutter to safety.
Tom
The Park position retracts the cutter to safety.
Tom
Tom, Agreed, that may not be a valid assumption. That's what I'm trying to determine now. If the tool is actually in spec, I'll need to regroup, and adjust my strategy. I also see that I screwed up my earlier statement. If the 1x3 sits .2mm proud. If I set my front plate .2mm off the rear plate, I'll end up with a .13 channel. Maybe I need to set it for .7mm? Still iffy considering I'm working with a very thin veneer.
- Joined
- Nov 3, 2007
- Messages
- 5,092
With the cutter even with the front (at zero on the scale), the cutter can contact whatever you sit the planer on. That's by design.
With the cutter in the "Park" position on the scale, it can't touch what you sit the planer on.
Both of the above assume we're talking about the stock cutter head. The rustic heads are even more proud and therefore come with a sort of "kickstand" to protect them.
Tom
With the cutter in the "Park" position on the scale, it can't touch what you sit the planer on.
Both of the above assume we're talking about the stock cutter head. The rustic heads are even more proud and therefore come with a sort of "kickstand" to protect them.
Tom
clutzer
Member
- Joined
- Dec 24, 2014
- Messages
- 37
Data point: after adjusting my "in feed" table on my HL 850 using the provided hex wrench, both in feed, out feed, and knife were at the same level. I tested this with a Woodpeckers straight edge and rotated the cutting wheel and the knife just barely contacted the straight edge. It was the lightest of contacts and didn't leave a mark on the red anodizing at all.
So... in my case, setting the unit to 0 (but only after I adjusted things), seems like it wouldn't take much off if anything. I may report back when I actually use the unit tomorrow.
So... in my case, setting the unit to 0 (but only after I adjusted things), seems like it wouldn't take much off if anything. I may report back when I actually use the unit tomorrow.
tiralie
Member
- Joined
- Jan 26, 2010
- Messages
- 3,614
sgt_rjp said:Tom, Agreed, that may not be a valid assumption. That's what I'm trying to determine now. If the tool is actually in spec, I'll need to regroup, and adjust my strategy. I also see that I screwed up my earlier statement. If the 1x3 sits .2mm proud. If I set my front plate .2mm off the rear plate, I'll end up with a .13 channel. Maybe I need to set it for .7mm? Still iffy considering I'm working with a very thin veneer.
You will need to leave a little of the edging proud of the top to avoid removing the veneer. Because of slight variations in substrate (plywood) and veneer thickness, the planer will remove any small height differences relative to the sole of the plane as it is designed to do.
Getting the right depth is easier if you creep up on it.
Generally speaking, using a 1010 or 1400 with the angle arm and edging plate attachments to trim edging is a better way to go as the edging plate only references a small area and will follow the small variations in veneer/substrate differences.
Tim
Similar threads
- Replies
- 2
- Views
- 137