Aluminum Tambor doors Complete update

Crazyraceguy

Member
Joined
Oct 16, 2015
Messages
4,901
I have to quite a few tambor doors over the years, usually wood on canvas. This time the slats are a combination of an aluminum outer skin with a plastic core, which houses the sliding joints.
I spent most of the day edging the 8 sides and fully assembling one unit, cutting rest of the slats after confirmation that it fit correctly. The other 3 went together very quickly after that.
The blue is just a protective film, which I probably will not remove. The installers will get that little satisfying job.


Attachments

  • FHTambor.jpg
    FHTambor.jpg
    392.1 KB · Views: 153
  • FHTambor2.jpg
    FHTambor2.jpg
    423.1 KB · Views: 125
Crazyraceguy said:
The blue is just a protective film, which I probably will not remove. The installers will get that little satisfying job.

My brother once left a small 2"x2" piece of film on his new fridge for almost 6 months just so that I could have the satisfaction of peeling it off.  Don't know what it is, but I'm one of them...
 
Look no further than Barrina LED's.  They have a clear, extremely thin piece of protective film covering the lighting element. It really feels good to remove it.  [smile]
 
Crazyraceguy said:
I have fitted quite a few tamboor doors over the years, usually wood on canvas. This time the slats are a combination of an aluminum outer skin with a plastic core, which houses the sliding joints.

Nice...a nice look for a contemporary settling. I never knew this option was available but it makes sense for custom contemporary kitchens.
 
Cheese said:
Look no further than Barrina LED's.  They have a clear, extremely thin piece of protective film covering the lighting element. It really feels good to remove it.  [smile]

[member=44099]Cheese[/member], how are your Barrina lights doing? I only installed 5 of the 6 I bought about the same time as you and 2 are already dead. As in extremely dim or no light at all.
 
Michael Kellough said:
Cheese said:
Look no further than Barrina LED's.  They have a clear, extremely thin piece of protective film covering the lighting element. It really feels good to remove it.  [smile]

[member=44099]Cheese[/member], how are your Barrina lights doing? I only installed 5 of the 6 I bought about the same time as you and 2 are already dead. As in extremely dim or no light at all.

Ouch…you’re cutting me with a knife Michael.

As we speak, I’ve initiated a warranty replacement with Barrina. Love ❤️ the product but not happy with the life span.
They seem receptive to criticism and are quick to answer emails and I’m expecting a reply tomorrow as they are located on the left coast and are hours behind normal correspondence. I’ll keep you updated.  [smile]
 
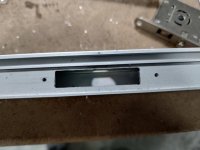
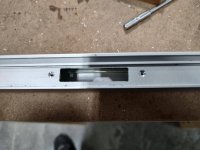
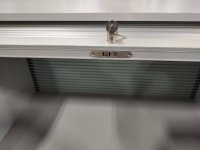
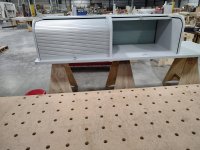
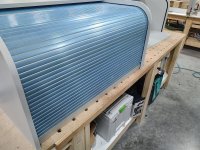
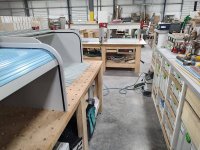
I did end up peeling them today. The boss decided he wanted to ship these assembled. The lock gets mortised into the countertop, since there is not bottom in the cabinet. I finished them all, but only got 2 attached to half of the top.
The mask is still on the others, until they get permanently attached.
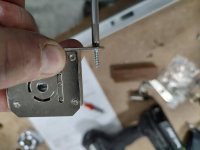
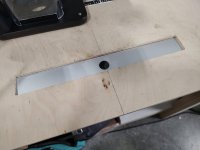
The lock rail turned this into a Shaper Origin job. The lock mortise and the hole for the tumbler were cut that way, as well as the strike plate.
It's a fairly nice system, but it is majorly lacking in engineering. The printed directions are in a word, horrible. They are disconnected and weak, but the worst part is that the dimensions are just plain wrong.
I don't mind precision at all, knock your self out with it, I come from a machinist background.
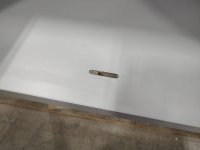
But "precisely wrong" just sucks. The drawing shows that the hole through the front is supposed to be 18mm dia. and 22mm above the bottom edge.
This can't work, for 2 simple reasons. The tumbler will not fit through an 18mm opening, plus the trim ring needs to slide over it too. It ends up needing to be 19.5mm
Then that 22mm centerline bites you too. It's 2mm too high.
This is why I have trust issues...I never trust directions/drawings without some verification, been burned too many times.
It takes a few extra minutes, to make test cuts, but saves time and materials in the end.
Then you have the sheer stupidity the screws. I run into this a lot, so I'm prepared to deal with it, but the average Joe? This is going to be a huge frustration.
The plates are thin and the tapered portion extends beyond it. This is bad enough with wood, which is at least somewhat compressible, metal is altogether different.
So, you go through all of the assembly step, mark/drill the holes, then take it back apart to countersink those holes......and put it all back together. Annoying, but if you don't, one of two things will happen, (1)the screw bottoms out but the part doesn't tighten up, and you are back to taking it apart again (2) you snap the head off of the screw. These are tiny things with a PZ1 drive, yet another issue in the US.

I did find out that even with a tiny O-flute bit (2mm), you still need some lube. It would chip-weld immediately. Just a simple swipe of lube on a brush solved it though. You can see some of the residue around the hole.
 

Attachments

  • FH lock screws.jpg
    FH lock screws.jpg
    150.2 KB · Views: 67
  • FHlock mort.jpg
    FHlock mort.jpg
    174.1 KB · Views: 63
  • FHlock mort2.jpg
    FHlock mort2.jpg
    231.2 KB · Views: 55
  • FHlock rail.jpg
    FHlock rail.jpg
    160.9 KB · Views: 52
  • FHroll top.jpg
    FHroll top.jpg
    381.4 KB · Views: 65
  • FHlock tab.jpg
    FHlock tab.jpg
    110.5 KB · Views: 56
  • FHlock.jpg
    FHlock.jpg
    201.8 KB · Views: 55
Back
Top