Mismarked
Member
- Joined
- Oct 8, 2014
- Messages
- 138
This concept is probably not ready for prime time but won't be messing with it for another month or two so figured I would post now and see if anyone had any ideas. (I am technology challenged, so apologies for not posting comments under each photo.)
I needed to rip a bunch of 1x6 walnut boards down to 1x3ish for rails and stiles. Didn't want to mess with Festool narrow parallel guides, and didn't want to buy the after market guides (yet).
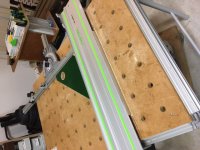
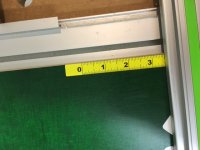
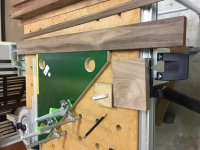
Decided to put the Anderson Square against the fence, with the edge that is parallel to the track right against the kerf. Then stuck on an adhesive left-to-right measuring tape on the Anderson square, with "0" mark even with the edge of the track away from the blade, and it goes up to approx. 7.25".
I slid the Anderson square to the left to read 2 7/8 or so. Held it in place with flag stop and a couple of festool clamps.
My 1 inch stock was taller than the Anderson square, which is 3/4, so I added a scrap piece of 1" to support the track closest to me.
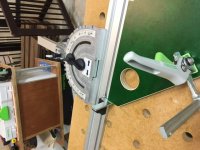
My stock was also longer than the width of the MDF (about 38 inches), so I couldn't use the bracket closest to me or the slop stop to keep track aligned. So with the track down and sitting flat on the MFT and firmly in the slop stop, I clamped another scrap next to the track (from underneath the table so it wouldn't hit the TS 55 motor) that would let me push the track against while sawing and keep it square even when the bracket and slop stop weren't in use.
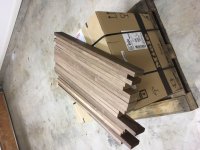
Lowered the bracket, put the stock firmly against the far bracket and ripped. Knocked out the project in a few minutes. In the photo, they look a little off because they are sitting on an uneven cardboard box that has some metal packing straps on top, but flat on the table next to each other, they came out pretty darn good.
If I had time, I might have switched to the longer Festool track and re-oriented everything on the MFT by 90 degrees so that the entire length of the stock would fit underneath the track with the slop stop in use.
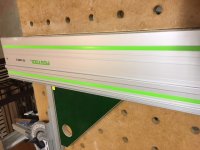
The only big issues were that the edge of the Festool track is curved, so it was difficult to get an exact reading on the measuring tape. Maybe that could be fixed by sticking something flat on the edge of the track and recalibrating. Also the Anderson square has curved edges (so that the phenolic edges aren't sharp), so it was difficult to align exactly with the kerf before I installed the measuring tape. I will need to adjust it on the next go round. As it was, it was fairly easy to simply mark the cutline on the first board, and then adjust the Anderson square before clamping it down.
I needed to rip a bunch of 1x6 walnut boards down to 1x3ish for rails and stiles. Didn't want to mess with Festool narrow parallel guides, and didn't want to buy the after market guides (yet).
Decided to put the Anderson Square against the fence, with the edge that is parallel to the track right against the kerf. Then stuck on an adhesive left-to-right measuring tape on the Anderson square, with "0" mark even with the edge of the track away from the blade, and it goes up to approx. 7.25".
I slid the Anderson square to the left to read 2 7/8 or so. Held it in place with flag stop and a couple of festool clamps.
My 1 inch stock was taller than the Anderson square, which is 3/4, so I added a scrap piece of 1" to support the track closest to me.
My stock was also longer than the width of the MDF (about 38 inches), so I couldn't use the bracket closest to me or the slop stop to keep track aligned. So with the track down and sitting flat on the MFT and firmly in the slop stop, I clamped another scrap next to the track (from underneath the table so it wouldn't hit the TS 55 motor) that would let me push the track against while sawing and keep it square even when the bracket and slop stop weren't in use.
Lowered the bracket, put the stock firmly against the far bracket and ripped. Knocked out the project in a few minutes. In the photo, they look a little off because they are sitting on an uneven cardboard box that has some metal packing straps on top, but flat on the table next to each other, they came out pretty darn good.
If I had time, I might have switched to the longer Festool track and re-oriented everything on the MFT by 90 degrees so that the entire length of the stock would fit underneath the track with the slop stop in use.
The only big issues were that the edge of the Festool track is curved, so it was difficult to get an exact reading on the measuring tape. Maybe that could be fixed by sticking something flat on the edge of the track and recalibrating. Also the Anderson square has curved edges (so that the phenolic edges aren't sharp), so it was difficult to align exactly with the kerf before I installed the measuring tape. I will need to adjust it on the next go round. As it was, it was fairly easy to simply mark the cutline on the first board, and then adjust the Anderson square before clamping it down.
Attachments
-
 Anderson Square 1.JPG114.1 KB · Views: 607
 -
 Anderson Square 2.JPG129 KB · Views: 524
 -
 Anderson Square 3.JPG100.9 KB · Views: 483
 -
 Anderson Square 4.JPG90.7 KB · Views: 466
 -
 Anderson Square 5.JPG122 KB · Views: 494
 -
 Anderson Square 6.JPG121.9 KB · Views: 588
 -
 Anderson Square 7.JPG117.7 KB · Views: 508
 -
 Anderson Square 8.JPG114.7 KB · Views: 552