Angled Face Joint

kd360

Member
Joined
May 12, 2021
Messages
2
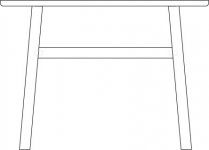
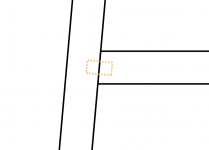
I'm thinking about purchasing a Domino and one of my first uses was going to join a leg cross member of a desk I've designed. This may seem like a very basic question but I was curious how I could use the Domino to attached the cross member to the table legs when the legs are at a 5 degree angle to the cross member? I've attached a JPEG to illustrate what I want to do.

Sorry if this is an obvious question but I would really know how this would be done with a Domino.

Thanks[attachimg=1]
 

Attachments

  • desklegs.jpg
    desklegs.jpg
    8.6 KB · Views: 620
Depending on how wide the legs are, I would make the mortise cuts perpendicular to the horizontal mating surface and not worry about it entering the leg at a 5-degree angle.  Just watch for blowout on the side.
 
Thanks Mike,
The legs and cross member are going to be about 2 inches wide. So what you are basically saying is that the domino will not be perpendicular to the floor or desk top but will be at 5 degree angle relative[attachimg=1] to the floor as shown in the attached image?
 

Attachments

  • Screen Shot 2021-05-12 at 3.55.24 PM.png
    Screen Shot 2021-05-12 at 3.55.24 PM.png
    50.3 KB · Views: 611
Just domino mortise on the crossmember prior to cutting the angle. That's how I do it on my rat machine. 
 
I don't have domino, but I do use dowel jigs. I would treat it like a miter joint.  I would go flush to the mating surfaces.  It is easier to visualize on the larger miters shown below.  I'm not sure how you would guarantee that the domino was square to the  surface of the end of the stock.

diy4.jpg
 
JDB said:
Just domino mortise on the crossmember prior to cutting the angle. That's how I do it on my rat machine.

This won't work as the dominoes could bottom out, and most importantly, the mortises milled on the rails are not angled. The mating mortises  (on the legs and rails) need to be of the same angle.

MikeGE's approach is the way to go.
 
kd360 said:
Thanks Mike,
The legs and cross member are going to be about 2 inches wide. So what you are basically saying is that the domino will not be perpendicular to the floor or desk top but will be at 5 degree angle relative to the floor as shown in the attached image?

Yes.  No one is going to see it after the assembly and the tenon should be strong enough after it is glued into the mortises.
 
The pieces were quite a bit thicker, but that is exactly how I did it on the first job I ever did with my DF500 that was more complex than faceframes or shelf edges.  These were something like 10 degrees if I remember right, it was long ago.
I even saved the test pieces from this for several years as a display on my desk. The machine is so precise that even with a double row of 10mm Dominos, you could pull the pieces apart and reverse them and it still fit together perfectly.
 

Attachments

  • 2015-09-16 10.01.27[711].jpg
    2015-09-16 10.01.27[711].jpg
    883.5 KB · Views: 404
I once had to help a friend build a baby crib that had vertical slats joining a curved top rail. I devised a way to reference the plunge angle using the side of the Domino instead of the front.  The sharpest angled joints got the shortest mortises, but he’s raises to babies in that crib and it’s still in good shape. Thr base of the crib was straight I used a very big Wooopeckers square to reference thr Domino’s side. Soulds fun key, but it stayed the day.
 
This is not a difficult task.

Just mark the centres where the dominoes will go. Keeping the machine flat against the rail faces is not difficult and all the depths will be right.

If you are assembling something like the picture shown by [member=74278]Packard[/member] then bring two pairs of adjacent sides together and then bring those two right angled sections together. That way the dominoes go straight in. If you try to assemble it as a square then it will be almost impossible.

Peter
 
It looks like Sedge might be covering this very topic on tomorrow's Festool Live Episode 55 - Domino Bevel and Miter Joints at 12PM EDT:
 
Back
Top