Another Thread About Parallel Guides

Just F Me

Member
Joined
Aug 4, 2014
Messages
227
Howdy ya'll  [big grin]

I have a project coming up to build some large cabinets for my laundry room.  I need to cut some large pieces that will be 12" x 70".  I've done a search on parallel guides and hear some mixed things about them.  Some people think they're great, some people think an aftermarket product is better.

If I could try to explain what I think the process would be, and ya'll can chime in to let me know if I'm heading down the right path.

I have a 42" rail and a 55" rail that I'll be joining together.  The sheets I'll be purchasing will be 48" x 96" of melamine. 

1)  Make a full rip cut to clean up edge.
2)  Make a cut roughly 24" so that I will end up with a 48" x 72" sheet.
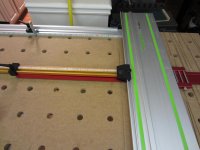
3)  Use the parallel guides to assist in making my two 12" x 72" pieces
4)  Put my new 12" x 72" piece on my MFT/3, but the long side up to the fence to roughly cut off one end and flip it over to cut the opposite end to obtain my final 70".

My overall question is, based on the process I listed above, would my piece also be perfectly square if my MFT/3 is setup correctly?  The whole idea for me is that I would like to build these large cabinets as accurately as I can.

I'm also trying to decide if I should buy the Festool Parallel Guide Extension Set or go with something else like the one offered by Seneca Woodworking?  I found this thread Parallel Guides vs Rip Guides vs Parallel Guide System where people seem to be pretty unhappy with the Festool product...
 
Theres a few things here, but up front ... you won't get 4 x 12" pieces out of a 48" panel as you'll be down approx 1/3" in total from the 3 kerfs (Just in case you weren't considering that [smile])

You'll get perfectly square cuts using you rails and MFT/3 (correctly joined and correctly squared), don't invest in parallel guides unless a) you really won't them or b) you going to be repetitively cutting many pieces.

I think the big issue people face with the Festool parallel guides is they're somewhat bulky and more expensive than cheaper alternatives that also leverage the Festool rails ... but there's nothing "wrong" with them - mine work fine!

You'll get varied opinions, so it'll be your call in the end anyway [wink]
 
Your process is good!  That is how ii break down sheet goods. except i dont  make that crosscut at 72/24, I leave my sheets full length.  That way i have any extra length on the panel "just in case".  The only way to make sure i have the same width is paralell guides or table saw.  Measuring and marking just leaves that tiny bit of lack of precision.
 
It may not be relievent to to your question, but you may want to do all your mating dados, rebates and the like, unless you are using KD fasteners, diminos or pocket holes, then I will be quite. In my old shop this help making pieces quite alot. Brent
 
Kev said:
Theres a few things here, but up front ... you won't get 4 x 12" pieces out of a 48" panel as you'll be down approx 1/3" in total from the 3 kerfs (Just in case you weren't considering that [smile])

You'll get perfectly square cuts using you rails and MFT/3 (correctly joined and correctly squared), don't invest in parallel guides unless a) you really won't them or b) you going to be repetitively cutting many pieces.

I think the big issue people face with the Festool parallel guides is they're somewhat bulky and more expensive than cheaper alternatives that also leverage the Festool rails ... but there's nothing "wrong" with them - mine work fine!

You'll get varied opinions, so it'll be your call in the end anyway [wink]

I actually only need three pieces of 12" x 70" so that works out perfectly for the 48" x 96" sheet. I was going to use the "left over" for my shelves as I designed my shelves to be slightly recessed and they're only 11" in depth. 

I guess what I'm also trying to think is HOW am I going to get square pieces.  My fear is that I'm using the parallel guides, but for some reason I have this super long piece that's not properly square.  Before I bought my MFT/3, I built some small cabinets and I was off by as much as 3mm.  I built a second cabinet this time having my MFT/3, and also using the experience from my first build and I was able to get things down to about 1mm. There is still room for improvement.

I would like to get them because I do think (I don't have any projects coming up) that I will need to make repetitive cuts in the future.

I suppose recently (Woodworking is completely new to me, I've only made 3 things) I didn't feel like I was being as consistent and as accurate as I would like so I've been buying tools to help reduce that problem.  I ordered the other day a 32" WoodPeckers T-Square.  Hopefully with this, I'll be able to have more accurate markings that is more consistent top and bottom so that I am able to line up my guide rail to.
 
roblg3 said:
Your process is good!  That is how ii break down sheet goods. except i dont  make that crosscut at 72/24, I leave my sheets full length.  That way i have any extra length on the panel "just in case".  The only way to make sure i have the same width is paralell guides or table saw.  Measuring and marking just leaves that tiny bit of lack of precision.

I'm only making the cross cut at 72/24 because my guide rail is actually a 42" and a 55" rail.  To leave the sheet full length, I wouldn't be able to use the parallel guides (I think), because it looks like it takes up a few inches on the rail itself.  But exactly what you mentioned, I don't want to have to measure, then cut again, I just want the same repetitive cut.
 
I don't like to rely on measuring for highly accurate and repetitive cuts. If I'm trying to cut a piece that is too big for my table saw and has to be exactly the same width at each end, I'll make a story stick that I use to position the track at each end of the cut. Usually, the story stick looks like a T-square. I also rely heavily on Woodpeckers squares. I think I have every size they make.
 
A story stick is another good way, but it has some pitfalls too.  If you striaghtline rip your full sheet, that is now the edge for reference. That will be where the length indicators for the parallel guides will rest with the rail laying at whatever measurement away form your initial straightline rip.  IF! you have set the parallel precisely the same your next rip will be parallel to that reference line.  Whether or not the end cuts are square is 1st of no importance and second not likely.  That is where your MFT comes in.  You now have a panel with 2 edges parallel to each other.  Now, IF! you have properly squared your MFT this is the step to make one end square to both parallel edges.  That cross cut is now your reference edge for crosscuts.  You now have a panel that has 2 edges parallel to each other and 1 end square to those parallel edges.  You will now measure( with the method of your choice) and set the flag stop on the MFT for repeating multiple, equally sized, square ends-tops-sides or whatever that particular piece will become in the cabinet carcase.  Eventually you will get to the end of your originally parallel ripped panel.  The remaining "scrap" may or may not be square on the end you never cut, (which is why I don't make that crosscut at 72/24, because I have no way of knowing with certainty the I am actually cutting it square at that measurement.  If I did, then the MFT would serve no purpose, except repeatability.  But it's actually an integral part of squaring the original panel and not just a fancy table that allows repeatability.)

SO, whether or not your initial straigtline rip is square or parallel makes absolutely no difference whatsoever.  It is simply a straight line rip to use as a reference point to make parallel cuts from.  You could actually turn your plywood or whatever into a Rhombus and as long as your rips are parallel and you use some method to square 1 end of the piece and the same method to make another square cross cut the only thing that will happen is you will waste material. 
Sorry if I rambled, it was reinforcing the process I learned during Festool training with Brian Sedgewick.
 
roblg3 said:
A story stick is another good way, but it has some pitfalls too.  If you striaghtline rip your full sheet, that is now the edge for reference. That will be where the length indicators for the parallel guides will rest with the rail laying at whatever measurement away form your initial straightline rip.  IF! you have set the parallel precisely the same your next rip will be parallel to that reference line.  Whether or not the end cuts are square is 1st of no importance and second not likely.  That is where your MFT comes in.  You now have a panel with 2 edges parallel to each other.  Now, IF! you have properly squared your MFT this is the step to make one end square to both parallel edges.  That cross cut is now your reference edge for crosscuts.  You now have a panel that has 2 edges parallel to each other and 1 end square to those parallel edges.  You will now measure( with the method of your choice) and set the flag stop on the MFT for repeating multiple, equally sized, square ends-tops-sides or whatever that particular piece will become in the cabinet carcase.  Eventually you will get to the end of your originally parallel ripped panel.  The remaining "scrap" may or may not be square on the end you never cut, (which is why I don't make that crosscut at 72/24, because I have no way of knowing with certainty the I am actually cutting it square at that measurement.  If I did, then the MFT would serve no purpose, except repeatability.  But it's actually an integral part of squaring the original panel and not just a fancy table that allows repeatability.)

SO, whether or not your initial straigtline rip is square or parallel makes absolutely no difference whatsoever.  It is simply a straight line rip to use as a reference point to make parallel cuts from.  You could actually turn your plywood or whatever into a Rhombus and as long as your rips are parallel and you use some method to square 1 end of the piece and the same method to make another square cross cut the only thing that will happen is you will waste material. 
Sorry if I rambled, it was reinforcing the process I learned during Festool training with Brian Sedgewick.

Thanks for your explanation.  I had to read it a few times and try to visually understand what you were talking about (I'm not very smart  [big grin] )  I tired to draw up a diagram real quick to see if this is what you meant.

For sake of example, this isn't drawn to scale, but more drawn to just prove a point...hopefully I understood your point properly.

So for this image, imagine the large box is a sheet good.  The line down at the bottom is only for reference to show the how off the sheet good is.  It serves no other purpose.
JXmKTRi.png


In this image, I add the red box, which is going to be our guide rail.  Lets pretend to make a cut at the bottom of the red box.
ZqZxpw1.png


This image below shows how the bottom of the sheet good is now straight.  It doesn't matter where we put the rail as long as we make a straight cut
SkJX5bE.png


Now, we're going to move the rail up, and make another cut.  For sake of example, don't worry about the "direction of the cut".  As in if we're going to make a cut on the top side or bottom side of the rail.  I'm personally imagining that this is the most important part.  The rail needs to be positioned perfectly in this second cut to ensure that the 1st and 2nd cuts are parallel.  Now this is where if I had parallel guides that it would play it's part.  If I didn't have parallel guides, I better make sure that my markings to position the rail are perfect or else, not good...
5RE5nNK.png


So in this image, we show the piece that we have cut from the large sheet. 
9hQFlcN.png


Here, since we have a side that we know is straight, we butt that end up to the fence rail on the MFT/3 (the long black box) and make a cross cut.  You can see on the right side that the piece we're going to cut isn't square.  This is one part that is pretty exact in the way that I drew it on the computer.
7JXXtLz.png


So once we make this cross cut, we should have a square corner.  Rotate the board over to the opposite side, and make another cross cut to straighten the edge so now everything is square and/or cut it so that it's square and also to the correct length.
oy0xySy.png


So how much of this was wrong, how much of it was right, and how much of it did I just pull out of my  [big grin]
 
Perfect! that is exactly how to make a "perfectly" square panel.  You said "flip" but I suggest that that you "helicopter" the board.  It is a good practice to rotate your work piece keeping the same face upwards so as not to lose the side that you are working on.  In this example it isn't necessary, but a good work practice that will help avoid mistakes during joining, sanding or finishing.

Also, if you have a good table saw you can make parallel cuts ** once you make the first straight line rip**
 
Melamine can sometimes have internal stress that will release when ripped.  When you rip the 12" piece, slide it over (close the saw kerf) and see if the two pieces bump back together.  A little bow at this point will go a long way in added frustration trying to get square parts.
 
In order to set both ends of the parallel guides to the same length, I use a Woodpecker rule with a rule stop on it.


Attachments

  • IMG_0133.JPG
    IMG_0133.JPG
    287.9 KB · Views: 561
I like my Festool parallel guides.  They work fine for me.  But I don't use them when I'm ripping only cutting up one or two sheets.

I use the razor blade system for that.  The razor blade system is simply using utility knife blades as stops.  You measure over with your tape and stick a razor blade in at the desired measurement.  Do it on both ends then bump the guide up against the two razor blades.  Don't forget to remove the blades before cutting!  With this system you don't even bother with making a mark pencil.

You tweak the positioning of the razor blades to suit the condition of your rubber edge. 

Sooner or later you're going to want to rip a whole sheet.  So why not go ahead now and get a guide that you can join to your 55 that will do that?  Then you can leave the 42" on your MFT.  If your current rail doesn't have holes for the LR32 you could could kill two birds.  Our you could get a 75" which would even permit diagonal cuts on an 8' sheet.  A 75 is a little nicer for full sheet crosscuts as well.
 
fshanno said:
Sooner or later you're going to want to rip a whole sheet.  So why not go ahead now and get a guide that you can join to your 55 that will do that?  Then you can leave the 42" on your MFT.  If your current rail doesn't have holes for the LR32 you could could kill two birds.  Our you could get a 75" which would even permit diagonal cuts on an 8' sheet.  A 75 is a little nicer for full sheet crosscuts as well.

I actually have a 55" LR32 rail, and two 42" rails.  When I bought my MFT/3 from Bob Marino, one of the rails came badly damaged on one of the corners.  Bob sent me another one, but the second one has a slight ding on top about the size of a finger tip.  I find it cumbersome if I asked him for a 3rd rail so I'll just live with it.  Kind of annoying.  So I have the rail on the MFT/3, but also the second 42" rail that I'll use to join to my 55" rail.  It's not a full LR32, but it will do for now.
 
I like my parallel guides, too. I did a test on several pieces of wood ripped, and they varied by only .2 mm. (Don't take this as fact; I am a little fuzzy on the results.)

However, they are a bit cumbersome to use, especially if you just want to make one parallel cut. How to other posters like the rip dogs? Do they work on larger boards? Can you fine tune them to take less than 1mm off a board?
 
Back
Top