Anyone Recognize this Lazy Susan Cabinet Hardware?

jeffinsgf

Retailer
Member
Joined
Oct 23, 2009
Messages
1,066
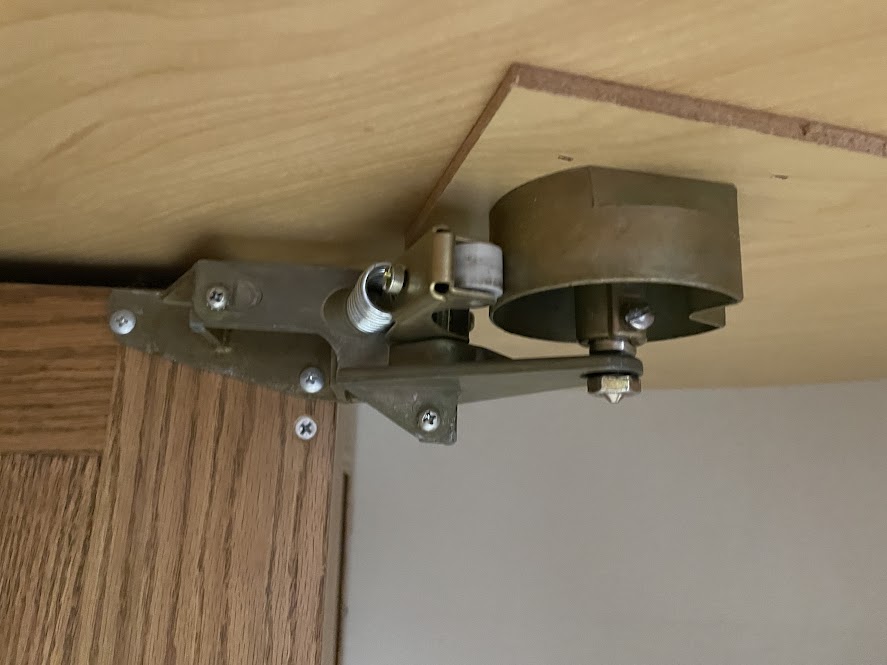
Looking for help. I'm trying to adjust a lazy susan corner cabinet that has been hanging open by about an inch since we bought our house. We just had a new floor put in the kitchen, and it seemed like the right time to address the issue, but I must admit it has be stumped. I understand how the mechanism works. It appears to have some adjustment to it, but no matter what I tweak, the door still closes to the same point. It looks like the circular piece with the wedge cut out needs to rotate, but it is screwed to the cabinet top and the screw holes don't appear to be over-sized or slotted to allow rotation (with what little viewing access I have).

I can't find any maker's mark on the hardware to look up instructions. I thought someone here might recognize it and know how to adjust it or at least point me to the manufacturer.

EDITED TO ADD: Cabinets built in 1990.

AP1GczPSgm8jFVu_gt97H4D7eyRNPb4t6PuOI6i8M6JZmn89XfnXTvzCXi_8WcsKApTDchRO1MXv_CdmB8uibirco98eXyYjS68PadewQiHHKAVZcjgyy2f2jQSsqRNX2k7EdcH2_3J_5yEIzqxOdZUmlwy0FQ=w887-h665-s-no
 
Thanks for the lead, Packard. It is indeed an Amerock Turn-A-Shelf 9920. But it's not broken, it's just out of adjustment or was not installed correctly to begin with. Amazing that the original installation instructions aren't floating around the internet somewhere. I guess it isn't so amazing since it probably went out of production sometime in the early 90s.
 
That link has a repair video.  I did not watch that. Maybe there are adjustment instructions in the video.

Good luck.
 
If you haven’t already solved the problem, here is what I’d do…

Remove the door.

Mark the rotational position of the “cam thing”.

Temporarily tack a few small pieces of wood as a low fence around the “cam thing” so it will stay concentric with its original location, assuming that aspect is presently okay.

Unscrew and remove the “cam thing” and enlarge the mounting holes with a step drill.

Reinstall the “cam thing” in the interpolated correct position adding washers to the mounting screws.

Reinstall the door and test.

Now you can fine tune the position of the cam thing”.

When good, if you plan to remove the fence, drill one or two pilot holes in the “cam thing” to add security screws in case it falls might slip under the washers.
 
I have never seen a mechanism like that before, pretty easy to see how it works, but doesn't look like the most robust thing I ever saw either.
I've done a bunch of them over the years, some like that, where the door goes inside as it rotates. Those require an in-set door though, and while some people do mix them with overlay doors on the other boxes, I don't like that look. Others use a bi-folding overlay door that opens to reveal the spinning shelves. That's the ones I like. Those all spin around a central round column. The most common brand is Rev-A-shelf, at least around here.
The also make some for blind-corner cabinets, that reach further inside that dead space, buy turning and pulling out like a drawer. That's what I did for my daughter's kitchen. Hers is just a single door, which left room for a drawer stack next to it. I did move the stove over a little, but it is a lot better.
It all started as in inset revolver type and stored way less stuff. Check out the darkness transformation. I just found the old pic, before the tear out, and the final after appliances. The extra cabinets were done as a second phase to fit around them.
 

Attachments

  • White kitchen blind2.jpg
    White kitchen blind2.jpg
    342.2 KB · Views: 160
  • White kitchen half in.jpg
    White kitchen half in.jpg
    439.9 KB · Views: 107
  • White kitchen phase 1.jpg
    White kitchen phase 1.jpg
    349.2 KB · Views: 110
  • White kitchen start point.jpg
    White kitchen start point.jpg
    334.5 KB · Views: 93
  • IZkitchen5.jpg
    IZkitchen5.jpg
    228.3 KB · Views: 97
Michael, I had fallen to closely the same procedure, except I was thinking of just outlining the cam with a marker. Love your idea of location blocks. There are at least two more sets of mounting holes, one of which is over-sized, so I'm pretty sure I can get it located and screwed securely without reusing the existing holes. Thanks for your help.

CRG, actually, the whole assembly is quite robust. There are two of them in opposite corners with a couple cabinets and the stove between. When we bought the house I was sure it was on the verge of collapsing, but (embarassingly) it has worked flawlessly for 5 years, just not clocked to the face frame.

I love what you did for your daughter's kitchen. I would much rather have another stack of drawers than a 3/4 lazy suzan. If it comes to remodeling the cabinets, I'm stealing the idea.
 
I have a lazy-Susan lower cabinet, and all the other hardware is Amerock, and also from circa 1990, and mine looks nothing at all like yours does.  The entire mechanism is hidden below the bottom shelf.

I recently re-faced my old cabinets and replaced the hinges with soft-close Blum hinges.

I would note that this would have been a straight forward swap with only a vix bit needed because the screw holes were not in the same position.  A nice upgrade.

I complicated things a good bit by changing the 1/2” overlay hinges to 1”overlay.  The less revealed face frame as a result looks more modern. 

It did create some complications on a few of the cabinets, but all were solved.

But if you are swapping like-for-like, a simple upgrade.
 
jeffinsgf said:
Michael, I had fallen to closely the same procedure, except I was thinking of just outlining the cam with a marker. Love your idea of location blocks. There are at least two more sets of mounting holes, one of which is over-sized, so I'm pretty sure I can get it located and screwed securely without reusing the existing holes. Thanks for your help.

CRG, actually, the whole assembly is quite robust. There are two of them in opposite corners with a couple cabinets and the stove between. When we bought the house I was sure it was on the verge of collapsing, but (embarassingly) it has worked flawlessly for 5 years, just not clocked to the face frame.

I love what you did for your daughter's kitchen. I would much rather have another stack of drawers than a 3/4 lazy suzan. If it comes to remodeling the cabinets, I'm stealing the idea.

Go right ahead [member=7266]jeffinsgf[/member] it has worked for her flawlessly. She had no idea of the final details. She just gave me some very specific parameters of "same basic layout, all bright white, flat slab doors, touch latches(no pulls) single bowl stainless sink". Somehow it changed to flat panel doors and she bought those chunky pulls herself.  [huh] I took her to the shop to see the Corian sheets full size, tiny samples just don't convey the reality. She picked Rain Cloud.
The hardware for the over microwave cabinet door was the other surprise for her. She had never seen Blum Aventos. It's a bit crazy for something that she never opens, it's really just access to the duct work and some once a year used items, that need a home.

I think robust was the wrong word, the parts actually look good. I guess I mean needlessly/strangely complicated. Getting two obviously separate parts (top/bottom) aligned seems to be an issue? I assumed sketchy because it appears to use the door itself as the connection.
It has never been right, since you've had it? I find it hard to believe that someone installed it while not closing correctly, though I don't know why? So how could it have gotten off afterword? If it was ever right.
 

Attachments

  • White kitchen Aventos.jpg
    White kitchen Aventos.jpg
    221 KB · Views: 57
You're right. The door is the structure and one of the reasons I wanted to find the original installation instructions was to see how you're supposed to locate the upper and lower attachment points...just out of curiousity.

When I started looking at the thing this morning I was instantly perplexed with just what you asked. The cabinetry in the kitchen is obviously custom built and of slightly above average quality. I can't imagine an installer walking away with the door not properly aligned, but if there's an adjustment to clock the door, I can't find it.

I'm going to watch the entire video Packard linked...as painful as that is going to be. The guy has the presentation skills of a 3-toed sloth. If I put it on double-speed maybe I can get to the alignment section without falling asleep.
 
[member=7266]jeffinsgf[/member] is it possible that they never got it right, by the manufacturer's instructions, and made some kind of stop that broke/failed? Does it revolve completely? IE, open by pushing either way? If so, a stop is not likely, which is why the detent stop in the first place. Someone may have done some kind of work around though.
The ones I have used the most (Rev-a-shelf) work by gravity. A cross pin in the center column drops into a groove on the base plate, which is easily clocked. With these, the door is not structural, technically you don't even need one. It's just a cover
 
Back
Top