A small story before the pictures. Last year I ordered a custom front door for my wife for christmas. Full arch made from African mahogany. I them built an overhang on the front of our cape cod to accent the door. (Pic 1)
I didn't buy the optional interior trim as it was $450 and I was already shelling out too much for the door. If always planned on cutting the window moulding into thin strips and bending it around a form and then glueing it back up. I had the form but didn't touch it for over a year. So now seemed to time to work on this.
I just finished putting Incra rails and positioner on my mafell erika so I felt confident Id be able to make the cuts I needed. (Pic 2)
I started with 2x 12' lengths of 4" wide trim. (Pic 3) I was taking about 3/8" rips but it depended where the saw nerf landed on the profile of the trim. Without the Incra rails im pretty confident that I couldn't have been precise enough to cut that profile into 10 pieces and reassemble it. Using calipers I would transfer the measurement of what I just cut back to the saw and add the saw kerf back in so that the other piece of trim then added the saw kerf back to the overall profile. I can't say enough about the Incra rails. (Pics 5,6,7)
So I've never done any sort of lamination like this so not being confident on my glue up skills I decided to do 2 sets of glue up. First Id do 4 pieces and the second glue up would be the other 6. I split it like this because the 4th rip was actually thinner than the other because it fell where the relief cut on the back of the trim was. By having this be the last piece in the first glue up I could more easily make it flush on the face with the others.
I cut squares into the form 3" back from the edge to clamp the pieces. Then put a piece of 5/8" sheetrock under and and screwed it all together. This would give me something to reference the bottom of the profile off of to make the face line up.
I didn't have enough clamps, I needed 24 small ones so I took a trip to old faithful, harbor freight. For 70$ I got clamps that I don't worry about getting glue all over.
I then set up on top of my dining room table and had my wife assist in the glue up. Rest of the pictures tell the story but so far it's working great. With a little hand sanfing, priming, hand sanding and then a cost of lacquer sprayed on im optimistic that I can get it to match the rest of the trim in the room. It's been a cool experiment and test of my abilities and I'll update as it progresses.
Attachments
-
 image.jpeg118.4 KB · Views: 389
 -
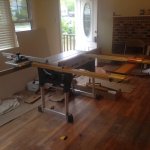 image.jpeg134.5 KB · Views: 409
 -
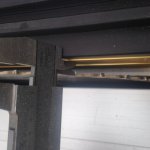 image.jpeg112 KB · Views: 351
 -
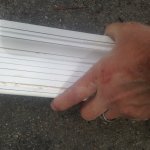 image.jpeg163.6 KB · Views: 319
 -
 image.jpeg97.5 KB · Views: 356
 -
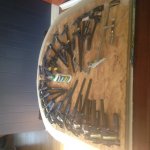 image.jpeg136.1 KB · Views: 423
 -
 image.jpeg135.8 KB · Views: 338
 -
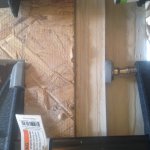 image.jpeg153.4 KB · Views: 323
 -
 image.jpeg144.7 KB · Views: 370
 -
 image.jpeg73.1 KB · Views: 384