DavidCBaker
Member
- Joined
- May 31, 2010
- Messages
- 537
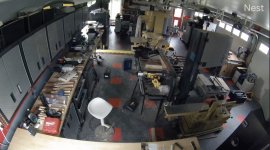
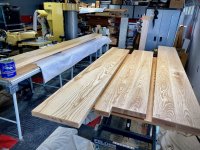
Well, that was fun. A much bigger job than I imagined, but my oldest son asked if I’d build the bartops (around the outside windows) for the 3rd location they are opening (this one in Birmingham). What took long was getting everything exact (some finished pieces were 15’ long) but mainly it was the sheer bulk/weight of these things, working alone. The pictures kind of tell the story, but here were the steps, in order. There were four tops of different lengths and shapes.
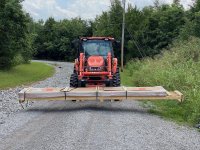
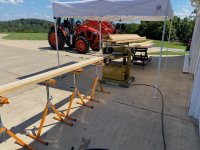
Unload semi-truck with 8/4 ash that I sourced from a mill in NE Ohio. This wood is absolutely gorgeous. If you ever need a great source for lumber, I’d recommend Baird Bros. I’ve used them twice now. That is, if you don’t mind dimensioning it all yourself.
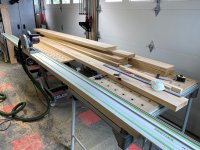
Next step was using the 23” Powermatic 209 thickness planer (5hp, 230v). It’s critical to minimize sniping with these exit stands at the right height, the infeed/outfeed rollers set up, the ground tabletop waxed, etc.
Then it’s time to make a perfect, long cut at exactly 90-degrees, on each side of both pieces. This will be the glue up joint for the edge-joining. I used my Festool TSC 75. I didn’t even need to sand the joints—they come out perfect. And of course a tracksaw is exactly what you want to keep it perfectly straight. The cut was so long that I had to join to tracks together. But that saw is so good that you I could skip using my Powermatic 3hp 12” Jointer.
Then cutting the domino mortises. I used 10mm x 140mm, spaced at 12” apart. The middle one is perfectly tight and the ones on the other side are looser since they are used just for vertical alignment.
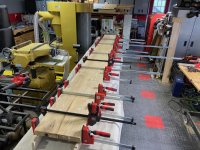
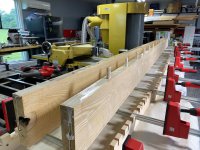
Glue up with every clamp I have.") They are compressed at 750 lbs of pressure using a hex driver in the handle, and then left for 24 hours to fully dry/cure.
They are compressed at 750 lbs of pressure using a hex driver in the handle, and then left for 24 hours to fully dry/cure.
Then through the thickness planer one more time to clean up the long joint (not pictured). Believe me, this was the heaviest physical work. The longest piece weighed 120 lbs or so and I did it alone. Not fun.
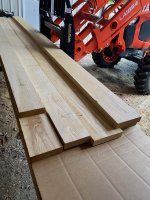
Then a little sanding (120 grit and then 220 grit) with the Festool ETS 150mm EC. But the thickness planer has a helical head, and it comes out nearly ready for the final finishing.
Then I used the Festool MFK 700 w/ a ¼” roundover bit.
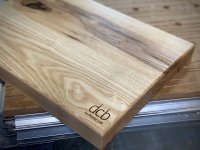
Then a hot branding iron.
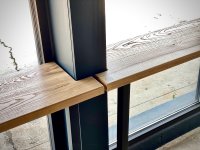
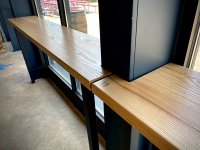
Then finishing with a General Finishes wipe on.
Then the installation today!
About 50 hours (not including the trip to measure or the trip to install).
[attachimg=1][attachimg=2][attachimg=3][attachimg=4][attachimg=5][attachimg=6][attachimg=7][attachimg=8][attachimg=9][attachimg=10]
Unload semi-truck with 8/4 ash that I sourced from a mill in NE Ohio. This wood is absolutely gorgeous. If you ever need a great source for lumber, I’d recommend Baird Bros. I’ve used them twice now. That is, if you don’t mind dimensioning it all yourself.
Next step was using the 23” Powermatic 209 thickness planer (5hp, 230v). It’s critical to minimize sniping with these exit stands at the right height, the infeed/outfeed rollers set up, the ground tabletop waxed, etc.
Then it’s time to make a perfect, long cut at exactly 90-degrees, on each side of both pieces. This will be the glue up joint for the edge-joining. I used my Festool TSC 75. I didn’t even need to sand the joints—they come out perfect. And of course a tracksaw is exactly what you want to keep it perfectly straight. The cut was so long that I had to join to tracks together. But that saw is so good that you I could skip using my Powermatic 3hp 12” Jointer.
Then cutting the domino mortises. I used 10mm x 140mm, spaced at 12” apart. The middle one is perfectly tight and the ones on the other side are looser since they are used just for vertical alignment.
Glue up with every clamp I have.
They are compressed at 750 lbs of pressure using a hex driver in the handle, and then left for 24 hours to fully dry/cure.Then through the thickness planer one more time to clean up the long joint (not pictured). Believe me, this was the heaviest physical work. The longest piece weighed 120 lbs or so and I did it alone. Not fun.
Then a little sanding (120 grit and then 220 grit) with the Festool ETS 150mm EC. But the thickness planer has a helical head, and it comes out nearly ready for the final finishing.
Then I used the Festool MFK 700 w/ a ¼” roundover bit.
Then a hot branding iron.
Then finishing with a General Finishes wipe on.
Then the installation today!
About 50 hours (not including the trip to measure or the trip to install).
[attachimg=1][attachimg=2][attachimg=3][attachimg=4][attachimg=5][attachimg=6][attachimg=7][attachimg=8][attachimg=9][attachimg=10]
Attachments
-
 01-forks.jpeg622.6 KB · Views: 569
 -
 15-finished.c.jpeg566.8 KB · Views: 555
 -
 14-finished.b.jpeg460.5 KB · Views: 564
 -
 12-finishing.jpeg455.5 KB · Views: 552
 -
 11-branding.jpeg255.4 KB · Views: 570
 -
 08-clamped.jpeg422.6 KB · Views: 555
 -
 07-glueup.jpeg324.5 KB · Views: 565
 -
 05-long.cut.jpeg385.6 KB · Views: 564
 -
 03-planer.setup.jpeg439.8 KB · Views: 566
 -
 02-raw.wood.jpeg406.4 KB · Views: 574