Atomic Ryan's BF/MFT Build Out

FishFly

Member
Joined
Dec 2, 2020
Messages
9
Third post here.  Someone suggested I start a thread for it.  I think I'll start by saying "Whew, what a build!"  I sank more half inch screws in the past two weeks than I have my entire lifetime!  But in all serious I'm still not done sinking screws.  I won't bore everyone with too much detail, but it is a very methodical/precision build.  Yeah there's a little wiggle room, but tolerances are fairly tight.  I wanted to make some minor changes early on, like a Cali Air Compressor and Sprayer on the large drawer end.  I've opted to stay the course with Ryan's original design, as it will help me free up a wall storage unit if I do.  I currently have no place for wood storage, so this would help achieve that. 

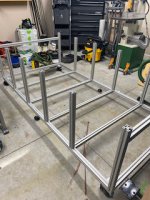
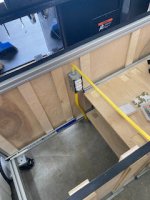
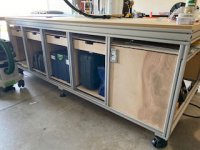
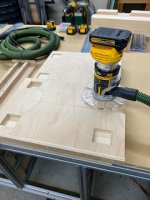
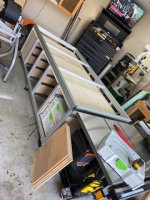
Below I have attached pictures of the unfinished build, as well as the plans I utilized from ACS (80/20 supplier out of Georgia).  Anyone can use these exact plans if they want to order it from ACS, just give them the plan name.  All in, you're looking at around $2500.00 without the guide rail system, or any TSO products.  If someone wants me to do a price breakdown of everything, I would be  happy to oblige.

[attachimg=1][attachimg=2][attachimg=3][attachimg=4]
 

Attachments

Starting Point
[attachimg=4]

Dividers In
[attachimg=5]

Getting the Drawer/Shelf spacing right
[attachimg=6]
 

Attachments

  • 3.jpeg
    3.jpeg
    25.8 KB · Views: 793
  • 2.jpeg
    2.jpeg
    51.6 KB · Views: 556
  • 1.jpeg
    1.jpeg
    27 KB · Views: 564
I'll get the image thing right in a moment.
Wiring to the MFT added.
[attachimg=1]

Far side.
[attachimg=2]

Drawers done.
[attachimg=3]
 

Attachments

  • IMG_1089.jpeg
    IMG_1089.jpeg
    20.6 KB · Views: 1,984
  • IMG_1091.jpeg
    IMG_1091.jpeg
    28.4 KB · Views: 1,953
  • 6.jpeg
    6.jpeg
    21.4 KB · Views: 2,515
Sys feet drawer jig. Poor palm router.
[attachimg=1]

Pan installed.
[attachimg=2]

Top installed, Drawers installed, pulls installed.
[attachimg=3]
 

Attachments

  • 7.jpeg
    7.jpeg
    22.6 KB · Views: 1,940
  • 8.jpeg
    8.jpeg
    29.8 KB · Views: 1,927
  • 9.jpeg
    9.jpeg
    55.7 KB · Views: 1,981
Looks great! Atomic style! Out of curiosity how many systainers does it hold, and do you remove that support leg in the middle to move it around?
Nice work
 
Vondawg...On the "double deep side" you could have 8 SYS 1,2, & 3's.....Or 24 sys 1's.  On the single deep side, it is set up for four Sys 5's.  More than I'll ever own!

rocky...The extrusion brand new from ACS was $1600. which included $160.00 UPS shipping charge.  The extrusion could be purchased cheaper if cut and drilled.  It was a service I paid for, because it sounded more exact that what I would have done with no room for error.  I would venture that there was nearly $300.00 worth of cutting and drilling upcharges.  I would say a person could get the aluminum shipped uncut for under $1k.  For me, the removal of my error was totally worth the uncharge!

Honestly, even though the expense was great my woodworking is already showing signs of improvement.  I've never had an outfield table, and never had an assembly table.  I'm imagining that with the addition of the guide rail and dog holes, things will look even brighter!  Work space definitely stays much, much cleaner with this table.
 
Superb work. Wish i had the room and budget for one. Currecntly building a sysport mft cart. Just waiting on updated drawer slides as the 12” slides dont really work for what i need.
 
Nice job! Curious why you feel that you couldn’t get the 80/20 cuts accurately enough on your own? Lack of proper equipment? From the looks of your shop, I would surely think that you have the skills.
 
I did a big project with 80/20 stock using 80x160mm profiles which were too big for me to cut in one pass so I paid them to cut the parts. I expected to receive short square ended blocks but instead got parallelograms.

I found out that their tolerance spec for angles was 1/10th degree which might be okay for small profiles but when the big stuff off that much (within spec for them) it affected the length enough that some of the pieces failed to meet the length spec (+/- 1/32”), so I was able to get several of them  replaced but still had to find another way to make them square.

Went to the local Maker Space to get time on the knee mill to square them up and for the other smaller profiles (40x120 and under) cut them with the TS 75 on the MFT, pretty darn close to square.
 
Wood_Slice, Thank you sir!

SteveL, It was a combination of not fowling up any pieces and the length you have to order the aluminum.  I believe their either 12 or 16ft pieces.  By the time I made the cuts, there would be little margin for error.  And with my OCD, I knew that I would stress over every cut ultimately slowing down the much needed build.  Furthermore, I can tell you that I had to raise the dust shelf which resides under the top.  As a result I had to drill out the holes to accept the Allen key.  It would have been a real chore to have drilled them myself.  By the looks of the tool you purchase from 80/20 to cut the holes, it works a lot like a dowler.  While I think my skills are there, I just didn't need anything slowing the project down further.  But it certainly would have been much cheaper doing it myself, around $170.00 which would have covered the cost of shipping.  Ultimately bringing the cost down to around $1200 to $1300.00.

Michael Kellough, I'm glad I went with ACT.  While I couldn't talk to anyone live on the telephone, the engineer on the project was "Johnny on the Spot!"  The email chain on this bench was reasonable, but I compressed a lot of questions into a couple of emails.  Luckily, AtomicRyan took a ton of guess work out of the build. 

I still don't have the dog holes in place, but can say that it is a vast improvement over what I had (MFT).  I cut a piece of 1" foam into four manageable pieces and taped it back together so that it folds like an accordion.  It rests in a small normally unusable spot in my shop and I break it out when I need to break down ply.   
 
FishFly said:
I cut a piece of 1" foam into four manageable pieces and taped it back together so that it folds like an accordion.  It rests in a small normally unusable spot in my shop and I break it out when I need to break down ply. 

I often use foam to break down ply, and I'm 100% stealing this idea.  I may be the last person on here who hadn't heard of/thought of this, but it never occurred to me at all. Thanks!
 
I haven't seen it used like that before, but I'm so cramped for space and OCD that I couldn't stand the thought of looking at a 4x8 sheet of foam all the time.  I'm sure someone else has done this.  When you tape it up, make sure you put the one tape side up, the other two will be face down.  It will keep you from cutting two pieces of tape and only cut into one when ripping that direction.  I used aluminum foil duct tape, thin and creases well.  It doesn't really have to be taken off just cover with more when in need.

So far it's been perfect, and out of sight until needed.
 
You can also use the interlocking foam floor pads. 8 pieces cover 4x8 feet, close enough anyway. You don’t actually need to cover the whole panel though, just enough to support it evenly and to cover the path of the saw.
 
Back
Top