Beginner's Attempt at an Assembly/Outfeed Table

16paws

Member
Joined
May 12, 2014
Messages
27
Hello

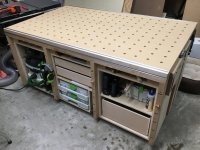
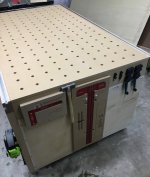
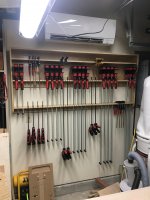
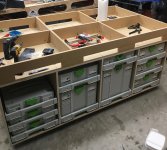
I made the following assembly/outfeed table.  The bench is basically two birch-ply cases glued, kreg screwed and dominoed together...one side for Festool storage, the other for drawers, vacuum, shelf, etc. The base is sits on leveling casters and supports an MDF torsion box with a 20mm hole array top.  I drilled the drawer alignment holes and the top using the LR32 system.  All dimensions had to be reversed-engineered from the videos below, but a total height of 880mm had to be established to act as an outfeed table for my table saw. Along each side of the top is a piece of hardwood containing 2 aluminum tracks from Misumi Engineering for clamping.  On the drawer side are 4 vertical hardwood pieces with domino slots cut into them so that I can place dominoes in the slots and rest work on them.  This table is obviously an adaptation of Alabama Woodworker's MO/AT and BenchWorks' shop plans.  In fact, I contact both Huy and Timothy during this project for their help and they both were very patient and helpful! Thanks guys!  I know it is not perfect, but it is my third project (first was Ron Paulk's bench, second was Timothy Wilmots clamp rack).

Beginner lessons learned:

1) Don't buy cheap Chinese plywood...it will tear out, have voids and thin veneers and not hold screws well.
2) Use the case building techniques shown in the BenchWorks videos, namely dadoes and rabbets for accuracy.  I didn't and paid the price in accuracy and ease of assembly.
3) Set aside enough time and be patient (I am working on it)
4) Don't watch "13 Hours: The Secret Soldiers of Benghazi" while assembling cases...every clamp was way over-tightened!
5) There are a lot of decent, experienced woodworkers out there willing to field sophomoric questions, including Huy and Timothy, not to mention the guys at my local Woodcraft store.
6) Don't let frustration get the best of you.  Like anything else in life, the more you do it, the better you get...YouTube helps facilitate that process.
7) Enjoy the journey

Hope this helps other beginners.

Marc


Attachments

  • IMG_1570.jpg
    IMG_1570.jpg
    2.1 MB · Views: 1,148
  • IMG_1563.jpg
    IMG_1563.jpg
    1.5 MB · Views: 934
  • IMG_1367.jpg
    IMG_1367.jpg
    1.9 MB · Views: 968
  • IMG_1565.jpg
    IMG_1565.jpg
    2.1 MB · Views: 983
Thanks!  Yes, the casters are approximately 4" in from the side and ends at each corner.  They are the same model that Huy used in his MO/AT. I believe I bought them from Caster Connection.
 
Are there any supports under the middle of the mft top or just in the sides?

Thanks, looks good and a pretty versatile shop setup.

Ben
 
Very nice!  Mind sharing the torsion box grid pattern?  Are there any holes in the bottom to retrieve items that find their way into the 20MM holes?

Cheers - Gary

 
Brs7377 said:
Are there any supports under the middle of the mft top or just in the sides?

Thanks, looks good and a pretty versatile shop setup.

Ben

Thanks Ben.  There is a middle support down the entire length of the table and then two cross supports equally spaced.  Once I had the bottom halves together, I used a flat edge and worked to get the top dead flat.  Once I did that, I glued on 1/2" MDF, the sides, and the middle sections.  I then used the large flat edge again to find any high or low spots.  In the end, I kept moving the flat edge around the top in all different directions and seeing if a playing card would fit under the edge.  If it did, I adjusted the top braces with a block plane.  The result is a very flat surface with the 20mm array.
 
Z48LT1 said:
Very nice!  Mind sharing the torsion box grid pattern?  Are there any holes in the bottom to retrieve items that find their way into the 20MM holes?

Cheers - Gary

Thanks Gary.  Attached is the pattern.  Like I said in my response to Ben, I kept checking the flatness with a 36" veritas flat edge and playing card and then adjusting with a block plane.  The array top is screwed down, so I can always remove/replace it. The slits that you see allow me to retrieve anything that falls below the array top with a scrap piece of the track.  I planned on those slits actually being cubby holes like the Alabama Woodworker's MO/AT, but had to settle on their current size to meet my 880mm overall height limit.  I believe Huy's MO/AT had room for the larger cubby holes, because he used homemade drawers for his Festool tools vs the Festool SYS-AZ drawers that I used.
 

Attachments

  • IMG_1503.jpg
    IMG_1503.jpg
    1.6 MB · Views: 825
Marc, thanks for sharing your project. I like your bench and will make an attempt to a similar design soon. I also like your clamp rack  [big grin]
 
Great looking bench. I've been looking through the FOG for a few nights now looking for what I was picturing in my mind and this is it.

Do you happen to still have any of the dimensions/plans that you used?

Thanks
 
I've learned the "don't buy cheap Chinese ply" lesson many times... Yet the temptation of $10 Craiglist 4x8 plywood sheets is always calling like a siren. At the end of the day, I'm not sure I've ever been happy with a project that has started with cheap ply. My thinking: my time is valuable. Why spend it trying to unwarp and cover up for problem materials? If I'm thinking about using cheap materials, well, I might as well just swing by the local Ikea. If I'm going to spend my time making something, it better be something I can't find at a big box store.
 
[member=51886]ryanjg117[/member]
ryanjg117 said:
I've learned the "don't buy cheap Chinese ply" lesson many times... Yet the temptation of $10 Craiglist 4x8 plywood sheets is always calling like a siren. At the end of the day, I'm not sure I've ever been happy with a project that has started with cheap ply. My thinking: my time is valuable. Why spend it trying to unwarp and cover up for problem materials? If I'm thinking about using cheap materials, well, I might as well just swing by the local Ikea. If I'm going to spend my time making something, it better be something I can't find at a big box store.

I bought Chinese Ply when I built my shop. A lot of void yes, but I use it to close the walls. Standard 3/4 ply 4'x8' @ homedepot was $84, the Chinese 3/4 G2S was $49  [eek] I can hang pretty much anything anywhere  [big grin]
 
ttf5003 said:
Great looking bench. I've been looking through the FOG for a few nights now looking for what I was picturing in my mind and this is it.

Do you happen to still have any of the dimensions/plans that you used?

Thanks

Hello.  Sorry for the delay in replying, but I did not see your message.  As I said previously, the bench is basically two cases, one on top of the other.  I measured everything in metric, but cannot find the exact plans.  Therefore, I went back and measured the following in inches:

The bottom case, where the festool tools are stored, measures 70 5/8"L, 31 1/2" H, and 42" W.  The individual spaces for the festool trays are 23 1/16H x 16 7/8"W.  I basically just joined two 70 5/8, 31 1/2, 21" cases together to form the entire bottom case.

The top case is 70 5/8"L, 40 1/8"W, 6 7/8" H.  This case is an adaptation of Huy's bench, which I believe was loosely based on Ron Paulk's bench.

When I started the project, I was trying to get the exact measurements from Huy, the AL woodworker, but in the end, just made the cases as close to his as I could using my preferred dimensions. I would definitely study Huy's and Timothy's videos at the AL Woodworker and Benchwoks, respectively.  Let me know if you have any other questions.

Hope this helps,

Marc
 
16paws said:
When I started the project, I was trying to get the exact measurements from Huy, the AL woodworker, but in the end, just made the cases as close to his as I could using my preferred dimensions.

This is where I was at, I wanted the exact dimensions of Huy's bench but couldn't find them. I don't mind designing a piece of furniture but I really just want to build ship furniture as quick as possible. After a night of searching I realized this was silly and just whipped up dimensions to fit my needs and built the bottom cabinets yesterday.

Hopefully I'll be working on the torsion box this week. Another quick question, I see in one of the photos up above you have the ribs pocket hole screwed to the bottom. You also mention that you have the top screwed down so you can replace it. Do you have screws face screwed through the top? I don't see any in the photos.

I was thinking about pocket holes for the top to the ribs and then screwing the bottom to the ribs. Is there any loss of rigidity by not gluing the tops on? I'd rather glue but that would make the whole assembly disposable when the top wears out.

Thanks
 
[member=56946]ttf5003[/member] if clamping through dog holes is not a concern to you, do the top in two layers. Glue up a 1/2 ply and screw a 3/4 MDF on each corner. That way the MDF top can be easily replaced.
 
ttf5003 said:
16paws said:
When I started the project, I was trying to get the exact measurements from Huy, the AL woodworker, but in the end, just made the cases as close to his as I could using my preferred dimensions.

This is where I was at, I wanted the exact dimensions of Huy's bench but couldn't find them. I don't mind designing a piece of furniture but I really just want to build ship furniture as quick as possible. After a night of searching I realized this was silly and just whipped up dimensions to fit my needs and built the bottom cabinets yesterday.

Hopefully I'll be working on the torsion box this week. Another quick question, I see in one of the photos up above you have the ribs pocket hole screwed to the bottom. You also mention that you have the top screwed down so you can replace it. Do you have screws face screwed through the top? I don't see any in the photos.

I was thinking about pocket holes for the top to the ribs and then screwing the bottom to the ribs. Is there any loss of rigidity by not gluing the tops on? I'd rather glue but that would make the whole assembly disposable when the top wears out.

Thanks

The plan was to have the top screwed down, but I found that the friction between the top, the rails and the ends of the torsion box holds it in place.  Therefore, I left it alone and it works great.  The top sits flush with the side rails so it is held snuggly between them. When I get to the point where I need a new top, I will just flip it over or make a new one using the current top as a template. I have a set of Kreg clamps that run in the rails, so if I really needed to clamp the top down, I would go that route.
 
That's really interesting that it's just sitting on top. Both of my pieced of MDF I got from Lowe's are crowned in the middle. I'm not talking about card shimming crowned but visibly crowned.

I think I will attach the ribs to the top with pocket hole screws and just screw through the bottom like I planned, without glue. Hopefully it is enough force to pull the crown out of it. I can always go back and glue later.

So the Kreg clamps fit in the Misumi Rails?

Thanks for all the help
 
Yes, the Kreg clamps fit into the rails, which is nice as I can clamp projects horizontally or vertically.  You are very welcome for the help!  Good luck on your build...I am looking forward to seeing pics of it!
 
Back
Top