bench dogs, fast and cheap

bermuda

Member
Joined
Feb 3, 2007
Messages
32
I haven't seen much about shop made bench dogs. These took about 20 minutes with
some help from a double shot of americano. No need to get under the table they hold
fine and they can be tightened by finger with the nut on top. If you require alot of
pressure then an added washer and nut on the bottom would do it. Anybody with some
better ones please show them.
Thanks
Rob
 
Rob,

Your links aren't working. 

A URL in a post is automatically converted to a link.  To test the link...  After creating a post that includes URL, click the "Preview" button and then click on the link.  If it doesn't work, then the link is broken or not formed correctly. 

If you want to include an image in a post, paste in the URL text.  Then, click the Insert Image button above the text editing box.  The Insert Image button looks like this:
6_09_04_07_10_33_08.gif
.  Then, your pics will show up in your post instead of links. 

When you select the URL text and click the Insert Image button, your URL will have img tags wrapped around it like this:

Code:
[IMG]http://www.festoolownersgroup.com/CoppermineMain/albums/userpics/6_02_03_07_10_18_29.jpg[/IMG]

Your pics will show up like this:
6_02_03_07_10_18_29.jpg


Give it a try by editing your post above.  Remember to hit the Preview button to check that your links and images appear correctly.

Best regards,

Dan.

 
Rob,

It looks like your images are showing up now.  Nice lookin' doggies!

Thanks,

Dan.
 
Hi Rob,

Nice job on the bench dogs!!!

Here's some "poor man's" version of the Festool Clamping elements...

jim
 
Rob,

Nice clamps.  What is the dowel/pipe that fits into the MFT and how is it attached to the washer?

Dave
 
Rob, nice attachment method!

I have a similar clamp, but it has to be fastened from the bottom.  I really like your solution to that problem.

EDIT:  I had originally posted what I thought were "improvements" to your idea, but the joke was on me, because they were incompatible with your method of attaching the clamp to the table.  What is that piece of metal that plugs into the hole, and how did you make it?  Also, I'm wondering how easy it is to adjust the clamping pressure at the connection to the table and at the work piece--would a star-shaped nut on the top work any better?

Regards,

John
 
Hi
Those pieces of metal are from 1/2 allthread connectors, cut to 3/4 and rounded a bit to fit in the 20mm holes of the mft. This idea is from Jerry's use of them in his mft guide. I used the allthread drop for some boards with 20 mm holes in them to match the table so that I could have something closer to cut or clamp against since I have a custom made wider mft. These connector pieces go in both a 3/4 board and the table to hold the board in place. I have them tighter in the 3/4 board so that I can lift the board out and drop it wherever I want.
Rob
 
I've been meaning to do this for a while and this thread provided the impetus for me to make the prototype.

Caveat:  I didn't have a long enough bolt (1/4x20) so I had to use a lower profile clamp than I will for the "production" hold downs.

There is a video at the end of this post showing the clamp in action.

OK, I wanted a hold down which could be inserted and removed without reaching under the table...here it is.

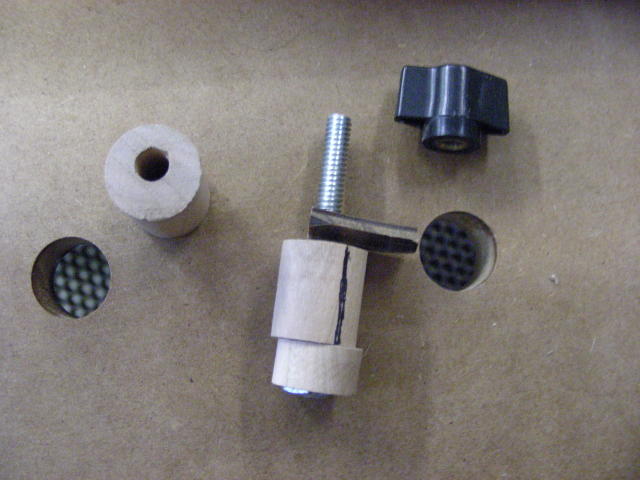
First, I turned a hardwood dowel to 19mm (you can buy a 3/4" dowel...I just didn't want to go out in the Nor'easter we're having)

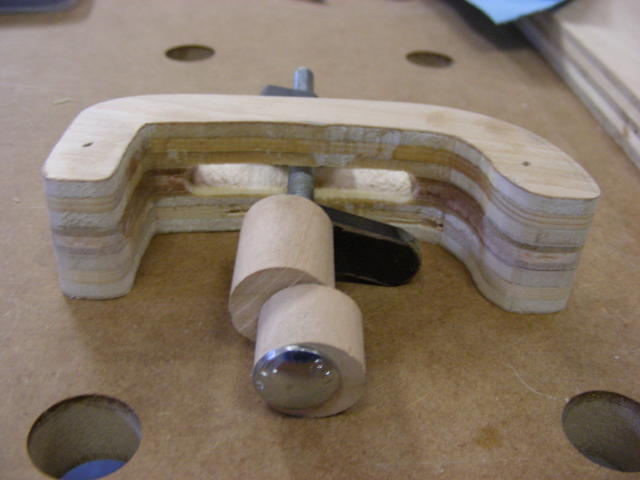
I cut the dowel to about 2" long and used a 7mm drill bit to drill a hole through the length of the dowel.  I positioned the bit so that the hole was offset. (see pic below)
mft_hold_down1.jpg


I then cut that dowel so the the body (the part which will go through the MFT) was 7/8" (1" will be fine) which seems to be a good length.  The dowel which is to be used as the cam I cut to 1/2" in length.  This piece can be longer and probably should be for strength, but my bolt wasn't long enough to accommodate a longer cam.  A 1" cam and 1" body would work well and provide good strength.

I counter bored the cam a little to fit the head of the 1/4x20 bolt and inserted the bolt and glued it in place.

Next I created a lever out of a piece of scrap phenolic.  It can be any material.  I drilled a hole in it and threaded it.  I put the body dowel on the bolt and then screwed on the lever.  Tightening the lever so that the assemblies was still loose, I aligned the lever so that it pointed at the maximum offset of the cam...then glued it in place with some CA.
mft_hold_down7.jpg


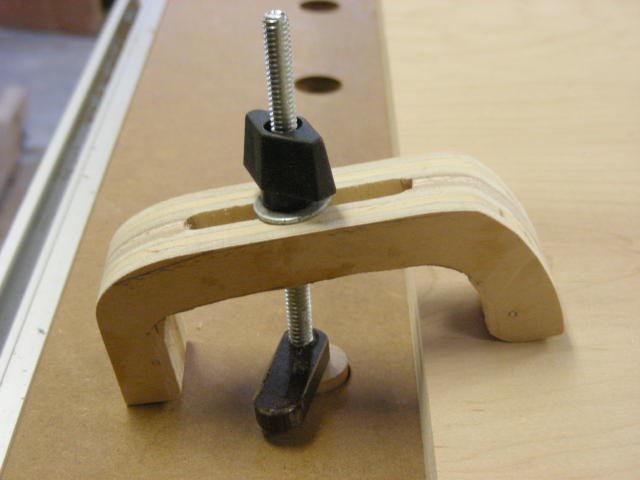
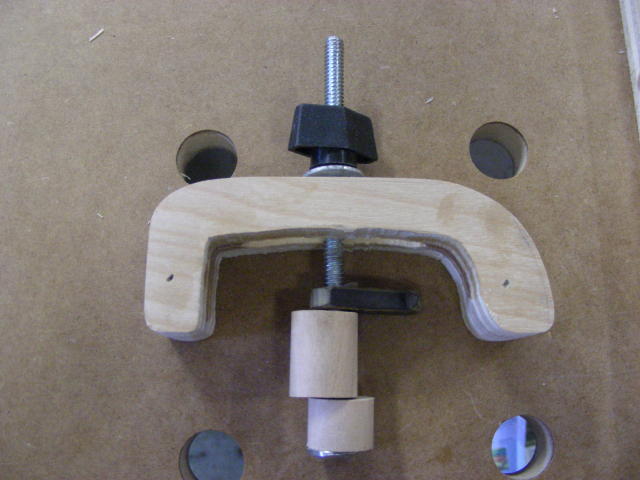
That's it, the assembly is complete.  Next make a clamp.  I used one that I use in T-Tracks but a larger "U" clamp like this Jorgy one would work better...again, my bolt wasn't long enough to make one.
jorgyclamp.jpg


So to use it, you stick in in the hole, rotate the lever until the cam locks the clamp from coming out of the hole, then tighten the thumbscrew.  The cam does not tighten in the hole, it rotates and forms a latch to prevent the dowel from coming out of the hole.
mft_hold_down3.jpg


So that's it. View this video to see how it works.
 
Thanks Bill for the video that made it clear. Those are great, the lever that locks it to the
table from the top is the best bit about it to me.
Rob
 
Rob,

I probably should have included a pic of it installed and working in the above post...might have mad it easier to understand.  I have one and I'll update the post when I get home at the end of the week.
 
bill-e said:
OK, I wanted a hold down which could be inserted and removed without reaching under the table...here it is.

Bill, thanks for the ideas.  Attached are two pics of a clamp I made quite a while ago.  It is attached under the table, but I don't see why it couldn't be modified to use your attachment method.  The features I wanted to point out are that it's slotted so that it can be adjusted fore-aft, and the clamping surface is faced with an anti-friction polymer matieral (thin carpet underlayment from Home Depot, attached with double-sided tape or 3M spray adhesive, I forget which).  Hope these ideas are useful to someone.

Regards,

John
 
Yes, I see what you mean. After using the ones I made with two holes for adjustment the slot on yours would work
easier. Combine it with Bill's top screw down and the lever, good combination.
Thanks
 
Here's the updated clamp.  I used a 5-1/2" 1/4x20 carriage bolt and plywood to make the clamp.  (yea, that's an 8mm Domino slot :) )

mft_hold_down5.jpg

mft_hold_down4.jpg

mft_hold_down6.jpg
 
That is good practical design to me. Shop made with ply leftovers, no plastic. Thanks Bill-e for your creative work. I'd call it yankee ingenuity but you may be from the south.
 
Back
Top