Kev said:
MichaelW2014 said:
hi Kev. thanks for the tip. What is the pro fix, for someone who has an art gallery and needs to hang pictures once a month, in perfect rows...?
I think you want a cheap laser level .. mark cross hairs on your sleeved block with orientation marks for consistency to align. Bosch make some good options at modest prices.
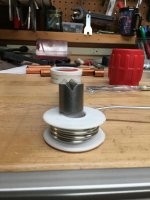
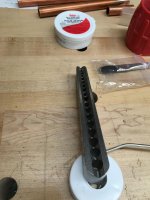
The problem when you hang pictures is that how tight the wire is on the back of the frame can throw off where your picture hangs even if your picture hooks are perfectly aligned in a row on the wall. What I have done is to use a long thin stick with a slot in the top of it. Put the wire in the slot with the stick in a vertical orientation below the picture so it acts as a handle to hold the picture by the hanging wire just as it will hang on the wall. Now you can line up the picture itself using a laser level. Finally when you have the picture just where you want it you carefully hold the stick still and remove the picture. The top of the stick is now exactly where you want the bottom of the picture hanging hook to be located.
You can use this technique to not only align pictures that are the same size so they are straight along a wall but also align pictures of different sizes so, for example, the center of each picture is aligned. If you want to align pictures on their centers I measure the center of the frame and then put a piece of painters tape on the frame with a small mark. Then it is easy to line up the mark on a laser level.
This works best with 2 people. One person to hold the stick still and another to take the picture off the stick when it is in the correct position. Otherwise the tendency is to move the stick slightly when the weight of the picture is removed.
Hope this helps.
")