Best way to cut corian?

Cheese said:
Alex said:
I do not need to polish it, designer wants the matte look, apparently that's totally the thing now over here.

Alex, what grit paper will you use for the matte finish?

I don't know, don't ask me such difficult questions!  [smile]

It is the first time I'm working with this stuff. I didn"t even know you can sand it.

I asked my designer to ask his supplier and the answer he got back was that you can use any good construction glue to glue corian on other materials, he specifically mentioned the 4tecx glue I have. But you have to use the 2 part glue Tom mentioned if you want to glue 2 plates of corian together, and then you can sand it to make the connection seamless. Looks like I'll have to do both.
 
Festool USA published this guide years ago. (Sorry for the poor picture) You might find it on their site somewhere.
9fd8f224876cbfbf76f96ba1edbdf2bb.jpg
41aec7cfaa2235ab263365762f882981.jpg
 
Alex said:
Cheese said:
Alex said:
I do not need to polish it, designer wants the matte look, apparently that's totally the thing now over here.

Alex, what grit paper will you use for the matte finish?

I don't know, don't ask me such difficult questions!  [smile]

It is the first time I'm working with this stuff. I didn"t even know you can sand it.

I asked my designer to ask his supplier and the answer he got back was that you can use any good construction glue to glue corian on other materials, he specifically mentioned the 4tecx glue I have. But you have to use the 2 part glue Tom mentioned if you want to glue 2 plates of corian together, and then you can sand it to make the connection seamless. Looks like I'll have to do both.

I'm going to explain an earlier statement I made. The reason you should not place solid surface matierial on a full top cabinet is they move very differently. Solid surface moves with changes in temperature, wood moves with changes in moisture. You don't want the products fighting with each other.

Never use an adhesive that hardens for the install, it must stay flexible, why I use Sil Bond. A veryslight gap to the wall is acceptable. The tops move.

A few pointers on using the two part adhesive;

Get extra mixing tips---at least six more, that should give you 8 tips. I buy them a box of 50 at a time.

Make sure you get the gun for the 2 part.

Place the tube in the gun, it will only go in one way.

Remove the caps from the tubes, do not install the mixing tube yet, hold the open end of the tube about 1" above scrap card board, squeeze the trigger until you get material to just expose.

Install the mixing tube, again over the cardboard squeeze the trigger until you get a dollop of adhesive on cardboard about 1" in diameter and 1/8" high. This gets the tube "primed".

You must do the above every time you need to apply adhesive.

Run a bead about 1/4" from the edges, run a squiggle between them.

Once done applying install the build up, next step, remove mixing tube, reinstall caps.

A few on doing the work;

MAKE A TEMPLATE

Make sure you glue on the back up blocks. Any other way is a lesson in frustration.

Clamp the build up where you want it, glue on the blocks with just a corner touching the build up.

Install one piece of build up at a time.

Practice with how you put the clamps on, you can move the build up around with the clamps when the adhesive is wet.

If there is a corner that needs build up, use a lap joint.

DO NOT wipe off any squeeze out, sand it off latter.

You'll need build up along the unseen sides. I use 15/16" strips of MRMDF (thickness assumes 2 pieces of build up stacked), you can use scrap solid surface.

I flush everything up using 2200's with special bits in them, then I sand.

Try to do any polishing before installing.

I'm sure I forgot something---good luck.

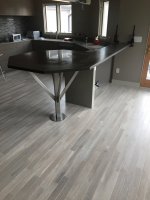
The one with the octagon weighed over 600 pounds. There is a staircase in a location where you can see the bottom of the top. It is kinda hollow, but appears solid. Forgot, the leg you see with the outlet/receptacle is hollow solid surface.

Tom


Attachments

  • IMG_1309.jpg
    IMG_1309.jpg
    251.1 KB · Views: 694
Wow, so much info, I knew you guys wouldn't let me down.

Thanks Dan for that resource article, that's gonna come in handy.

And thanks Tom for that very detailed explanation, I'm sure that will save me some frustration indeed.

Looks like working with corian is a whole trade by itself, my head's still buzzing from learning how to plaster the last 3 months, now I'll have to find a corner somewhere to stuff this information.

Tom, I won't be glueing this onto wood, but on a built-in water reservoir for a toilet like this:

[attachimg=1]
 

Attachments

  • 123.jpg
    123.jpg
    13.1 KB · Views: 2,757
One more point to add to Tom's detailed info.....

Wherever you make a cutout in the Corian, dont leave any  sharp internal corners. Always leave a small radius in the corners. For example, the cutout for that rectangular Flush Valve, I would make a template jig and cut it out with a router.

Good Luck with it Alex!
 
One addition to Tom's detailed description is you only have about 5 minutes working time before the epoxy starts hardening both in the mixing tube and your project. Thats why the extra mixing tubes are recommended. A couple of dozen 2" spring clamps are your friend for small projects, I have 100+ for corian countertop glueups.
 
kcufstoidi said:
One addition to Tom's detailed description is you only have about 5 minutes working time before the epoxy starts hardening both in the mixing tube and your project. Thats why the extra mixing tubes are recommended. A couple of dozen 2" spring clamps are your friend for small projects, I have 100+ for corian countertop glueups.

[eek]  Blimey!,....The weather must be a lot hotter in Canada than I have been led to believe!

Even in the height of Summer over this side of the Pond, you will get 15 to 20 mins before the adhesive sets hard.

In February in the UK, in an unheated workshop, its closer to 45 mins......

The glue nozzles are a one time use, but you do normally get 2 with each tube of 2 part adhesive....
 
Told you there were little things I forgot. Thanks for covering them.

One more thing----scuff sand where you're going to apply the solid surface adhesive, 150-180 grit will work.

I'd still use Sil-Bond to mount the cover to that frame.

Clamping the build up for the piece that will go on that frame, I'd have about 150 clamps on it. I have ~600 2" spring clamps and run out at times.

Alex, go back and look at the pictures I my previous posts, they will make this all much clearer.

Template, template, template......

Tom

 
Distinctive Interiors said:
kcufstoidi said:
One addition to Tom's detailed description is you only have about 5 minutes working time before the epoxy starts hardening both in the mixing tube and your project. Thats why the extra mixing tubes are recommended. A couple of dozen 2" spring clamps are your friend for small projects, I have 100+ for corian countertop glueups.

[eek]  Blimey!,....The weather must be a lot hotter in Canada than I have been led to believe!

Even in the height of Summer over this side of the Pond, you will get 15 to 20 mins before the adhesive sets hard.

In February in the UK, in an unheated workshop, its closer to 45 mins......

The glue nozzles are a one time use, but you do normally get 2 with each tube of 2 part adhesive....

10 minutes tops here. Maybe we get the "good stuff". Causes more dead brain cells but hey, why not [scared]

Tom
 
Distinctive Interiors said:
kcufstoidi said:
One addition to Tom's detailed description is you only have about 5 minutes working time before the epoxy starts hardening both in the mixing tube and your project. Thats why the extra mixing tubes are recommended. A couple of dozen 2" spring clamps are your friend for small projects, I have 100+ for corian countertop glueups.

[eek]  Blimey!,....The weather must be a lot hotter in Canada than I have been led to believe!

Even in the height of Summer over this side of the Pond, you will get 15 to 20 mins before the adhesive sets hard.

In February in the UK, in an unheated workshop, its closer to 45 mins......

The glue nozzles are a one time use, but you do normally get 2 with each tube of 2 part adhesive....

Depends on where you live, this area can see highs close 100F and lows to -25F. I also never work in an unheated shop in Winter or an uncooled shop in Summer. I was also lead to believe all you got was rain and fog, LOL.

I would also assume being on a different continent you might have a different epoxy supplier hence the difference. So maybe when Alex does his glueup he can pass on his experience, like Tom and I have passed on ours.

A very simple glueup might take 2 tips from my experience, on some larger jobs I've 8 or 10 tips.
 
In an earlier post I stated "clamp on the build up, install the glue blocks".

To be clear this is a dry fit. No adhesive until the blocks are in place.

Tom
 
best-way-to-cut-corian


Proof that one can never have too many clamps. :-)

Sorry Alex, couldn't resist.

Now back to our regularly scheduled program.
 
Alex said:
Tom, I won't be glueing this onto wood, but on a built-in water reservoir for a toilet like this:
I would suggest to think about using magnets to stick it to the metal in-wall frame. While the mechanism can be serviced solely through the hole (the plate with the buttons goes to) it can be beneficial to have a way to access the inside of the wall in a non-destructive manner.
 
Bob D. said:
Proof that one can never have too many clamps. :-)
Sorry Alex, couldn't resist.
Now back to our regularly scheduled program.

Hey, hey, hey.  It looks like you could have put a few more clamps on that sink top.  There are a few open spaces I see.  Don't be doing shoddy work now.
 
How on earth do you have an orange clamp in there?  I would have to throw that away instantly, having one rouge clamp would drive me nuts.

Anyway,  Alex, nice work site, no different than what anyone working off the NJ turnpike would see every day of the week.  [big grin]
 
Just one more question, if you glue the seams, do have to make absolutely sure it is filled in one go? Or is it possible to apply a bit more glue later if you find any dimples?
 
Alex said:
Just one more question, if you glue the seams, do have to make absolutely sure it is filled in one go? Or is it possible to apply a bit more glue later if you find any dimples?

I'm curious too about handling seams. Do you use painters tape or something similar along each edge to prevent squeeze-out from contacting the finish surface and trim off any ooze. Or is there very little extra is applied properly. If you want to fill right up to the edge as Alex asks about it would seem you can't hold back too far from the edge as you might with wood glue.

I don't have anything coming up in the near future like this but would like to know how to handle it if/when I do.
 
Back
Top