Best way to glue hardwood veneer to plywood edges and close glue seams?

ryanjg117

Member
Joined
May 18, 2015
Messages
329
I'm partial to birch or maple plywood with hardwood edging. I've got a nice thin rip jig for the cabinet saw and it's quite easy to pound out 1/8" or 1/4" thick hardwood veneers for edge banding.

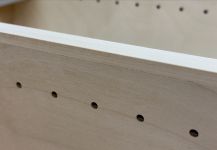
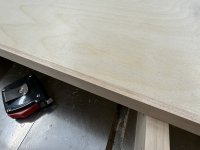
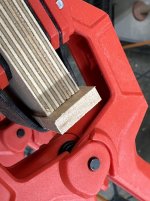
However, I often find my glue-ups leave a bit to be desired. Here's a nice visual encapsulation of my problem:

[attachimg=1]

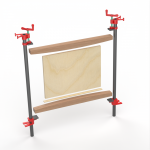
I think this really boils down to not applying adequate clamping pressure uniformly across the edge. I've made some cauls and do get the best results when I use two big parallel clamps at either side, like depicted below:

[attachimg=2]

But sometimes it's not possible to do this - for example, when applying edge banding on a finished cabinet carcass. In the future, I'm going to try to remember to always apply edging before I assemble the cabinet...

In the situation above, the cabinet was already built, and I used about 15 Large Spring Molding Edge Band Clamps 8" Long for Banding up to 1-1/2" Thick. I've also experimented with 3M Binding Tape. Neither is really strong enough to close up that gap.

So, I'm curious - given that my clamping options can't be improved, is there a better glue option to use here? Perhaps one that dries exactly the same color as the wood? I've experimented with Better Bond X-Press in Light Color and that does seem to hold well, though it's not recommended for super-thick veneering like what I'm trying to do here.

Given that I'm already in a pickle, do you think there's a way to improve this? I could try chasing the seam with a Bahco carbide 3-point scraper and fill it with some Mohawk Fil-Stik that is perfectly color matched, but I'm a little nervous to use a wax product before finishing. (These will be sprayed with a clear, semi-gloss poly finish).
 

Attachments

  • edging1.png
    edging1.png
    1.5 MB · Views: 410
  • clamping-caul-depiction.png
    clamping-caul-depiction.png
    808.2 KB · Views: 402
You do need to hollow one side of the joint but leave the hardwood square. Use this Collins router bit on the plywood and then even the spring banded edge clamps will work.

If you can’t wait for the bit to arrive just sand a hollow down the center of the plywood with 80 grit abrasive. Doesn’t need to be deep.

You can use a track saw to cut the edge band off and then do the above if you want to improve the joint.
 
Michael Kellough said:
You do need to hollow one side of the joint but leave the hardwood square. Use this Collins router bit on the plywood and then even the spring banded edge clamps will work.

It never dawned on me that the plys were soaking up moisture and causing the edge banding to push away. Snapped up the bit - excited to test it out as this has been the bane of many glue-ups!

I also watched the Spencer Lewis video and -- if it works -- I think I'll dedicate a trim router to this like he did, and build the subfence.

Any reason this wouldn't also work on cabinet carcass butt joints?
 
I regularly use iron on veneer edge banding with good results. So that is why I used the following method.

First, a few caveats:

1.  I did this a long time ago, and the details are a bit hazy.
2.  I don’t remember why I used this method.
3.  I no longer have the piece, but the edgebanding remained secure for several years.

Method:

1. I painted the edgebanding with the wood glue I was using at the time (probably Woodworkers II).
2.  I painted the edge of the plywood with the same glue.
3.  I waited for the glue to be dry to the touch.
4.  I applied it with a hot clothes iron just like I would with heat applied edgebanding.

Make your own tests to confirm that it will work with the edgebanding that you use.
 
ryanjg117 said:
Michael Kellough said:
You do need to hollow one side of the joint but leave the hardwood square. Use this Collins router bit on the plywood and then even the spring banded edge clamps will work.

It never dawned on me that the plys were soaking up moisture and causing the edge banding to push away. Snapped up the bit - excited to test it out as this has been the bane of many glue-ups!

I also watched the Spencer Lewis video and -- if it works -- I think I'll dedicate a trim router to this like he did, and build the subfence.

Any reason this wouldn't also work on cabinet carcass butt joints?

Coring out the middle of the ply will make the surface veneers more delicate and you’ll probably want to add Dominoes to make sure the thin edge doesn’t ride over the second piece. You don’t want to hollow both pieces.

On the other hand I can’t think of a time when I made such a a joint that would be left exposed.
 
Years ago, I tried this technique at the recommendation of one of the magazines. 

In involves a tongue and groove router set and a router table.  I did this for shelves that I thought would get rough treatment.

The first step was to route the groove into the edge of the shelf.

I was using 3/4” plywood. 

Then I ripped a strip of 3/4” wood for the edge about 1” wide. 

Then I routered the tongue on both edges of the 1” strip.

Then I applied glue to the edges or 2 shelves and to both sides of that 1” wide strip.

I clamped the two shelves together into one wide plank. 

I allowed it to dry and then I ripped the wide plank into two shelves by cutting in the middle of that 1” strip. 

You end up with about 1/2” wide edge banding.  The shelves themselves act as the “cauls”. 

In the end, it worked exactly as described in the magazine article.  However, I did not find it to be a worthwhile effort. 

It was probably more durable than the iron on or even the glued and nailed on edgebanding.  But my failure rate for those was extremely low.

It did please my sense of craftsmanship, but too much effort for too little advantage.

Note:  If you want to try this, the most daunting aspect was adjusting the height of the router bit.  If it is not exactly right, the pieces will not fit.

I did read about a similar effort using canoe strip router bits to accomplish the same.  It looked less fussy.  But I was not inclined to try it.

The image below from Whiteside.

3520-3530-profile-300x300.jpg


I think those schemes utilizing a tongue in groove idea are wasteful of the molding. I’d rather use biscuits or Dominos than that.
 
Michael Kellough said:
I think those schemes utilizing a tongue in groove idea are wasteful of the molding. I’d rather use biscuits or Dominos than that.

OK.  I’ll buy that. The one useful aspect of that was gluing up two shelves and then cutting them apart.  It was easier to clamp the two shelves than to clamp one.  You would have to have a wider edge strip with biscuits, dowels or dominoes than with the tongue and groove.  Of the three, I would probably fall back on biscuits.

But then the iron on works remarkably well and is quick and inexpensive.  I would note that the wood edgebanding works better than the resin ones.  I have had repeated failures on the resin banding.  Maybe it is something I am not doing right, but the resin edge banding never lasts as long.
 
Michael Kellough said:
I think those schemes utilizing a tongue in groove idea are wasteful of the molding. I’d rather use biscuits or Dominos than that.

I still like tongue and groove edge banding bits like the Amana 55468 for joint strength.  [smile]
 
[member=51886]ryanjg117[/member] Rather than go to the trouble of making curved cauls, which are somewhat size dependent, there is a better way. It is much easier to simply clamp 2 shelves together, with the edges facing each other. It does require longer clamps, but you also get 2 at once, so it takes fewer of them.
It gives you absolutely even pressure.
 
The Collins bit seems like a great option for solid wood banding.  I’m assuming it would be unnecessary or even counterproductive for iron-on?
 
Sparktrician said:
Michael Kellough said:
I think those schemes utilizing a tongue in groove idea are wasteful of the molding. I’d rather use biscuits or Dominos than that.

I still like tongue and groove edge banding bits like the Amana 55468 for joint strength.  [smile]

Some other router bit company makes one without the tongue and groove...just opposing vee-cuts. The Amana one and the strictly vee one both appeal to me more than creating a hollow. Not sure why.

I'm in the early planning stages on a set of built-ins, so this thread is very timely for me.
 
Cheese said:
jeffinsgf said:
Some other router bit company makes one without the tongue and groove...just opposing vee-cuts. The Amana one and the strictly vee one both appeal to me more than creating a hollow. Not sure why.

I'm in the early planning stages on a set of built-ins, so this thread is very timely for me.

Like this?
https://infinitytools.com/products/edge-banding-router-bits?_pos=2&_sid=acf816a48&_ss=r

It allows the appearance of an iron-on edge banding with the durability of thick edge banding.  It can mimic solid wood, except for the ends of the board.
 
Michael Kellough said:
You do need to hollow one side of the joint but leave the hardwood square. Use this Collins router bit on the plywood and then even the spring banded edge clamps will work.

If you can’t wait for the bit to arrive just sand a hollow down the center of the plywood with 80 grit abrasive. Doesn’t need to be deep.

You can use a track saw to cut the edge band off and then do the above if you want to improve the joint.

Michael, great suggestions on the Collins Ply Prep bit! It really fixed my issue. And something I'm going to use a TON in the future, not just for edge banding but also for butt joints. Here's some pics:

[attachimg=1]

As you can see, it only carves out a small bit of material from the middle. Yes, the edges are a bit more delicate until you get the edge banding on. No longer need to clamp it with the parallel guides - the bandy clamps and 3M edge tape can do the trick.

[attachimg=2]

Another benefit - the glue has somewhere to go. So, if you over apply glue, which I have a tendency to do, it's less likely to squeeze out and cause a huge mess. Rather most of it stays in the inside channel.

Now I just need to get my tear-out game to zero.
 

Attachments

  • collins1.JPG
    collins1.JPG
    434.4 KB · Views: 203
  • collins2.JPG
    collins2.JPG
    246.9 KB · Views: 200
The tongue in groove type bits clearly make registration dead simple but you still need to take time to cut the waste off top and bottom after glue-up, unless you take the time to perfectly dial in the heights of the two router bits, (and the stock) ideally using two router tables.

Also, with the much larger surface area of the routed joint you need to apply more clamping pressure to get a seamless joint. Maybe some of these bit sets have built-in relief to mate tightly only at the top/bottom surfaces?

I just prefer the simplicity of using the Collins bit (one pass with the router along the panel edge, handheld or in a table) and fewer clamps. Cauls work great for this but it can get tricky to keep the edge banding from sliding around. If you don’t want to use brads (as Spencer did in the video above) to keep the edge banding in place just add a few biscuits or Dominoes.

Or just do as Ryan did, apply multiple edge banding spring clamps which allow easy adjustment as you go.
 
Back
Top