Best way to handle trim when door jams and drywall don't line up?

ryanjg117

Member
Joined
May 18, 2015
Messages
329
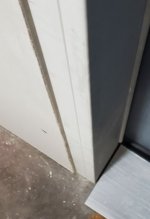
I build a new door jamb for a garage firedoor and was more concerned about it being plumb and level than making sure it was perfectly 1/2" proud of the studs. Stupid move on my part as the door has self-closing hinges so, really, even if it was out of plumb, the door still would have closed fine. Now that I've drywalled it, part of the left and right jambs are about 1/8" or 3/16" recessed from the drywall. I'm curious if there are any good finish carpentry tricks to concealing this with trim. I will be caulking it afterward, but I think it's just a bit too large to conceal well with caulk.

[attachimg=1]

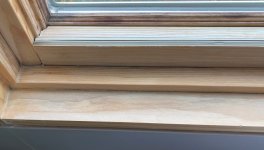
Also, knowing I'm going to have to fight the opposite battle later, curious if there are any similar tricks to dealing with jambs that protrude beyond the drywall. Shave down the jamb with a power planer (about the only tool I DON'T have)?
 

Attachments

  • Capture.JPG
    Capture.JPG
    24.3 KB · Views: 11,733
If the jamb extends beyond the drywall, just extend the jamb.  Easy to do with 3/4” stock, glue and a pinner.  I’ve cut a piece to length and the pinned it top and bottom to scribe, or clamp it in place through the door.  Scribe and cut with your track saw and pin/glue in place.

If the jamb protrudes beyond the drywall, I’ve used my Vectoro with the round blade to ride on the drywall and cut the jamb back.  Worked really well for me.

 
Common issue when the jambs are sized for 1/2 drywall and you are putting up 5/8". Comes up all the time.
Easiest option, at least for me, take a drywall knife or rasp and shave the drywall at an angle down to the jamb level. This will allow the casing to nail flat onto the jamb.
If you don't shave the drywall well you'll notice the angle on the casing. Once you get used to shaving the drywall you'll know how much to shave to get the casing to sit almost flat. It will still have a slight angle but nobody should be looking that close.
If this is high end work, ok fine build out the jamb. For normal work that's a waste of time and generally doesn't look that good unless you are a real good finisher. That extra seam is obvious.
If this is a recurring issue and it needs to look really good, orient the jamb flush on one side, build up the other side. Less work, only one seam to finish, etc.
Hope that helps.
 
If the door jamb edge is ABSOLUTELY square without a RADIUS, then adding a jamb extension works well. I've done that a lot when installing new windows into plaster walls. The plaster is never the same thickness in every room. If however, the jamb edge has a slight radius, then there will be a witness line between the two joined pieces. If you fill the witness line with putty/bondo, the constant closing of the door will eventually shake it loose because of the limited amount of purchase the filler has on the radius.

Here's a photo of a window with a 1/2" jamb extension, it's barely visible and when it gets painted you'll not be able to see it at all.

[attachimg=1]

If there's a radiused edge, then I'd follow Holzhacker's recommendation by shaving the drywall and massaging the trim. Using a wider trim will help eliminate the "angled effect". Sometimes you may need to thin the outer or the inner edge of the trim to also reduce the "angled effect".
 

Attachments

  • 9516 Bleach copy.jpg
    9516 Bleach copy.jpg
    363.5 KB · Views: 10,355
I’ve had luck doing sort of built up trim detail.  Mark out the trim on the drywall- cut the paper to that outline- shave it/scrape that drywall flush or slightly below the jamb, install the trim so the outside edge sits down in the drywall and the jamb side is tight- then add another piece of molding, 1x1 or what have you to the outside edge to cover the cut drywall edge.  Like a craftsman sort of detail.
 
What if you rabbit the outside edge of the casing to lap over the drywall and hold the inside edge back slightly to create a reveal at the jamb.
 

Attachments

  • door casing.png
    door casing.png
    10.6 KB · Views: 610
Industry  standard; 1/8", beat it flush with your hammer . Greater than a 1/4" then you start talking jamb extensions. I generally try to verify plumb and plane before installation, moving plates or king stud/trimmer to rectify deficiencies
 
@InsiderCarpentry - rolling miter. Straight forward process for accounting for compound bevel when jamb is proud/shy.

Youtube
 
Back
Top