You are using an out of date browser. It may not display this or other websites correctly.
You should upgrade or use an alternative browser.
You should upgrade or use an alternative browser.
Best Way to Make Template for Arc with 8ft radius
- Thread starter AdW
- Start date
pettyconstruction
Member
- Joined
- Oct 17, 2010
- Messages
- 704
The best way I was shown for arches is:
Take the longest wall or straight line , place the ply there.
Run a center line down: in your case 4'
Put a mark at the side at the distance you want the arch to go down: i.e. 12" lower than the center.
Put a tape measure at the two points and run them out to when they have the same number. Say 12' , (this I why you need a large space) at the intersection of the 2 tape measures , place a mark.
That is the spot for your trammel.
Arching from that point will give you a half circle that ends up at the same deme toon down the wall.
Make sense? Hope so .
Way easier to to than say on a I phone.
Works for any size arch as long as you have the room to lay it out.
Good luck
Charlie
Sent from my iPhone using Tapatalk Pro
kinvermark
Member
- Joined
- Mar 26, 2016
- Messages
- 3
so, basically an 8'+ stick will do the job (your "trammel"). Screw the router to this in some fashion and then fix the other end so it can swivel (nail, screw, drill bit...) and rout away. I have done this many times with good results.
A small arc like this is relatively easy. What I would like to know is a GOOD way to do siding arches that have radii of 70' or more. (e.g. a 3-4" drop over 16') Can't really make a trammel for that.
A small arc like this is relatively easy. What I would like to know is a GOOD way to do siding arches that have radii of 70' or more. (e.g. a 3-4" drop over 16') Can't really make a trammel for that.
Maximus
Member
- Joined
- Nov 15, 2016
- Messages
- 98
If marking out the arc is the issue, and you don't own a trammel, that's not a problem. Get a spare offcut block of wood and drill a pencil width hole down the middle. Slide sharp pencil into the hole. On the other end insert a screw eye. Bang a nail or panel pin into centre point of your required arc. Attach string to centre point (with a looped knot so the string can rotate) Tie other end of string to screw eye of your wooden block so that the centre pin to pencil point distance is 8'.
Carefully mark out your arc. Machine along line. Problem solved.
Carefully mark out your arc. Machine along line. Problem solved.
Holmz
Member
- Joined
- Oct 11, 2014
- Messages
- 3,876
kinvermark said:so, basically an 8'+ stick will do the job (your "trammel"). Screw the router to this in some fashion and then fix the other end so it can swivel (nail, screw, drill bit...) and rout away. I have done this many times with good results.
A small arc like this is relatively easy. What I would like to know is a GOOD way to do siding arches that have radii of 70' or more. (e.g. a 3-4" drop over 16') Can't really make a trammel for that.
You can try
tjbnwi
Member
- Joined
- May 12, 2008
- Messages
- 7,383
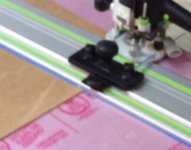
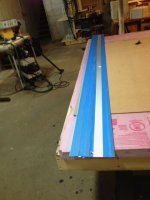
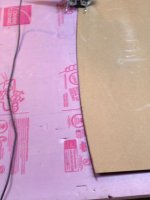
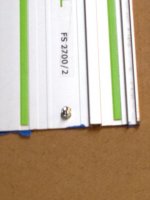
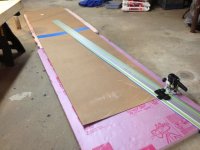
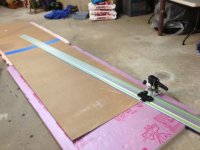
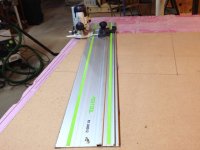
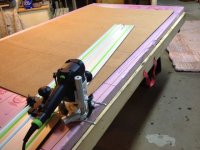
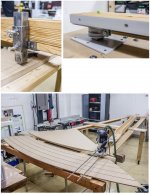
Use guide rails, the hole accepts a 5/16 bolt, guide rail adapter is locked in place with anti kick back devices that come with the TS saws.
You have to cover the grip strips with masking tape so the rail slides.
Tom
You have to cover the grip strips with masking tape so the rail slides.
Tom
Attachments
-
 IMG_0365.jpg36.9 KB · Views: 455
 -
 IMG_0372.jpg18 KB · Views: 414
 -
 IMG_0372 (1).jpg17.9 KB · Views: 419
 -
 IMG_0370.jpg66.1 KB · Views: 397
 -
 IMG_0363.jpg31 KB · Views: 380
 -
 IMG_0362.jpg28 KB · Views: 404
 -
 IMG_0361.jpg34.3 KB · Views: 437
 -
 IMG_0360.jpg41.2 KB · Views: 405
 -
 IMG_0359.jpg38.2 KB · Views: 453
 -
 IMG_0369.jpg40.5 KB · Views: 432
 -
 IMG_0368.jpg49 KB · Views: 474
mike_aa
Member
Couldn't you just use the MFS? If you don't have extra extensions, connect to a guide rail to make up the distance.
Mike A.
Mike A.
tjbnwi
Member
- Joined
- May 12, 2008
- Messages
- 7,383
mike_aa said:Couldn't you just use the MFS? If you don't have extra extensions, connect to a guide rail to make up the distance.
Mike A.
I have the MFS now. Did not have it when I had to create some large arcs. Came up with the guide rail method.
Tom
I did this by drawing the arc in Sketchup, print the arc, attach the paper to the ply, mark the line with a utility knife then cut shy of the line and sand to the line.
This may not get the precision you need, I used this method for a 15' arc once with good results (it was the edge of a desk, so smoothness of the curve and appearance was more important than precision).
This may not get the precision you need, I used this method for a 15' arc once with good results (it was the edge of a desk, so smoothness of the curve and appearance was more important than precision).
Holmz
Member
- Joined
- Oct 11, 2014
- Messages
- 3,876
Svar said:A strip of plywood with two holes 8 ft apart, one for pivot another to tightly fit router bushing. No need to attach the router. This is a very versatile setup as you can also easily make very small circles.
One can reduce this to a piece of rope with one end to to the router and the other looped around a bolt.
With two bolts an ellipse...
And with some practice you can eliminate the tether altogether and just eyeball it.Holmz said:One can reduce this to a piece of rope with one end to to the router and the other looped around a bolt.Svar said:A strip of plywood with two holes 8 ft apart, one for pivot another to tightly fit router bushing. No need to attach the router. This is a very versatile setup as you can also easily make very small circles.
With two bolts an ellipse...
alkaline said:...and this is one way to do it.
I wish you much success.
[wink][attachimg=1]
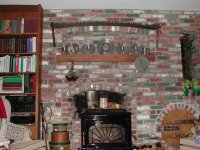
Way back when i was a mason contractor, i occasionally had to make arch forms. this is the way i did it only i used my circular saw bolted to the end of a trammel if it was a large radius. If tighter, i used my jig saw. I think i used my circular saw for anything over a 6 foot radius. The saw used an 8-1/4" blade but i had a couple of 3 and 4 inch blades that i used. That way, i did not get kick back. When cutting curves like that, i always made it with a scoring cut mainly to get he feel and then would make a second or even three cuts. If the first cut felt tight, i broke out my jig saw.
View attachment 1
I think i did the top form with my circular saw.
The two lower curves were certainly done with my jig saw.
Tinker
Attachments
Holmz
Member
- Joined
- Oct 11, 2014
- Messages
- 3,876
alkaline said:...and this is one way to do it.
I wish you much success.
[wink][attachimg=1]
That pivot point in the upper right picture we could call "the axis of evil"...
Similar threads
- Locked
- Replies
- 8
- Views
- 549
- Replies
- 35
- Views
- 2K
- Replies
- 14
- Views
- 1K