Best way to paint Hardiplank Inside Corners ?

3PedalMINI

Member
Joined
Nov 30, 2012
Messages
492
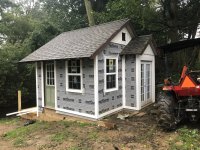
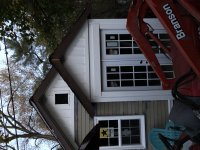
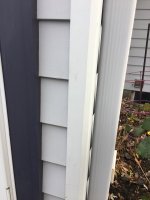
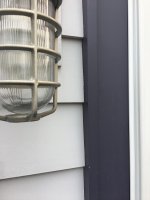
What is the best way to paint the inside corners of the PVC "Corners"? My plan is to spray the body but I haven't decided if I want to spray the trim or not. I prefer the look of where the planks butt up to the trim to be white but I would prefer to not have to cut in. I understand most painters just paint the face of the trim and leave the inside the color of the body but it just seems kind of "half assed"

If I tape everything off and spray the trim am I going to be in for it with crappy lines? Probably so, the OSI caulk didn't agree with me so my "lines" arent the greatest.

Am I over thinking this? should I just paint the face method and be done with it?

TIA
 
[member=17435]3PedalMINI[/member]

Just for clarity, are talking about the inside corners where two walls meet at a 90 degree corner and there is typically a 5/4 by 5/4 vertical strip there, OR are you talking about the side of the trim (like on a door) where the siding butts up to it?

Peter
 
I'm like you and prefer the edges of the trim to be painted like the faces rather than the body color. So, while it is much quicker and easier to simply paint the trim faces and leave the edges, most of the time I have gone back and cut in the edges. Cutting in doesn't need to be perfect to look good enough, though I often have to go back and do a little touch up before I'm happy -- if you're like me, you will be fussier than anyone else that sees your work. If this is your house, and leaving the trim edges the body color will bother you, spend the extra time.
 
Peter Halle said:
[member=17435]3PedalMINI[/member]

Just for clarity, are talking about the inside corners where two walls meet at a 90 degree corner and there is typically a 5/4 by 5/4 vertical strip there, OR are you talking about the side of the trim (like on a door) where the siding butts up to it?

Peter

Anywhere where the siding touches the trim! Most of the shed is trimmed in 5/4!
 
Corwin said:
I'm like you and prefer the edges of the trim to be painted like the faces rather than the body color. So, while it is much quicker and easier to simply paint the trim faces and leave the edges, most of the time I have gone back and cut in the edges. Cutting in doesn't need to be perfect to look good enough, though I often have to go back and do a little touch up before I'm happy -- if you're like me, you will be fussier than anyone else that sees your work. If this is your house, and leaving the trim edges the body color will bother you, spend the extra time.

It’s actually for a shed at my house. It has gotten a bit excessive, to the point where I’m so deep in it I might as well keep going. Maybe you’re right and I should just cut in, I went around yesterday fixing the caulk so I think cutting in shouldn’t be that bad! I’m also rethinking spraying the body, maybe just a 2” roller will suffice? We’re painting it blue! What nap roller should I use for smooth Hardie Plank? I have chosen to go with satin duration and prime with loxone!


Attachments

  • 29D52A4B-D68F-4CB0-8361-F7A7721266E2.jpeg
    29D52A4B-D68F-4CB0-8361-F7A7721266E2.jpeg
    4.2 MB · Views: 542
  • C6632DC4-A08A-40D5-9E67-7731F1E6697E.jpeg
    C6632DC4-A08A-40D5-9E67-7731F1E6697E.jpeg
    3.7 MB · Views: 546
  • DB79A8EA-9CC0-4785-9004-AC1B3D20955A.jpeg
    DB79A8EA-9CC0-4785-9004-AC1B3D20955A.jpeg
    3.4 MB · Views: 539
Use brush to paint the side of the trim.  Adds impact and showcases the different dimensions versus just painting the face of the trim.

Personally I paint the trim first then cut in the siding.  Finish the siding with either brush or jiffy roller in 1/2 nap.  Some like the brush look and back brush after roller.  But I say it is just a shed.

Peter
 
I don't paint that often and I have a horrible time cutting in. What works for me is to caulk, prime & paint and then mask the siding with blue painters tape and paint the trim with a brush.

It takes a little extra time to do the masking but it actually saves me time overall from having to keep "touching up" the cut in areas. The result is some pretty sharp lines that also happen to be straight. [big grin]

[attachimg=1]

[attachimg=2]
 

Attachments

  • 6185_S.JPG
    6185_S.JPG
    462.7 KB · Views: 595
  • 6186_S.JPG
    6186_S.JPG
    493.7 KB · Views: 383
Back
Top