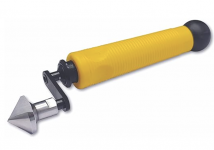
Bit to make countersink holes with CNC?

Joined
Jan 23, 2007
Messages
7,096
I’m going to be using the Shaper Origin to cut out a router plate from 1/4” 6061 aluminum (for a flattening sled) and want to go ahead and countersink the holes while the SO knows where they are. Hopefully just change bits and run Online or a little inside.

Some of the screws will be M6 so a regular 90* carbide V bit should work but the screws for the Milwaukee router are UNC 10-24 and the angle is 82*.

Would the 90* countersink be okay for the 10-24 screws or is there a bit that can cut  82*and can run in a router? (Shaper Origin is basically a router in the clutches of a little CNC)
 
You could consider swapping the flat heads with the angled heads to a pan head type screw. You would then only need a counterbore the correct depth and size. You should be able to do that with a standard bit that can do a flat bottom. Most of the after market bases that I’ve seen use that approach.

Ron
 
Michael Kellough said:
Some of the screws will be M6 so a regular 90* carbide V bit should work but the screws for the Milwaukee router are UNC 10-24 and the angle is 82*.

Just wanted to confirm that for metric 90º flat head screws, the 90º bits work great.

As for 82º, you can't get that with a 90º bit. In Fusion 360, you can probably get a toolpath that come close to the right profile using the 90º bit and then just finish by hand with the 82º bit. And I do mean "by hand" like using a brace or something similar like this (this one has a 90º head, btw):
https://www.amazon.com/gp/product/B0C4B7R4M5
[attachimg=1]
 

Attachments

  • Screenshot 2024-08-09 at 4.09.31 PM.png
    Screenshot 2024-08-09 at 4.09.31 PM.png
    161.4 KB · Views: 268
I'd just get a decent 82 degree zero flute countersink and use a drill.

Is there any reason to use Origin?

RMW
 
Richard/RMW said:
Is there any reason to use Origin?

I'm not the OP, but the answer is hole location accuracy. Which is why I think at least starting the hole with the SO is the way to go.
 
smorgasbord said:
Richard/RMW said:
Is there any reason to use Origin?

I'm not the OP, but the answer is hole location accuracy. Which is why I think at least starting the hole with the SO is the way to go.

Makes sense to cut the thru hole with Origin. What I was suggesting is to follow it with a drill to make the countersink. I do that all the time, they basically self center in the hole.

RMW
 
Richard/RMW said:
I'd just get a decent 82 degree zero flute countersink and use a drill.

Is there any reason to use Origin?

RMW

I did order a fresh zero flute countersink this afternoon and a fresh carbide WWing router bit. It might work okay…

Linear rail bearing blocks will be mounted to the aluminum plate so there isn’t much tolerance for misalignment.
As long as the SO is there and awake it would be nice to finish the holes with as much concentricity as possible.

I want to use flatheads for the router to keep the underside of the sled flat so some kind of dust collection rig can be mounted there.
 
Michael just my dos pesos, I've had more grief trying to hit precise tolerances rather than designing in some adjustability. As Ron suggested, you can use pan heads and counter bores with a slightly oversized thru hole to give you room for minor error.

I've done exactly what you are doing, with some Thompson 3/4" linear guide bearings using Origin. If you can align the rails precisely using spacers, and have a little adjustability in the holes for the bearings, it's easy to finesse a great fit when installing.

With 1/4" plate you have the depth needed to counterbore for M6 pan heads and still have them below the surface. Ditto the 10-24 for the router. And a single 1/8" bit can bore the thru hole as well as the counterbores.

Again, just my input from personal experience.

RMW
 
My initial thought Michael was to use a spotting drill to chamfer the holes. The material is aluminum, fairly forgiving and you can spin the small spotting drills up to router speeds and they are available in a myriad of angles.

However, I just noticed the 6mm FHCS you're using has a head diameter of close to 1/2". That limits the rpm of the spotting drill back to the 8000 rpm range.  [sad]

Richard brings up a good point, the recent zero flute countersink bits have a great propensity for finding "center" whereas the older multiple flute countersink bits tended to walk off center at times.

Is this chamfer locating a critical feature, or is it just attaching the aluminum base to the router?
 
In the case of, just burying the heads to get the surface flat, I don't know that I would be that offended by an 82 degree screw head in a 90 degree countersink? It will still center perfectly, the aluminum is soft, the difference is minimal. It's only 4 degrees.
In that case the Origin can do it very well. You switch the drilled hole outline into an "on line" cut and dial in the depth you need. At 45 degrees, the depth and width are the same, so it's not hard to figure out.
 
The tapped holes in the router base are even square to the base so high precision isn’t necessary. They’ll still be countersunk.

Turns out there are solid single flute (I think it should be single since 10k is the slowest speed on the SO) carbide bits in 82 and 90 degrees but only in 1/4”. Or maybe I didn’t search long enough? 1/4” isn’t big enough to carve a countersink for M6 flathead screw heads even if driven on the line. I might try a braised carbide bit…

I’m going go ahead and make the bearing block mounting holes with the SO. If they aren’t precise enough for the linear rail I can enlarge the holes by hand later. Or maybe I’ll tape out a workstation for the project so the part can be revised.
 
Michael Kellough said:
Or maybe I didn’t search long enough? 1/4” isn’t big enough to carve a countersink for M6 flathead screw heads even if driven on the line. I might try a braised carbide bit…

Take a look at Weldon, some of their larger countersinks come with 1/4" shanks.
 
Cheese said:
Michael Kellough said:
Or maybe I didn’t search long enough? 1/4” isn’t big enough to carve a countersink for M6 flathead screw heads even if driven on the line. I might try a braised carbide bit…

Take a look at Weldon, some of their larger countersinks come with 1/4" shanks.

Are those bits capable of spinning at 10k?
 
Richard/RMW said:
Michael just my dos pesos, I've had more grief trying to hit precise tolerances rather than designing in some adjustability. As Ron suggested, you can use pan heads and counter bores with a slightly oversized thru hole to give you room for minor error.

I've done exactly what you are doing, with some Thompson 3/4" linear guide bearings using Origin. If you can align the rails precisely using spacers, and have a little adjustability in the holes for the bearings, it's easy to finesse a great fit when installing.

With 1/4" plate you have the depth needed to counterbore for M6 pan heads and still have them below the surface. Ditto the 10-24 for the router. And a single 1/8" bit can bore the thru hole as well as the counterbores.

Again, just my input from personal experience.

RMW

I’m heading back in your direction.

While I’m pretty confident the SO can make the holes precisely enough I’m not so confident the tapped mounting holes in the bearing blocks are dead parallel or evenly straddle the big hole where the bearing is installed.
 
Pretty much any 2 flute chamfer bit can do it.
Since you are following a line, rather than just pushing it down, like with a drill press. It would only cut with one flute at a time. The thing you have to watch out for is your offset, which affects the cut direction.
You don't want to be climb-cutting in Aluminum.

I would like to find a but with a 45 degree beveled corner, that still cuts a flat bottom.
 
Michael Kellough said:
Richard/RMW said:
Michael just my dos pesos, I've had more grief trying to hit precise tolerances rather than designing in some adjustability. As Ron suggested, you can use pan heads and counter bores with a slightly oversized thru hole to give you room for minor error.

I've done exactly what you are doing, with some Thompson 3/4" linear guide bearings using Origin. If you can align the rails precisely using spacers, and have a little adjustability in the holes for the bearings, it's easy to finesse a great fit when installing.

With 1/4" plate you have the depth needed to counterbore for M6 pan heads and still have them below the surface. Ditto the 10-24 for the router. And a single 1/8" bit can bore the thru hole as well as the counterbores.

Again, just my input from personal experience.

RMW

I’m heading back in your direction.

While I’m pretty confident the SO can make the holes precisely enough I’m not so confident the tapped mounting holes in the bearing blocks are dead parallel or evenly straddle the big hole where the bearing is installed.

Michael if this is for the Vevor linear rail router sled you've posted about elsewhere, my option is even firmer. (Not necessarily "correct" tho....)

The trick to the linear rails lies with getting them dead nuts parallel. Easy using spacers, cut a scrap of ply to the desired width and rip it into 2 strips. Install the long (X) rails using the spacers, then the bearings on the rails. Install whatever you are using for brackets on those bearings and repeat the aligning the (Y) rails again with scrap spacers. As long as the X brackets and Y router plate holes have a little room to be adjusted you can dial in parallelism.

Alternately, install the bearings onto the router plate and align them parallel using spacers, then use the assembly to set the spacing on the Y rails.

My experience with using FHSCS is the angle of the head forces them to center in the holes so you are stuck with whatever level of precision you managed to achieve. With a BHSCS and oversized thru and counter bores you have a little room for alignment.

Way too many time I aimed for absolute precision and got bit in the butt. As alway, YMMV.

RMW
 
I hear you.

The bearing blocks are in the corners of the plate and I think button head screws are are low enough that I don’t even need to counterbore.
 
Ya, my Crafted Elements sled just uses cheeseheads to mount both the blocks and standard rounds for the router.  There's a little play in the mounting to the blocks so you can tram.  You'd have issues if you wanted to countersink the bottom of the sled for all hardware.
 
Back
Top