Blue Pine Garage Cabinets: Build

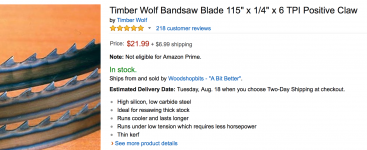
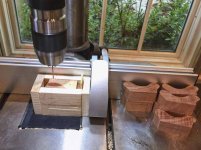
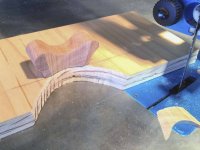
Just ordered a 1/4" blade for the Laguna.  Wanted one anyway.
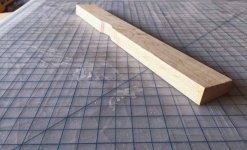
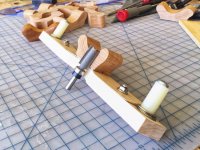
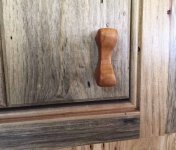
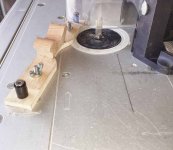
If I attach the pull to a long narrow 1/4" strip template I can steer the workpiece around the blade without getting near it.  It'll  should be nimble too.

Thanks for the input everyone.

[attachimg=1]


Attachments

  • Screen Shot 2015-08-13 at 3.33.52 PM.png
    Screen Shot 2015-08-13 at 3.33.52 PM.png
    636.1 KB · Views: 1,332
Thought more about the jig.  Since I not only have to pinch the waist, but cut it on a bias I'm going "Try" to make a jig to do this too.
How?
BONDO, naturally.  The magic muck.

I cover a blank pull in saran wrap and place it in a wood form cavity such that it will dry at the proper orientation to the saw blade. When, dry, trim and sand.  Then pop in a blank and run it through the saw on a curve.  I should be able to make repeat cuts at the proper angle.

At least in theory..... until I find I can't make it work.

You guys are great.
 
As usual I over complicated the process.  In fact, as everyone but myself knew, I did not need Bondo.
Maybe next time.

All it took was measuring the bevel of the prototype, 7 deg, and ripping a 7 deg face off a piece of stock that will act as the template.  Then trace the "pinched waist" and cut it out while the band saw table is set to that angle.
Use simple double stick tape, affix the raw pull and guide the pull it through the saw.

Works great.  This minimized the sanding and provides repeatable results.  Yet, each pull will be slightly different from finished sanding giving it an organic look.

Below is the slimmer test piece.  Because the waist of the prototype is not symmetrical  I will make a new template with a notch for each side.

[attachimg=1]

[attachimg=2]


Attachments

  • NewPull-2-2.jpg
    NewPull-2-2.jpg
    85.4 KB · Views: 1,193
  • NewPull-2.jpg
    NewPull-2.jpg
    111.5 KB · Views: 1,202
Thinks are slow, haven't felt "right", doc adjusted my meds today..

Actually thought ahead and figured I better drill pilot holes before I contoured the pulls.  Made a little angle/holder/box/widget with a shim to hold them.

I wasn't going to reveal the following until After I tried it, but I can't keep a secret.  My dad used to tell me when I was a boy that there were three major methods of communication.  Tell-a-graph, tell-phone, and tell-a-Luke.

I wasn't looking forward to sanding all those little things and getting them uniform.

[attachthumb=3]

Go to eBay, buy a used rock tumbler and experiment with sand and crushed walnut shells.  Kinda like a crockpot for sanding.

[attachimg=1]

[attachimg=2]
 

Attachments

  • Unknown.jpeg
    Unknown.jpeg
    1.5 KB · Views: 141
  • Screen Shot 2015-08-19 at 5.08.36 PM.png
    Screen Shot 2015-08-19 at 5.08.36 PM.png
    506.6 KB · Views: 1,043
  • drillPulls-1.jpg
    drillPulls-1.jpg
    107.3 KB · Views: 1,029
Do you think the tumbler will work?
Home Depot has the walnut shells but I have to buy 10 pounds for $15

I think I'll drive to the beach and try some sand first.
 
If it does work the corner of the surface that meets the door face will be rounded also. Maybe that doesn't matter to you but I'd want that corner to remain sharp.

Shane
 
If you stick two of the knobs together, back to back, or screw them to a sacrificial piece, then the back edge will not be rounded over.

Since the beach sand is free I would try that first. Beach sand may not work very well as it is not very abrasive, you need some that is used by sandblasters like garnet which is available in small quantities from tool stores, or see if you can get some from a local sandblaster.

Haven't tried walnut shells so can't comment.
 
Bohdan said:
If you stick two of the knobs together, back to back, or screw them to a sacrificial piece, then the back edge will not be rounded over.

Since the beach sand is free I would try that first. Beach sand may not work very well as it is not very abrasive, you need some that is used by sandblasters like garnet which is available in small quantities from tool stores, or see if you can get some from a local sandblaster.

Haven't tried walnut shells so can't comment.

Great point [member=5578]shanegrilah[/member]
Got me thinking.....Naturally I will dip the base in...... Bondo.

I've discovered the definitive reference for tumbling...  1939 Popular Mechanics.  I remembered reading this one.

[attachimg=3]

[attachimg=1]

[attachimg=2]
 

Attachments

  • Screen Shot 2015-08-20 at 6.44.35 PM.png
    Screen Shot 2015-08-20 at 6.44.35 PM.png
    908.3 KB · Views: 928
  • Screen Shot 2015-08-20 at 6.44.46 PM.png
    Screen Shot 2015-08-20 at 6.44.46 PM.png
    580.9 KB · Views: 951
  • Screen Shot 2015-08-20 at 6.50.43 PM.png
    Screen Shot 2015-08-20 at 6.50.43 PM.png
    1.2 MB · Views: 964
My son sent me this.
It assumes one is capable of building the device such that it is accurate.

 
I have been playing a crazy amount of tennis the past two months.  Would love to see the article "how to play winning tennis".

Thanks.
 
Brian Livingstone said:
I have been playing a crazy amount of tennis the past two months.  Would love to see the article "how to play winning tennis".

Thanks.

Brian,
As you wish.
I thought that maybe I should send it in a PM.  Then I though.....  It's my thread.  I can do whatever I want.
After this I get back on point.

[attachimg=1]

[attachimg=2]

[attachimg=3]

[attachimg=4]

[attachimg=5]
 

Attachments

  • Screen Shot 2015-08-21 at 11.16.29 AM.png
    Screen Shot 2015-08-21 at 11.16.29 AM.png
    83.9 KB · Views: 851
  • Screen Shot 2015-08-21 at 11.11.35 AM.png
    Screen Shot 2015-08-21 at 11.11.35 AM.png
    929.1 KB · Views: 886
  • Screen Shot 2015-08-21 at 11.11.20 AM.png
    Screen Shot 2015-08-21 at 11.11.20 AM.png
    924.7 KB · Views: 873
  • Screen Shot 2015-08-21 at 11.11.11 AM.png
    Screen Shot 2015-08-21 at 11.11.11 AM.png
    879.8 KB · Views: 901
  • Screen Shot 2015-08-21 at 11.11.01 AM.png
    Screen Shot 2015-08-21 at 11.11.01 AM.png
    980.7 KB · Views: 872
Working through the "slows"
I made a new jig for the pulls.  The lead-in / lead-out makes it easier to track and yields better results.  I cut three pulls. 
[attachimg=1]


Attachments

  • pulljig-1.jpg
    pulljig-1.jpg
    84.8 KB · Views: 784
iamnothim said:
Working through the "slows"
I made a new jig for the pulls.  The lead-in / lead-out makes it easier to track and yields better results.  I cut three pulls. 
[attachimg=1]

Luke,

Are those pulls screwed to the plywood with two screws?  If so, I would almost be inclined to clean up your arc on the plywood to be pretty smooth and the put a bearing bit in my router table (or flip it over and use a handheld router) to clean up the waist. It would save you quite a bit of sanding and probably take the same amount of time to trim all the parts.

Looking good my friend!

Cheers. Bryan.
 
bkharman said:
Are those pulls screwed to the plywood with two screws?  If so, I would almost be inclined to clean up your arc on the plywood to be pretty smooth and the put a bearing bit in my router table (or flip it over and use a handheld router) to clean up the waist. It would save you quite a bit of sanding and probably take the same amount of time to trim all the parts.
Bryan,
The pull in the prior picture of the bandsaw jig was held using double sided tape.  I originally wanted to use a router but didn't think I could come up with a good jig.  I also thought the bandsaw would be "good enough".  Well the cut quality with a 1/4" blade isn't the greatest and no matter how hard you try, the blade will take a bit of the jig out with each pass.

After your suggestion I looked at the router again and I have something that should work.  You have to fasten and unfasten the pull between sides.  It can't be double sided because of the angle.

I cut a shim at 7 degrees and I screwed the pull to the shim from behind.  The shim is then fastened to a larger piece so the jig can be safely be guided around the router bit.  The nylon standoff's are the to grasp the jig.  I was very luck in my selection of stock for the jig.  My bottom bearing bit just clears.
Thanks [member=21412]bkharman[/member]

[attachimg=1]

[attachimg=2]


Attachments

  • pulljigrtr-1.jpg
    pulljigrtr-1.jpg
    118 KB · Views: 750
  • pulljigrtr-2.jpg
    pulljigrtr-2.jpg
    127 KB · Views: 712
I like it Luke!! 

I really like your jig. Great job!

Did you run work through it yet? 

Cheers. Bryan.
 
bkharman said:
I like it Luke!! 

I really like your jig. Great job!

Did you run work through it yet? 

Cheers. Bryan.
Thanks.  Except...

The bit wasn't tall enough.  So I ripped some material off the bottom and found fasteners that would work.  Actually better than the first.

Except...
Because of the odd shape of the piece I didn't realize I would be routing into end grain.  I noticed it immediately as I guided the piece into the bit.  You can see tear-out after just tiny amount contact with the bit.  From experience, it won't work.  At a minimum,  it will be a gouged mess.  Probably shatter.  Then there's my fingers.  It's a really scary sound that I have not gotten used to even when I'm expecting it.

[attachimg=1]

[attachimg=2]


Attachments

  • pulljigrtrA-1.jpg
    pulljigrtrA-1.jpg
    87.5 KB · Views: 706
  • pulljigrtrA-2.jpg
    pulljigrtrA-2.jpg
    83.5 KB · Views: 708
Luke,
I don't know if you have one of these, but could you use an oscillating spindle sander? You would need to be careful not to sand into the jig too much, but it might be worth a shot.
 
Runhard said:
Luke,
I don't know if you have one of these, but could you use an oscillating spindle sander? You would need to be careful not to sand into the jig too much, but it might be worth a shot.
That's a good idea.  I tried it with the other jig and it wasn't too great.  That's because the jig and piece were flat and the blade was canted.

It's the other way around with this jig so it might work. 
 
Back
Top