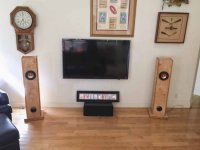
Brines M10-A10 MLT Speaker Build.

limestonemike said:
As far as flattening the backs of new LN or Veritas tools (or other plane irons and chisels) there is a huge benefit to flattening the backs. Even the best tools need a little work to get the best performance out of them. Flattening the backs is the only way to reliably dial in a sharp edge and will reduce the time needed to regain a sharp edge. I see you are doing some learning through Mark S (wood-whisper), he should be able to explain. I learned from Garret Hack, Rob Cosman and others. Its all pretty consistent though.
I will look into this.  Right now the irons are fairly new and the backs are Reference Surfaces.  I could never lap the back as flat as the factory.  To my way of thinking, if you hone the bevel side and get a full wire across the edge you are golden.  Plus the Veritas PM-V11 backs are stepped.  Not sure if that's a plus or a minus.  Perhaps down the road when the backs get out of whack by pulling the wire off I'll do it.  I'm happy with the edges I'm getting.

limestonemike said:
Re the honing angle on the veritas jig, you may just want to use the set-up jig as a rough guide. When you hone your primary bevel, just ensure the jig is set-up so the tip of your chisel or plane iron is in contact with the stone, not lifted above it. The heel of the iron or chisel can just brush the stone, it should not grind against it. If you using the jig to establish a secondary micro-bevel, just ensure it is set up at the correct position before you start (ie not the micro bevel position - that comes last). Lee Valley has a good video on their site on how to use it. You'll find after gaining experience with sharpening hand planes and chisels, you may not need the guides. With time, you'll just sharpen by feel alone.

Mike.
Take a look at my pictures up a few posts.  The MK-II Honing Guide sets the bevel angle perfectly.  Slide the shiny little guide on the jig and clamp it tight at the line for the width of the iron.  Fit the iron in the jig and move it until it is flush with the guide.  Now it's perfectly square.  Then loosen the clamp on the jig and slide the iron down to meet the stop on the guide.  The stop is set to the angle you want.  There are many to choose from.  Tighten down the jig on the iron and remove the gauge.  Done.  Perfect Angle Locked In. 
Now, say you want a micro bevel.  You turn the brass knob on the axel of the roller.  It has stops indexed for a couple micro bevel angles.  Done... again

You don't have to look at the bevel on the stone and wonder if it's flat.  After your irons and chisels are honed once on the jig subsequent honing will take much less time.

Luke
 
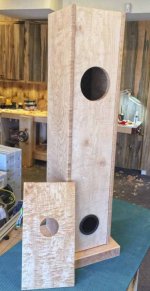
One plinth is done and ready for final sand and finish.
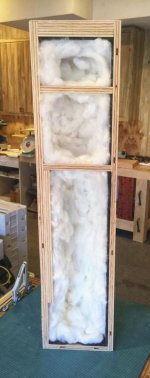
The Acousta Stuf came in just now.  Tomorrow I'll line the boxes and seal them up.  From there it's just finishing.

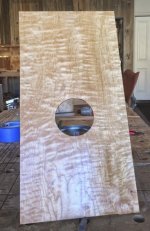
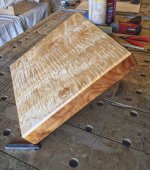
I'm going to top coat with Deft lacquer.  It does a fine job of popping the grain.  This is great news.  No dye everything will be natural.  Below is a test panel.

[attachimg=1]

[attachimg=2]


Attachments

  • Deft2-1.jpg
    Deft2-1.jpg
    69.9 KB · Views: 1,017
  • Deft-1.jpg
    Deft-1.jpg
    103.7 KB · Views: 1,015
That test panel is really sweet, Luke.  For my tastes, I'd go with something that adds just a bit more of an amber tint.  [smile]
 
Sparktrician said:
That test panel is really sweet, Luke.  For my tastes, I'd go with something that adds just a bit more of an amber tint.  [smile]

I hear ya Willy.
It's close... but could use something.  Some butter honey warmth.  I don't like oil based products because I don't have as many color mixing options I do with dyes.  However if water based dye/stain hits it the grain goes bonkers.  Raised to the moon.  Obviously you can't sand grain down after dying.    I put some Charles Neil Blotch Control on another panel and I'll test some color. 

I will also test a glaze over the Deft.  That might give a nice result.  If not no color is a nice fallback.  I have a lot of time waiting for glue to dry.
Thanks for the post
Luke
 
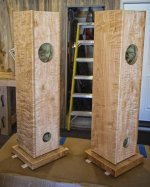
The first speaker is stuffed, glued, and clamped.
I took a different test panel, put blotch control on it, and wiped on some dye.  I didn't like it.
Then I took the panel with Deft top coat, scuff sanded it and applied the same dye mixture on top of the Deft.  A "glaze.  In in image of the test panel, ignore the Right Side.  It's hard to pick up the correct color in the photo.  I think I like it and may go a tad more concentrated on the glaze.

The plinth does not have the glaze.  You can see how different pieces take on a different color.  The sides are from the same material as the skirt on the plinth.

I will spray the top coat on the speakers.

[attachimg=1]

[attachimg=2]

[attachimg=3]
 

Attachments

  • Stuff-1.jpg
    Stuff-1.jpg
    79.8 KB · Views: 950
  • Glaze-2.jpg
    Glaze-2.jpg
    126.9 KB · Views: 955
  • Plinth-1.jpg
    Plinth-1.jpg
    201.1 KB · Views: 969
Any way you cut it, that maple looks wonderful.  I hope the sound comes up to the finish.  [smile]
 
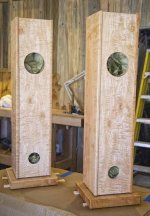
The first top coat is on.  I may have enough for two more coats then I have to wait until Thurs afternoon when more Deft arrives.
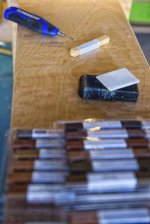
In the meantime I can work on small repairs.  I purchased 32-color wax repair sticks from Mohawk.  They are pretty nifty. 
I'll also work on a little glaze.  So far, so good.

I put shims between the speakers and the plinths so I could coat the corners better.

[attachimg=1]

[attachimg=2]
 

Attachments

  • 1st_Coat-1.jpg
    1st_Coat-1.jpg
    79.1 KB · Views: 840
  • First_TC-2.jpg
    First_TC-2.jpg
    66.1 KB · Views: 848
[eek] Looking very nice! If they sound half as good as they look, I think you'll have a keeper  [thumbs up]
 
Using Mohawk Wax Fill Sticks.
Mohawk sells the sticks in different colors.  24 total, I think.
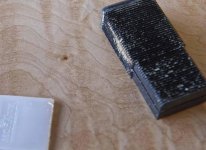
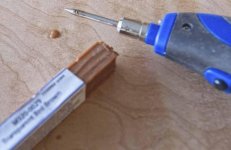
There is also a plastic scraper block with a comb and a quick heat cordless Iron.  Buy them all.

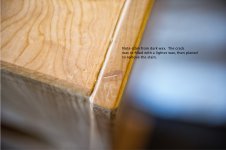
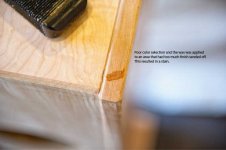
Very Important.  Do Not Use The Sticks on Unfinished Wood.  The wax will stain the surrounding area.  The stain is deep.  They must be used over finished wood.  The photos show where my scuff sanding after the first coat took off too much of the finish and resulted in a wax stain.  Luckily it was an edge and I planed it off with a block plane.

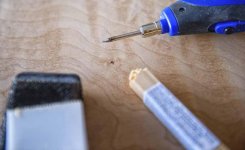
Prepare the imperfection by removing any excess material.  Heat up the iron until you have a wax dropplet  and touch the drop to the wood.  This doesn’t take long.  If the imperfection is deep you will need to fill it in a couple stages.  For linear fills you can move the iron along the scratch while holding the wax on the iron.  You can also smooth the wax with the edge of the iron. 

The wax dries in about a minute and the excess can be scraped smooth with the block.  The grooves in the block fill up with wax pretty quickly so you need to comb the block along the way.  The block does a great job of removing all the wax around the fill without damaging the finish.  I am probably using too much wax.  Clear coat over the repair.

I am still getting my technique down.  Selecting the correct color filling and scraping.  Some imperfection completely disappear.  Linear scratches are the hardest.


[attachimg=1]

[attachimg=2]

[attachimg=3]

[attachimg=4]

[attachimg=5]

[attachimg=6]

[attachimg=7]
 

Attachments

  • Wax-3.jpg
    Wax-3.jpg
    43 KB · Views: 763
  • Error_Wax-1.jpg
    Error_Wax-1.jpg
    568.8 KB · Views: 755
  • Error_Wax-2.jpg
    Error_Wax-2.jpg
    30.3 KB · Views: 749
  • Wax-6.jpg
    Wax-6.jpg
    61 KB · Views: 736
  • Wax-5.jpg
    Wax-5.jpg
    43.2 KB · Views: 756
  • B_Wax-1.jpg
    B_Wax-1.jpg
    39.3 KB · Views: 734
  • A_Wax-1.jpg
    A_Wax-1.jpg
    43.8 KB · Views: 742
It's killing me to wait until late tomorrow for more lacquer to arrive.  I had enough for one more coat this morning.  Now I'm doing little stuff.  If everything goes as planned I should have music sometime Saturday.

[attachimg=1]
 

Attachments

  • BPost-5.jpg
    BPost-5.jpg
    44.7 KB · Views: 673
iamnothim said:
Using Mohawk Wax Fill Sticks.
Mohawk sells the sticks in different colors.  24 total, I think.
There is also a plastic scraper block with a comb and a quick heat cordless Iron.  Buy them all.

blah

blah

blah

That was an interesting video, certainly did the job on that demo scratch.
 
Well.
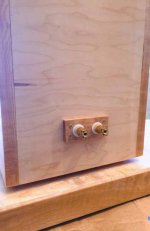
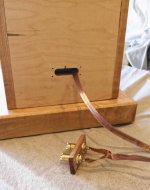
I had some time to kill waiting for the Deft to arrive.
So…..

[attachimg=1]

[attachimg=2]

[attachimg=3]
 

Attachments

  • spkrscpl-5.jpg
    spkrscpl-5.jpg
    74.7 KB · Views: 679
  • spkrscpl-6.jpg
    spkrscpl-6.jpg
    57.5 KB · Views: 613
  • spkrscpl-7.jpg
    spkrscpl-7.jpg
    67.6 KB · Views: 612
So how do they sound Luke?  Or should I call you E F Hutton?!?

They look great!

Cheers. Bryan.
 
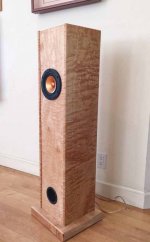
I love them. The sound staging is great and they have a big voice for small drivers.
Played some Classical blues and soft rock. The base surprised me too.  They should get better results when the cones break in.  They are very efficient
 
Back
Top