Built in checklist?

DynaGlide

Member
Joined
May 16, 2017
Messages
1,697
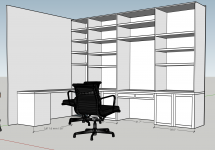
I am roughly a month out from having 10 days to myself to work on an Office built in project. I'm at the broad planning stage for materials I'll need. Phase 1 is 5 frameless base cabinets and a countertop. Here is what I've put down so far:

Plywood in ¾, ½, 6mm (carcass, drawers, carcass back, drawer bottoms)

White edgebanding

Legs

Water based poly

Blum hardware

Rail and stile material (Shaker door and drawer faces)

MDF panels (Doors)

J roller

Contact cement

Laminate and Particle Board

Cabinet trim GRK fasteners

Dominos

Titebond II

Does anyone do this type of work regularly that has a list they go off of when starting a new project? Care to share? Anything glaring I'm missing? Obviously this is a very general list at this point. I plan on working on it over the next few weeks with specifics and ordering materials. I will be happy to get the base cabinets and top installed. The doors and drawers can come later. Boxes will be pre-bored with LR32. I'm still debating between Process 32 or another system.

Thanks everyone,
Matt


Attachments

  • Screen Shot 2020-05-25 at 8.09.17 AM.png
    Screen Shot 2020-05-25 at 8.09.17 AM.png
    292.1 KB · Views: 382
What about pocket screws?  Also, the plywood will most likely be 18mm and 12mm rather than 3/4" and 1/2".  This might help as you dimension the entire project, especially if you're working to metric standard.  [smile]
 
Taunton Press makes a good book on te subject "Built Ins" that may help you

 
Hello Matt

You mention laminate, so I would add a laminate trimming bit and laminate file to the list.

 
Rob Z said:
Hello Matt

You mention laminate, so I would add a laminate trimming bit and laminate file to the list.

Thank you [member=6193]Rob Z[/member] . I'm getting closer. The closet is mostly out but I have to deal with a  $#@$ romex that the electrician ran down one of the closet walls. It's just hanging in the middle of the room from the attic through my office down into the floor. So I get to go up to the attic, remove the insulation that we just had blown in last year up to 18" to clear a path to work, and add in some junction boxes to get the wire into the studs in the wall. I'm really not looking forward to that. Electrical doesn't bother me. Electrical in my attic which doesn't have stairs or a built in ladder and you can't even see the joists because of all the insulation. . .that's another story.

i-3RzBfLQ-X3.jpg


Maybe you could just reroute that on the bottom side (within the room) without going into the whole attic problem?

Seth
 
SRSemenza said:
Maybe you could just reroute that on the bottom side (within the room) without going into the whole attic problem?

Seth

[member=1619]SRSemenza[/member] Seth, I wish I could. The length of the Romex isn't sufficient to get to the wall and up in to the attic. I don't want any junction boxes in the room as that would mean cutting into the cabinetry I plan on installing to make them accessible with blanking plates.
 
[member=65062]DynaGlide[/member] what if you carefully remove the 2x4 from the ceiling without damaging the romex, cut the cable close to the floor and tuck it into the ceiling "channel" left by that piece of 2x4, then run it down the wall and install a junction box close to the floor? You'll have to cut a hole in the back of your cabinets, but judging by the plan it will be hidden by cabinet doors. Out of sight, but still accessible.
 
serge0n said:
[member=65062]DynaGlide[/member] what if you carefully remove the 2x4 from the ceiling without damaging the romex, cut the cable close to the floor and tuck it into the ceiling "channel" left by that piece of 2x4, then run it down the wall and install a junction box close to the floor? You'll have to cut a hole in the back of your cabinets, but judging by the plan it will be hidden by cabinet doors. Out of sight, but still accessible.

I just don't think there is enough slack and room to work. Above that 2x4 is a layer of underlayment separating insulation from falling down. So let's say I cut the romex where you suggest. In order to get the romex up past the underlayment and through a top plate in the wall, just seems really tough without access from the attic side. And this is assuming the romex isn't stapled in the attic between where it is now and where it needs to be. I'm not discrediting your advice. I just don't know how I'd do it.
 
DynaGlide said:
I just don't think there is enough slack and room to work. Above that 2x4 is a layer of underlayment separating insulation from falling down. So let's say I cut the romex where you suggest. In order to get the romex up past the underlayment and through a top plate in the wall, just seems really tough without access from the attic side. And this is assuming the romex isn't stapled in the attic between where it is now and where it needs to be. I'm not discrediting your advice. I just don't know how I'd do it.

Yes, with that underlayment above the 2x4 my idea wouldn't work. I don't envy you, I had to do something similar a few years ago when it was 100 degrees outside. Attic felt like 400 degrees. But once you do it you'll at least know that circuit is wired properly.

Regarding your list, have you considered purchasing the Blum Tandem boring template? It's not required, but speeds up drawer installation. Rockler has a cheaper version that works just as well.
 
serge0n said:
DynaGlide said:
I just don't think there is enough slack and room to work. Above that 2x4 is a layer of underlayment separating insulation from falling down. So let's say I cut the romex where you suggest. In order to get the romex up past the underlayment and through a top plate in the wall, just seems really tough without access from the attic side. And this is assuming the romex isn't stapled in the attic between where it is now and where it needs to be. I'm not discrediting your advice. I just don't know how I'd do it.

Yes, with that underlayment above the 2x4 my idea wouldn't work. I don't envy you, I had to do something similar a few years ago when it was 100 degrees outside. Attic felt like 400 degrees. But once you do it you'll at least know that circuit is wired properly.

Regarding your list, have you considered purchasing the Blum Tandem boring template? It's not required, but speeds up drawer installation. Rockler has a cheaper version that works just as well.

I did buy that template, actually. I made a mockup cabinet out of MDF to play around with. My only issue with it is I used 1/2" drawer sides and fronts to accept an applied front and when I drilled the front 1/2" material using the template and drove the supplied screws in they poked through. Not really an issue because I'll be attaching drawer faces but I wasn't expecting it. Maybe user error.
 
I know it's not the easy path, but that said, I'd cut a hole in the drywall where you want the end box to be, then locate the top plate above it in the attic.  Drill a 5/8" hole in the plate, then run a fishtape down through the hole to the freshly cut box location.  Pull the loose end out of a Romex box, attach it to the fishtape, then pull the new run up through the top plate.  Now the "fun" part - find the connection point where the existing run of Romex terminates.  Turn off the power to that circuit.  Pull the new run over to that box, leaving 12-18" of slack.  Remove the old piece of Romex and replace it in the box with the new run of Romex.  Rearrange the insulation to cover it all and get out of the attic.  Now connect the receptacle to the other end of the Romex using the screws, not the stab-ins and close up the box.  Turn the power back on and test the new circuit.  Take a shower and grab a glass of wine...  [smile]
 
You mentioned being in the beginning planning stages and you’ve covered a lot in your list I might suggest deciding now specifically what Blum hardware will be used as it can affect material say if your doors are inset ? Overlay ? And how much overlay ? The same can be said for drawer slides If they are under mount you can batch out the notches prior to assembly instead of hacking through it after glue up. Undermount slides. require at least 1/2” under the drawer bottom Side mount affects drawer width and possibly carcass depth.  If you build it using the 32 mm system for height and then use inset doors the LR 32 system will be affected regarding hinge placement on the doors. It’s not a game changer but it takes some fiddling. It’s easy but not automatic as it would be with full overlay doors that are in multiples of 32mms
It looks like a fun and very functional projects be sure to share pics along the way
Best
 
Matt

Sparky's idea is what my Sparkies did on jobs like this.  Abandon the old wire  and run new wire to some new junction box upstream. Hopefully your old wire is coming out of a junction in the attic for one of the attic  lights (if there are some lights in the attic...there should be given the age of your house).

Still have to get in the attic but it is hopefully  fairly quick for you.
 
Matt

I just looked at your drawing ...that's going to be a great home office set up.

I just thought of two more things for your list.  I don't recall the name of those thingys that we used to install in built-ins like this...someone here will know the name.  Drill a hole of a certain size and this plastic gizmo fits in the hole, has a pivoting cover, and can swing open to allow cords from the printer or computer to pass through.

And the most obvious is often the thing that is forgotten: a bundle of cedar shim for the installation.  [big grin] Unless you have the only house in NoVA with level floors and plumb walls .  [blink]
 
Grommets.  Doug Mockett is the king of these.

He's using legs, so shims shouldn't be needed.
 
[member=6193]Rob Z[/member] [member=7493]Sparktrician[/member]

I thought I got away without shoveling this year. . . ::)

Where it goes into ceiling
i-3RzBfLQ-X2.jpg


Other side
i-hQPDFzb-X2.jpg


Takes a turn
i-qGKkGsj-X2.jpg


Runs along (top of!) joists
i-tHBmzzd-X2.jpg


Drops into a wall here
i-PrZcwSb-X2.jpg


So I'm thinking. . .cut it fairly far away from where it enters the ceiling to give myself a lot of slack to work with to run it up the stud and into the top plate. 1st junction box. goes in attic where I made the cut, with some slack. Pull the original romex other end back through the ceiling, run it up through a hole in the top plate, and connect it to 2nd junction box. Then join the two junction boxes with new romex. Sound good?

Matt
 
DynaGlide said:
So I'm thinking. . .cut it fairly far away from where it enters the ceiling to give myself a lot of slack to work with to run it up the stud and into the top plate. 1st junction box. goes in attic where I made the cut, with some slack. Pull the original romex other end back through the ceiling, run it up through a hole in the top plate, and connect it to 2nd junction box. Then join the two junction boxes with new romex. Sound good?

Matt

I'm going to suggest that you forget the second junction box altogether.  Code is pretty clear on having junction boxes in hidden locations.  Make it a single run from the existing, code-approved box to the new end point.  Yes, it's not the easiest path, but it will be capable of being approved by an inspector. 
 
Sparktrician said:
DynaGlide said:
So I'm thinking. . .cut it fairly far away from where it enters the ceiling to give myself a lot of slack to work with to run it up the stud and into the top plate. 1st junction box. goes in attic where I made the cut, with some slack. Pull the original romex other end back through the ceiling, run it up through a hole in the top plate, and connect it to 2nd junction box. Then join the two junction boxes with new romex. Sound good?

Matt

[member=7493]Sparktrician[/member]
I'm going to suggest that you forget the second junction box altogether.  Code is pretty clear on having junction boxes in hidden locations.  Make it a single run from the existing, code-approved box to the new end point.  Yes, it's not the easiest path, but it will be capable of being approved by an inspector.

In that case, I would rather install two junction boxes to make the splice in the office and make them accessible through the cabinetry. Tracking the Romex down from its original source and fishing it up doesn't sound fun to me. Maybe it isn't that bad?
 
DynaGlide said:
Sparktrician said:
DynaGlide said:
So I'm thinking. . .cut it fairly far away from where it enters the ceiling to give myself a lot of slack to work with to run it up the stud and into the top plate. 1st junction box. goes in attic where I made the cut, with some slack. Pull the original romex other end back through the ceiling, run it up through a hole in the top plate, and connect it to 2nd junction box. Then join the two junction boxes with new romex. Sound good?

Matt

I'm going to suggest that you forget the second junction box altogether.  Code is pretty clear on having junction boxes in hidden locations.  Make it a single run from the existing, code-approved box to the new end point.  Yes, it's not the easiest path, but it will be capable of being approved by an inspector.

In that case, I would rather install two junction boxes to make the splice in the office and make them accessible through the cabinetry. Tracking the Romex down from its original source and fishing it up doesn't sound fun to me. Maybe it isn't that bad?

It sounds a bunch worse than it really is.  I will admit that it can be messy, though, especially with loose insulation.  Better to be 100% code-compliant. 
 
Back
Top