Built-In: Master closet lined in Walnut

alfa

Member
Joined
Nov 4, 2011
Messages
53
I'm trying to build this (see pic below) for my closet.

I've ripped down 3/4" ply for the boxes which I want to line with Walnut and finish Surfix. I have 8/4 Walnut that I want to cut down to 1/8" to 1/4" planks using a Rikon 14" bandsaw (purchased for this endeavor).

I also want to incorporate indirect lighting using LEDs.

Any thoughts or ideas would greatly be appreciated - especially re. creating the Walnut veneers and considerations for indirect lighting angulations.

Thanks!
 
why not buy walnut sheet goods  and rip to width instead and then use the 1x material and make the face frames.  thats what I did awhile back and ripped it to 1x2  and made face frames and nailed to edge of walnut sheets and it came out great... no reason to go to all the work when it will look great with sheet walnut which is only $80 bucks a sheet for a grade walnut and it is a closet
 
Hi

You will need to veneer both sides of any of your ply to keep it straight.
 
Festoolfootstool said:
Hi

You will need to veneer both sides of any of your ply to keep it straight.

That's something I need clarification on:

Will it still be necessary to veneer on both sides if the plywood is 3/4" AND the walnut is
 
honeydokreg said:
why not buy walnut sheet goods  and rip to width instead and then use the 1x material and make the face frames.  thats what I did awhile back and ripped it to 1x2  and made face frames and nailed to edge of walnut sheets and it came out great... no reason to go to all the work when it will look great with sheet walnut which is only $80 bucks a sheet for a grade walnut and it is a closet

Thanks for your reply!
In hindsight, that would probably been the way to go but I'm committed now that I ripped the ply down.
Hopefully it'll work out and my inexperience won't be too detrimental  [unsure] [smile]
 
As for the lighting, a recent PBS woodworking show dealt with the newest lighting technology. I think it was the show where the guy uses his wife a lot.  Can't think of the name. On a personal basis I have used the lighting from rockler pro and been very happy. It uses a touch pad to turn on the lights and also dim them. Wasn't led but it was a while back. They probably have led now.
 
Yes, absolutely veneer both sides especially if you are using real wood veneer (ie the 1/8" you are talking about). In my opinion 1/8" is still too thick as a veneer, you really want to get down to below 1/16".

It doesn't have to be the same species, either, ie for hidden areas you could use poplar veneer to save some $$.

I always try to lay the veneer so that the grain is running perpendicular to the substrate, this way the veneers counteract each other in terms of wood movement. The cross-grain situation is good enough to hold each other tight, but not strong enough (thickness under 1/16") to crack.

Also, I wouldn't secure the veneer with the pin nails. You will have to sand the piece after you veneer it and if you use the pin nails they will make sanding problematic, and also show after the veneer is sanded down.

That being said, a closet would be a really, really obnoxiously sized piece to do using thicker veneer. Not to discourage you, but just some things to consider as you are still early on, since you only have the ply broken down:

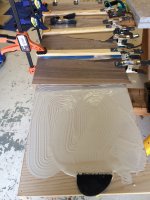
1) Do you have a large vacuum press? Pieces of that size would be very, very difficult to cold press properly. You will see problems at your veneer seams, and also if you don't press properly I guarantee you will see bubbling.

2) Is there a particularly good reasons to be using real wood veneer on this, over a high quality walnut ply? I can see a rationale if you are doing some thing like book-matching or grain matching, but you can also do that with commercially available veneer (which is much easier to apply without a vacuum press, just contact cement or cold-press glue). The other rationale is if you are using some very very expensive wood like rosewood or cocobolo, where the extra time investment makes financial sense.

3) What glue/adhesives are you planning on using? I've veneered small-width pieces with cold-press glue but for veneer of that width you'd almost have to go with a urea-formaledhyde glue to ensure you don't get any glue creep (happens with most PVA glues). Those are nastier glues to work with and also certain individuals have allergies to formaldehyde- especially since this piece is going to be in an enclosed indoor area, it will continue to off-gas.

4) Time... do you have the patience to joint, resaw, joint/drum sand, (repeat multiple times), sand the veneer, rough cut the ply, seam the veneer, spread the glue, press, sand the seams, finish sand, finish cut the veneered ply?
Personally if you wanted the look of real wood, it would be more cost efficient to do it with solid walnut, no kidding. On the veneer work that I have done, I would think the total time investment was at least 3 times that of what it would take me to do the same thing with solids, and probably 6 times that of what it would take me to do with a appropriately faced commercial ply. I would just get a good quality DOMESTIC walnut plywood (Murphy?) and attach a face frame. You can ask for bookmatched (not rotary cut) face veneers if you want.

5) Last consideration, substrate quality. Since you are doing the veneer yourself, the ply can do all sorts of crazy things as you lay it on. Remember your veneer work will only be as good as the bond for the face veneer of your substrate. Even if you can stick your veneer on, if your substrate veneer peels off....

You absolutely need the best ply that you can get. Ply that is flat and will stay flat (try putting glue on the face veneer of cheap BORG ply and see what happens). IMO there are only two choices- Finnish/Russian/Baltic birch (13 ply), or domestic Appleply. Figure $60-$70 for a 5x5 sheet of BB, and $120+ for 4x8 ApplePly.
You can also look at MDF (very, very glue hungry, and iffy when it comes to water contact), or MDF core ply.

Good luck, let us know what you decide on doing.

alfa said:
Festoolfootstool said:
Hi

You will need to veneer both sides of any of your ply to keep it straight.

That's something I need clarification on:

Will it still be necessary to veneer on both sides if the plywood is 3/4" AND the walnut is
 
Hi bicyclecafe -

Thanks for your response - you gave me a lot to think about. I'm no pro at all and just have always been into fixing up the house.

Since I've finished schooling and a homeowner, I can now buy myself the toys to fix up the house.

Some answers to your questions....

1) I don't have a vacuum press or access to one. I've read the challenges associated with applying veneers and its beyond my abilities to consider such an undertaking.
2) I opted to to do real wood veneer because access to walnut ply was challenging for me. That, in combination with the fact that veneer required more equipment than I could justify, pushed me towards that as a viable option. I did discover adhesive-backed veneers a little later on though. I also saw some reclaimed hardwood that used this technique of annealing thick veneers (~1/4") to plywood which made me think that it would a feasible solution.
3) As for glue, I was thinking Titebond III. I thought a couple hair pin nails after gluing up and sanding (but filled before SurFixing) wouldn't be too bad for a closet application.
4) Time... I'm pretty flexible in the sense that its my closet and I'm in no real rush. What I have now is what the builder put in. I also will need to take out a small 1' wide wall that is in between the opening and hang some doors I've made.

Alfa
 
Alfa,
 If you want to press the veneer without a vacuum press, you'll have to make a few jigs to press the veneer to the substrate. Nails will definitely not apply enough pressure. If anything, the pin nails would only be good for holding the veneer in place (since it might buckle with moisture from glue) before you apply pressure.

The easiest way is to make two 1.5" thick boards (pressure plates) out of plywood/melamine, so you can "sandwich" the veneer/substrate assembly. Then you would apply pressure across the sandwich with clamped cauls (can be hardwood, 2x4s, etc). I prefer melamine since the glue squeeze out will be easier to clean off.

What's the largest size panel you plan on making? Consider that a long piece would require lots of clamps/cauls, and longer pressure plates.

In my opinion real wood veneer is harder to apply correctly and more equipment intensive. I would think commercialy available veneer would be easier to apply. Consider that you can apply commercial veneer with a few small hand tools (veneer hammer, scraper, smoother) and contact cement.

Also, if you can get a large enough sheet, you can avoid having to seam the veneer edges, which you will more than likely have to with real wood, unless your board is super wide.

1/4" is far beyond the thickness of what I would consider "veneer". It's "thin", but at that thickness it works and behaves like solids. 1/8" is pushing it in terms of gluing to plywood, 3/32" is the max thickness I would go for real wood veneer, 1/16" being what I aim for as it is the best balance between minimal movement, appearance of solid wood, and having material left to sand.

PSA (Pressure sensitive adhesive) backed veneer is a good option to consider if you want a mess-free and time effective solution.

Titebond III is not a good choice for veneering, one because PVA glues tend to creep over time, but more so for open time. Yes, it has a longer open time than say, TB II, but even that 15 minute window is far too tight for working with real wood veneer. It can easily take that long just for applying rolling on the adhesive, not to mention that you have to position, clamp, uncurl (it will buckle!) the veneer. Titebond makes a cold press veneer glue that is OK for this purpose. It really is designed to replace contact cement in a commercial veneer setting, but I find that it is acceptable for real wood. Also it dries brown, so if it squeezes out through the seams it's less noticeable with walnut.

alfa said:
Hi bicyclecafe -

Thanks for your response - you gave me a lot to think about. I'm no pro at all and just have always been into fixing up the house.

Since I've finished schooling and a homeowner, I can now buy myself the toys to fix up the house.

Some answers to your questions....

1) I don't have a vacuum press or access to one. I've read the challenges associated with applying veneers and its beyond my abilities to consider such an undertaking.
2) I opted to to do real wood veneer because access to walnut ply was challenging for me. That, in combination with the fact that veneer required more equipment than I could justify, pushed me towards that as a viable option. I did discover adhesive-backed veneers a little later on though. I also saw some reclaimed hardwood that used this technique of annealing thick veneers (~1/4") to plywood which made me think that it would a feasible solution.
3) As for glue, I was thinking Titebond III. I thought a couple hair pin nails after gluing up and sanding (but filled before SurFixing) wouldn't be too bad for a closet application.
4) Time... I'm pretty flexible in the sense that its my closet and I'm in no real rush. What I have now is what the builder put in. I also will need to take out a small 1' wide wall that is in between the opening and hang some doors I've made.

Alfa
 
I hate to rain on your parade, but this is a really bad idea. When you slice your 8/4 walnut into thin boards, they will not stay flat--they will curve both lengthwise and across the grain ("cupping"). Even if the boards were perfectly flat, after you glue them to the plywood they will expand and contract across the grain, causing splitting and buckling, and probably warping the entire glued-up panel. If you have your heart set on veneer, the sheets should be less than 1/16." A standard thickness for many years was 1/28." This was a good compromise--offering decent pliability while still allowing finish sanding with little risk of burn-through. Even with an appropriate thickness, the veneer sheets will require great care to flatten, edge-join, and glue. And yes--you must veneer both sides, although not necessarily with walnut. You will also need to apply a solid wood band to all the edges, to allow easing or profiling what would otherwise be very sharp edges. This is a lot of work for a closet built-in. Might I suggest an adhesive-backed sheet product for the panel faces, reserving the solid wood for the edges? You could even do a modest face-frame without creating an annoyingly pronounced lip to interfere with removing the contents. And whether the back is the wall, or you are adding a back panel, I would paint that white to help provide some reflected light.
 
I agree with all the advice given, this is not a veneer project for a novice to attempt, especially without the right equipment.
Also I think in the future you'll be bummed you used 8/4 walnut to line your closet with.
I'd take the loss on the plywood you already cut up and look for decent A1 walnut veneer core ply.
It's all you really need for a closet project, save the 8/4 for something you'll really enjoy making out of solid lumber!
 
May the Wood Gods and Festool Pros smile upon and send me good Karma as this folly of a novice - and glutton for pain if Nick's predictions turn true - is pushing on...

I broke-in the Rikon 14" band saw (but just ordered a Kreg Precision Bandsaw Fence with 7" Resaw Guide and a Woodslicer blade) and made a first round of ~3.5mm walnut planks: band saw and a few passes through the thickness planer...

Amazing how beautiful the unfinished wood is and fine pearlescent flecks that can be seen.

 
Nice one!  [big grin]

Sand the Walnut to 800+ and see what happens!  [cool]

Have a good one,

Vi_k
 
Can't believe its taken this long to update pics. Alas, this is a hobby. But here are some pics of the bottom center unit. For me, it was the most complicated unit and hopefully the other pieces will go quicker ;)

n.b. only a Festool CT lets you do woodworking with a router and track saw in a bedroom with no significant trace of work when the wife comes home - LOL.
 

Attachments

  • IMG_3346.jpg
    IMG_3346.jpg
    1.5 MB · Views: 600
  • IMG_3368.JPG
    IMG_3368.JPG
    2 MB · Views: 585
  • IMG_4867.JPG
    IMG_4867.JPG
    1.9 MB · Views: 477
  • IMG_4868.jpg
    IMG_4868.jpg
    549.1 KB · Views: 586
Let me say I know literally NOTHING about veneering as it's not my cup of tea but your project is looking very nice. I'm happy to see its going well for you after reading the potential issues that we're brought up in this thread!
 
Long overdue but here is where my project is at.

Pending items include: building shoe racks on either side of the center piece, redoing the door(s) and mechanism(s) and adding under shelf LED lighting.
 

Attachments

  • IMG_5591.JPG
    IMG_5591.JPG
    812.7 KB · Views: 387
  • IMG_5643.JPG
    IMG_5643.JPG
    576.1 KB · Views: 316
  • IMG_5645.JPG
    IMG_5645.JPG
    1.3 MB · Views: 287
  • IMG_5581.JPG
    IMG_5581.JPG
    873.2 KB · Views: 326
  • IMG_5587.JPG
    IMG_5587.JPG
    878 KB · Views: 319
  • IMG_5367.JPG
    IMG_5367.JPG
    1.6 MB · Views: 309
  • IMG_5303.JPG
    IMG_5303.JPG
    801.7 KB · Views: 323
Realized the first two pics which show how I did the stenciling for the airbrushing didn't come out on the pics. Here you can see it a little better.
 

Attachments

  • IMG_5727.JPG
    IMG_5727.JPG
    991.4 KB · Views: 461
Back
Top