You are using an out of date browser. It may not display this or other websites correctly.
You should upgrade or use an alternative browser.
You should upgrade or use an alternative browser.
Camper/boat-interior/small house?
- Thread starter Holmz
- Start date
charley1968
Member
- Joined
- Sep 20, 2013
- Messages
- 479
I think [member=60576]Lemwise[/member] is a professional boatbuilder, he might be able to help ye.
I recon there are any number of low-cost fixes for vibrationprone joinery..
Time for some 'experimental carpentry', Randal!
I recon there are any number of low-cost fixes for vibrationprone joinery..
Time for some 'experimental carpentry', Randal!
I've done a little bit of basic boat repair, I even built a small speedboat at one point. I've done quit a bit of camper repair (oddly, I don't like camping, but my wife is on her third camper). The last camper my wife bought was deemed a complete loss by insurance. It was brand new, but hit by a drunk driver in a large pickup while the camper was on the dealer's lot.
In my normal wood working I use standard glues (usually Titebond), but when I do camper work I often use epoxy in place of glue. I like the strength, but I really like that it is impervious to moisture.
In my normal wood working I use standard glues (usually Titebond), but when I do camper work I often use epoxy in place of glue. I like the strength, but I really like that it is impervious to moisture.
I converted an ex demonstrator Mercedes van into a camper many years ago. At that time almost every camper was about the size of the classic VW camper and mine was not much bigger. I had a raised roof put on by a specialist company, had someone put windows in as I did not have the means to cut the steel van sides and did the rest myself.
Peter
Peter
In boat building we use Sylomer strips to decouple the entire interior from the steel hull. Sylomer is a hard foam designed specifically to absorb sound and vibration. First we use a ms polymer adhesive and glue Sylomer strips to all the steel floor beams and other places where the interior might come into contact with the hull. Then we glue the base floor to the Sylomer leaving a gap between the edge of the floor and the hull and that way you have complete decoupling. Another example is when I'm placing a partition wall. I first glue a strip if Sylomer to the hull and that becomes the base against which I glue the partition wall. This again ensures complete decoupling. We work like this throughout the entire boat.
Holmz
Member
- Joined
- Oct 11, 2014
- Messages
- 3,876
[member=23670]Jasonj888[/member] - Yep I have been thinking epoxy. Maybe with some fiberglass...
[member=11196]Peter Parfitt[/member] - Similar idea here... Did you do the interior sort of like a house or boat?
Perfect = Thanks! Did you use Sikaflex for gluing in the walls to the Sylomer strips? Or do they use their own glues?
[member=11196]Peter Parfitt[/member] - Similar idea here... Did you do the interior sort of like a house or boat?
Lemwise said:In boat building we use Sylomer strips to decouple the entire interior from the steel hull. Sylomer is a hard foam designed specifically to absorb sound and vibration. First we use a ms polymer adhesive and glue Sylomer strips to all the steel floor beams and other places where the interior might come into contact with the hull. Then we glue the base floor to the Sylomer leaving a gap between the edge of the floor and the hull and that way you have complete decoupling. Another example is when I'm placing a partition wall. I first glue a strip if Sylomer to the hull and that becomes the base against which I glue the partition wall. This again ensures complete decoupling. We work like this throughout the entire boat.
Perfect = Thanks! Did you use Sikaflex for gluing in the walls to the Sylomer strips? Or do they use their own glues?
I suppose the interior would have been more boat than house but it really has a style of its own which is probably "campervan".
I only have a couple of old photos which I will try and find - it was 1974-5 ! There was a very compelling TV series here in the UK at the time called "The Six Million Dollar Man". We put so much money into our van conversion that we called it, and had an engraved sign made, "The Six Million Dollar Van". We still have that somewhere.
I see that you mention Sikaflex products. I did not use (or even know of) such products in those days. I put fibreglass insulation wool on the inside of the metal skin held in place with splodges of resin (I would not do that now). I fixed batons to the more substantial parts of the van structure onto which the interior fittings were fixed. So no Sika just screws.
I have used one of the Sika products (I forget which one) to secure the awning to my present motorhome. I took professional advice and I remember that they were adamant that one particular Sika product was to be used and not others. If I were you I would check which Sika products are better for particular types of fixing.
Peter
Holmz said:Copy that [member=11196]Peter Parfitt[/member] - I will sus it out.
Most of the Sika stuff sticks, in the Aussy vernacular, "like stuff to a blanket". But I know they have a few different things.
I suspect that the main differences will be performance in differing temperature ranges, bond strength and flexibility.
When you fix things to the inside of the shell of a motorhome there has to be some flexibility as there is no way that the vehicle chassis will be absolutely rigid. If you put a rigidly bonded compartment on a bendy chassis then there will be fractures at the interfaces.
My awning ran down the length of one side of my motorhome and there would have been a very small amount of torsional flexing (probably negligible) and only a slight amount of differential expansion and contraction due to temperature along the length. That required whichever Sika solution that was recommended by the motorhome manufacturer.
I was helped by my motorhome dealer in Germany whom I am sure would have advised anyone about the range of Sika products that they sell. I would hope that your Sika dealer can give you the right advice.
Peter
Just to make it clear - the awning that I am referring to is the one on my current motorhome. It weighs over 70 kg.
[quote author=Holmz]Perfect = Thanks! Did you use Sikaflex for gluing in the walls to the Sylomer strips? Or do they use their own glues?[/quote]
You can use Sikaflex but any good quality ms polymer caulk will do. Just make sure you use a caulk that stays somewhat elastic so it doesn't crack when it's fully cured.
You can use Sikaflex but any good quality ms polymer caulk will do. Just make sure you use a caulk that stays somewhat elastic so it doesn't crack when it's fully cured.
Holmz
Member
- Joined
- Oct 11, 2014
- Messages
- 3,876
Peter Parfitt said:...
When you fix things to the inside of the shell of a motorhome there has to be some flexibility as there is no way that the vehicle chassis will be absolutely rigid. If you put a rigidly bonded compartment on a bendy chassis then there will be fractures at the interfaces.
My awning ran down the length of one side of my motorhome and there would have been a very small amount of torsional flexing (probably negligible) and only a slight amount of differential expansion and contraction due to temperature along the length. That required whichever Sika solution that was recommended by the motorhome manufacturer.
I was helped by my motorhome dealer in Germany whom I am sure would have advised anyone about the range of Sika products that they sell. I would hope that your Sika dealer can give you the right advice.
Peter
I have 2 options.
1) Fit-out the inside of an existing steel shell. (which I would have to buy)
2) Mount some entire small 2x1.8x1.6 m "cube" onto the Chassis rails (Which is how an existing shell mounts - bolted to the chassis ladder)
The chassis shell is a lot of $ and I have everything to work around like a lot of windows and doors - more like a bus exoskeleton.
A "cube" would be more like replacing only a pickup truck bed - and keeping the existing dual-cab as is.
I have seen caravans bolted onto a chassis but they don't look that good !
Whichever route you go for put a lot of effort into insulation and ventilation. If your vehicle has a metal skin then paint the outside white or silver.
I must do a search for the photographs from 1974.
Peter
Whichever route you go for put a lot of effort into insulation and ventilation. If your vehicle has a metal skin then paint the outside white or silver.
I must do a search for the photographs from 1974.
Peter
I have found the photographs and have photographed them with my digital camera...
We started with a Mercedes 206D ex demonstrator van:
View attachment 1
I had a roof put on and windows put in by professionals in the trade:
View attachment 2
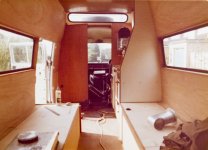
Fibreglass wool insulation with plywood covering on a baton frame:
View attachment 3
Work in progress:
View attachment 4
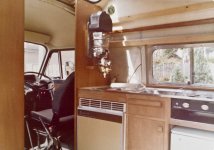
The sink with fridge and oven below, gas rings with grill and the instant hot water heater:
View attachment 5
As I said, we called it the Six Million Dollar Van and there is a story behind why this sign was never attached to the van:
View attachment 6
Peter
We started with a Mercedes 206D ex demonstrator van:
View attachment 1
I had a roof put on and windows put in by professionals in the trade:
View attachment 2
Fibreglass wool insulation with plywood covering on a baton frame:
View attachment 3
Work in progress:
View attachment 4
The sink with fridge and oven below, gas rings with grill and the instant hot water heater:
View attachment 5
As I said, we called it the Six Million Dollar Van and there is a story behind why this sign was never attached to the van:
View attachment 6
Peter
Attachments


alkaline
Member
- Joined
- Jun 18, 2013
- Messages
- 422
Peter Parfitt said:I have found the photographs and have photographed them with my digital camera...
We started with a Mercedes 206D ex demonstrator van:
View attachment 1
I had a roof put on and windows put in by professionals in the trade:
View attachment 2
Fibreglass wool insulation with plywood covering on a baton frame:
View attachment 3
Work in progress:
View attachment 4
The sink with fridge and oven below, gas rings with grill and the instant hot water heater:
View attachment 5
As I said, we called it the Six Million Dollar Van and there is a story behind why this sign was never attached to the van:
View attachment 6
Peter
YES !
Knight Woodworks
Member
- Joined
- Jul 24, 2012
- Messages
- 277
Peter,
That's mighty fine, well done indeed.
John
That's mighty fine, well done indeed.
John
I bought my Sprinter a few years ago as a bare bones cargo van and built/installed a custom interior. I used a combination of rubber washers around every fastener and strips of rubber at every connection point to completely isolate the interior from the metal frame. I've driven many, many miles of rough dirt roads and the interior continues to function perfectly.
Before:

After:

Before:
After:
[member=45553]HMR[/member]
A lovely job.
Our current motorhome is a factory made one but it is based on the Sprinter. Mercedes make some amazing vehicles and I am always impressed by the performance despite the rather high overall weight.
Peter
A lovely job.
Our current motorhome is a factory made one but it is based on the Sprinter. Mercedes make some amazing vehicles and I am always impressed by the performance despite the rather high overall weight.
Peter
Similar threads
- Replies
- 20
- Views
- 2K
- Replies
- 1
- Views
- 318
- Replies
- 14
- Views
- 788