cannot remove rotex 125 sanding pad

Joined
Dec 18, 2009
Messages
82
I just cannot remove the pad from my 125mm Rotex no matter how hard I try.

I have no problems with my 90mm and 125mm Rotex sanders.

Although I have had the sander for years, I haven't used it that much. It used to jump and bounce around all over the place, so much so that I eventually only used it with an interface pad for sanding 2K paints on MDF. I guess that I should have returned it as faulty but it was quite some time before I got to use a friend's 125 and realised that mine is badly balanced.

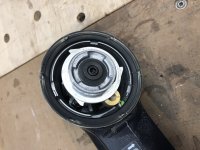
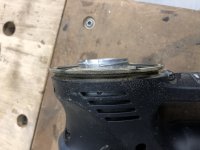
My last attempt to remove the pad ended up with the velcro and foam backing sheering off, leaving just the plastic base.

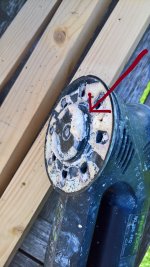
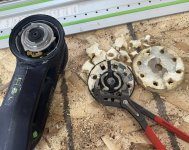
I guess that I am going to have to use an oscillating saw to remove it. Can any one post a picture of the sander without a pad fitted so that I know where to be careful when cutting, or can anyone recommend an alternative way of removing it?

Many thanks

 
Hello Imaginarynumber.

I hope you can remove the pad without damaging the sander.

Here you are a pic.

Considering the backing of the pad is plastic, mounted into metal, have you thought on heating the plastic with something and trying to remove it instead of cutting it?

Regards.
 

Attachments

  • 513B014D-0885-4773-9046-989AD0C41F91.jpeg
    513B014D-0885-4773-9046-989AD0C41F91.jpeg
    2.4 MB · Views: 793
Other pic, to see how much it sticks out.


Attachments

  • 96D46B82-D312-44BD-8AF9-C82F209F49E4.jpeg
    96D46B82-D312-44BD-8AF9-C82F209F49E4.jpeg
    2.1 MB · Views: 605
Great, thanks Milvus.

With your assistance I finally managed to remove it. I used a combination of cutting and then wide jaw pliers.

The new pad goes on/comes off with ease.

I am hoping that the replacement pad will help to reduce the bouncing. Need to order some more paper first!!!

Once again, thanks for your help.
 
I have the same problem as imaginarynumber did, in case anyone has a solution.  My hope is that my problem is insufficient grip on the pad.  So far the problem is academic; I haven't needed to remove it, I just wanted to, because I bought another pad when I bought the sander for when it became appropriate.  My intended solution, when that day comes, is to fashion a jig to more easily apply more torque to the pad.  It will consist of a board with a pattern of dowels to match the pad's dust extraction holes that I can clamp to the work bench  Anyone have a better idea?

The jig would also be handy for aligning sanding discs to the sanding pad so I might as well just make the darn thing.

Cheers - Gary
 
That is a good tip if it's as easy as Sedge makes it look. I really struggled trying to change the pad on my RO150 with my small hands.
 
I had previously tried the technique used by Sledge- it didn't work.

I genuinely do not believe that I was being weedy. I was lucky that my pad had disintegrated shortly after using Sledge's technique, thereby enabling me to use slip jaw pliers to grab the centre of the pad. Even then, I still had to apply a hell of a lot of torque to release it.

View attachment 1

My rotex is dated as 2008. I noticed that the original backing pad is listed as 108071 (PA6-GF50/PUR
 

Attachments

  • WP_20180623_09_13_41_Pro.jpg
    WP_20180623_09_13_41_Pro.jpg
    2.8 MB · Views: 359
Z48LT1 said:
I have the same problem as imaginarynumber did, in case anyone has a solution. 

Cheers - Gary

Hi Gary,

I hope that the jig works for you. Perhaps you could talk to someone in China and develop an after market product.  ;-)
 
Near one end of a 12" scrap of 1x2 or the like, drill two holes that are 3 1/2" apart.  The holes are 5/16".  Insert a couple of 5/16" dowels through the holes.  Use this "wrench" to remove the pad--much easier than trying to twist the pad off by hand.
 
mixedplate said:
Near one end of a 12" scrap of 1x2 or the like, drill two holes that are 3 1/2" apart.  The holes are 5/16".  Insert a couple of 5/16" dowels through the holes.  Use this "wrench" to remove the pad--much easier than trying to twist the pad off by hand.

Anyone tried this?  I cannot remove the Ro125 pad with just hand pressure.  I asked my burly neighbor to try and he could not do it.  I took it to the gym and picked out the most buff guy there and he could not do it either.  I'm at my wits end about how to get the pad off without damaging the sander.
 
It can be quite difficult to remove, the first time, but I have never heard of it being that bad.
 
Crazyraceguy said:
It can be quite difficult to remove, the first time, but I have never heard of it being that bad.

Me neither, I have removed pads on my other sanders without issue, but the Ro125 is older, about the same age as the one in the OP's post.  After having every strong person I know try to remove it with hand strength alone, I'm convinced I need to use some mechanical advantage to get the pad off.
 
I've tried the Sedge sandpaper & MFT method, it works some of the time.  [sad]

If that doesn't work, I'll place a couple of steel dowel pins in a bench vise and use that like a spanner wrench.

The latest pad change was because the foam was trashed so the easiest method was a Knipex pliers.  [smile]

[attachimg=1]
 

Attachments

  • 15338.jpg
    15338.jpg
    1.1 MB · Views: 217
I took mine off very early on, to replace it with the hard pad. I generally work on flat material (sheet goods) and use it to blend. The hard pad is better for that.
 
John Russell said:
Crazyraceguy said:
It can be quite difficult to remove, the first time, but I have never heard of it being that bad.

Me neither, I have removed pads on my other sanders without issue, but the Ro125 is older, about the same age as the one in the OP's post.  After having every strong person I know try to remove it with hand strength alone, I'm convinced I need to use some mechanical advantage to get the pad off.

I tried using wood dowls and they broke before the pad would budge.  Then I used some wood screws 75mm apart in a 2x4 clamped to the MFT, sawed off the screw head and this worked to remove the pad.  The new pad went on easily.
 
Back
Top